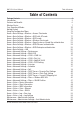
DAP- 2533 User’s Manual Table of Contents Table of Contents Package Contents Introduction Features and Benefits Wireless Basics Four Operational Modes Getting Started Using the Configuration Menu Home > Basic Settings > Wireless > Access Point mode Home > Basic Settings > Wireless > WDS with AP mode Home > Basic Settings > Wireless > WDS mode Home > Basic Settings > Wireless > Wireless Client mode Home > Basic Settings > Wireless > Open System or Shared Key authentication Home > Basic Settings > Wireless >
DAP- 2533 User’s Manual Table of Contents Maintenance > Administrator Settings > System Name Settings Maintenance > Administrator Settings > Login Settings Maintenance > Administrator Settings > Console Settings Maintenance > Administrator Settings > SNMP Settings Maintenance > Firmware and SSL Certification Upload Maintenance > Configuration File Maintenance > Time and Date System > System Settings Help Troubleshooting Technical Specifications Warranty Registration Technical Support 57 58 59 60 61 62 63 64
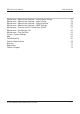
Package Contents DAP- 2533 User’s Manual Package Contents D-Link DAP-2553 AirPremier N Dual Band PoE Access Point DC 5V, 2.5A Power Adapter (Use With the power supply provided by the manufacturer) Manual on CD Ethernet Cable Quick Installation Guide Warning: Using a power adapter with different specifications than the one included with the DAP-2553 will cause damage and void the warranty for this product. If any of the above items are missing, please contact your reseller.
DAP- 2533 User’s Manual Introduction Introduction The DAP-2553 802.11a/n or b/g/n switchable AP increases productivity by allowing you to work faster and more efficiently. With the DAP-2553, bandwidth-intensive applications like graphics or multimedia will benefit significantly because large files are now able to move across the network quickly.
DAP- 2533 User’s Manual Features and Benefits Features and Benefits Four different operation modes - Capable of operating in one of four different operation modes to meet your wireless networking needs: Access Point, WDS with AP, WDS, or Wireless Client. Faster wireless networking with the 802.11n (draft) standard to provide a maximum wireless signal rate of up to 300 Mbps*. Compatible with the 802.
DAP- 2533 User’s Manual Wireless Basics Wireless Basics D-Link wireless products are based on industry standards to provide high-speed wireless connectivity that is easy to use within your home, business or public access wireless networks. D-Link wireless products provides you with access to the data you want, whenever and wherever you want it. Enjoy the freedom that wireless networking can bring to you.
DAP-2553 User’s Manual Wireless Basics Standards-Based Technology The DAP-2553 Wireless Access Point utilizes the 802.11a, 802.11b, 802.11g, and 802.11n (draft) standards. The IEEE 802.11n (draft) standard is an extension of the 802.11a, 802.11b, and 802.1g standards that came before it. It increases the maximum wireless signal rate up to 300 Mbps** within both the 2.4 GHz and the 5 GHz bands, utilizing OFDM technology.
DAP-2553 User’s Manual Wireless Basics Installation Considerations The D-Link DAP-2553 lets you access your network, using a wireless connection, from virtually anywhere within its operating range. Keep in mind, however, that the number, thickness and location of walls, ceilings, or other objects that the wireless signals must pass through, may limit the range. Typical ranges vary depending on the types of materials and background RF (radio frequency) noise in your home or business.
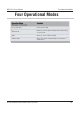
DAP- 2533 User’s Manual Four Operational Modes Four Operational Modes Access Point (AP) Create a wireless LAN WDS with AP Wirelessly connect multiple networks while still functioning as a wireless AP WDS Wirelessly connect multiple networks Wireless Client AP acts as a wireless network adapter for your Ethernetenabled device D-Link AirPremier N Dual Band PoE Access Point 10
DAP- 2533 User’s Manual Getting Started Getting Started 1 You will need broadband Internet access. 2 Consult with your cable or DSL provider for proper installation of the modem. 3 Connect the cable or DSL modem to a router. See the printed Install Guide included with your router. 4 See the printed Install Guide included with the DAP-2553. 5 If you are connecting a desktop computer to your network, install a wireless PCI adapter into an available PCI slot on your desktop computer.
DAP-2553 User’s Manual Getting Started Connecting PoE (Power over Ethernet) Connect one end of an Ethernet cable (included with your package) to the LAN port on the DAP-2553 and the other end of the Ethernet cable to either your computer or to your PoE switch. The AP can be powered on by a PoE switch or by the power adapter shipped with the AP.
DAP- 2533 User’s Manual Using the Configuration Menu Using the Configuration Menu To configure the DAP-2553, use a computer that is connected to the DAP-2553 with an Ethernet cable (see the Network Layout diagram). First, disable the Access the Internet using a proxy server function. To disable this function, go to Control Panel > Internet Options > Connections > LAN Settings and uncheck the enable box. Start your web browser program (Internet Explorer, Mozilla Firefox).
DAP-2553 User’s Manual Using the Configuration Menu After successfully logging into the DAP-2553 the following screen will appear: When making changes on most of the configuration screens in this section, use the Apply button at the bottom of each screen to save your configuration changes. Click the Apply button to configure changes.
DAP-2553 User’s Manual Using the Configuration Menu Home > Basic Settings > Wireless > Access Point mode Wireless Band: Select either 2.4 GHz or 5 GHz from the pull-down menu. Mode: Select Access Point from the pull-down menu. The other three choices are WDS with AP, WDS, and Wireless Client. Network Name (SSID): Service Set Identifier (SSID) is the name designated for a specific wireless local area network (WLAN). The SSID’s factory default setting is dlink.
DAP-2553 User’s Manual Using the Configuration Menu Channel: All devices on the network must share the same channel.To change the channel, first toggle the Auto Channel Selection setting to Disable, and then use the pull-down menu to make the desired selection. (Note: The wireless adapters will automatically scan and match the wireless settings.) Channel Width: Allows you to select the channel width you would like to operate in. Select 20 MHz if you are not using any 802.11 wireless clients.
DAP-2553 User’s Manual Using the Configuration Menu Home > Basic Settings > Wireless > WDS with AP mode In WDS with AP mode, the DAP-2553 wirelessly connects multiple networks while still functioning as a wireless AP. Wireless Band: Select either 2.4 GHz or 5 GHz from the pull-down menu. Mode: WDS with AP mode is selected from the pull-down menu. Network Name (SSID): Service Set Identifier (SSID) is the name designated for a specific wireless local area network (WLAN).
Using the Configuration Menu DAP-2553 User’s Manual Auto Channel Enabling this feature automatically selects the channel that will proSelection: vide the best wireless performance. This feature is not supported in WDS with AP mode. The channel selection process only occurs when the AP is booting up. Channel: All devices on the network must share the same channel.To change the channel, use the pull-down menu to make the desired selection.
DAP-2553 User’s Manual Using the Configuration Menu Home > Basic Settings > Wireless > WDS mode In WDS mode, the DAP-2553 wirelessly connects multiple networks, without functioning as a wireless AP. Wireless Band: Select either 2.4 GHz or 5 GHz from the pull-down menu. Mode: WDS is selected from the pull-down menu. Network Name (SSID): Service Set Identifier (SSID) is the name designated for a specific wireless local area network (WLAN). The SSID’s factory default setting is dlink.
Using the Configuration Menu DAP-2553 User’s Manual Auto Channel Enabling this feature automatically selects the channel that will provide Selection: the best wireless performance.This feature is not supported in WDS mode. Channel: All devices on the network must share the same channel.To change the channel, use the pull-down menu to make the desired selection. Channel Width: Use the pull-down menu to choose 20 MHz or Auto 20/40 MHz.
DAP-2553 User’s Manual Using the Configuration Menu Home > Basic Settings > Wireless > Wireless Client mode Wireless Band: Select either 2.4 GHz or 5 GHz from the pull-down menu. Mode: Wireless Client is selected from the pull-down menu. Network Name (SSID): Service Set Identifier (SSID) is the name designated for a specific wireless local area network (WLAN). The SSID’s factory default setting is dlink. The SSID can be easily changed to connect to an existing wireless network.
Using the Configuration Menu DAP-2553 User’s Manual Channel: The channel used will be displayed, and follow the root AP. Channel Width: Use the pull-down menu to choose 20 MHz or Auto 20/40 MHz. Site Survey: Click on the Scan button to search for available wireless networks, then click on the available network that you want to connect with. Authentication: Use the pull-down menu to choose Open System or WPA-Personal. Select Open System to communicate the key across the network.
DAP-2553 User’s Manual Using the Configuration Menu Home > Basic Settings > Wireless > Open System or Shared Key authentication Encryption: Use the radio button to disable or enable encryption. Key Type*: Select HEX or ASCII. Key Size: Select 64 Bits or 128 Bits. Key Index (1~4): Select the 1st through the 4th key to be the active key. Key: Input up to four keys for encryption.You will select one of these keys in the Key Index pull-down menu.
DAP-2553 User’s Manual Using the Configuration Menu Home > Basic Settings > Wireless > WPA-Personal authentication WPA Mode: When WPA-Personal is selected for Authentication type, you must also select a WPA mode from the pull-down menu: AUTO (WPA or WPA2), WPA2 Only, or WPA Only. WPA and WPA2 use different algorithms. AUTO (WPA or WPA2) allows you to use both WPA and WPA2. Cipher Type: When you select WPA-Personal, you must also select AUTO, AES, or TKIP from the pull down menu.
DAP-2553 User’s Manual Using the Configuration Menu Home > Basic Settings > Wireless > WPA-Enterprise authentication WPA Mode: When WPA-Enterprise is selected, you must also select a WPA mode from the pull-down menu: AUTO (WPA or WPA2), WPA2 Only, or WPA Only.WPA and WPA2 use different algorithms. AUTO (WPA or WPA2) allows you to use both WPA and WPA2. Cipher Type: When WPA-Enterprise is selected, you must also select a cipher type from the pull-down menu: Auto, AES, or TKIP.
DAP-2553 User’s Manual Using the Configuration Menu Home > Basic Settings > LAN LAN is short for Local Area Network. This is considered your internal network. These are the IP settings of the LAN interface for the DAP-2553. These settings may be referred to as private settings. You may change the LAN IP address if needed. The LAN IP address is private to your internal network and cannot be seen on the Internet. Get IP From: Static IP (Manual) is chosen here.
DAP-2553 User’s Manual Using the Configuration Menu Home > Advanced Settings > Performance Wireless: Use the pull-down menu to turn the wireless function On or Off. Wireless Mode: The different combination of clients that can be supported include Mixed 802.11n, 802.11g and 802.11b and Mixed 802.11g and 802.11b in the 2.4 GHz band and Mixed 802.11n, 802.11a and 802.11a only in 5 GHz band. Please note that when backwards compatibility is enabled for legacy (802.11a/g/b) clients, degradation of 802.
DAP-2553 User’s Manual Using the Configuration Menu Beacon Interval Beacons are packets sent by an access point to synchronize a (25-500): wireless network. Specify a value in milliseconds. The default (100) is recommended. Setting a higher beacon interval can help to save the power of wireless clients, while setting a lower one can help a wireless client connect to an access point faster. DTIM Interval Select a Delivery Traffic Indication Message setting between 1 and (1-15): 15. 1 is the default setting.
DAP-2553 User’s Manual Using the Configuration Menu Connection Limit: Select Enable or Disable. This is an option for load balancing. This determines whether to limit the number of users accessing this device. The exact number is entered in the User Limit field below. This feature allows the user to share the wireless network traffic and the client using multiple APs.
Using the Configuration Menu DAP-2553 User’s Manual Home > Advanced Settings > Multi-SSID The device supports up to eight multiple Service Set Identifiers. You can set the Primary SSID in the Basic > Wireless section. The SSID’s factory default setting is dlink. The SSID can be easily changed to connect to an existing wireless network or to establish a new wireless network. Enable Multi-SSID: Check to enable support for multiple SSIDs. Band: This read-only value is the current band setting.
Using the Configuration Menu DAP-2553 User’s Manual SSID Visibility: Enable or Disable SSID visibility. Enabling this feature broadcasts the SSID across the network, thus making it visible to all network users. Security: The Multi-SSID security can be Open System, WPA-Personal, or WPA-Enterprise. For a detailed description of the Open System parameters please go to pages 23-24. For a detailed description of the WPA-Personal parameters please go to page 25.
DAP-2553 User’s Manual Using the Configuration Menu Home > Advanced Settings > VLAN > VLAN List The DAP-2553 supports VLANs. VLANs can be created with a Name and VID. Mgmt (TCP stack), LAN, Primary/Multiple SSID, and WDS connection can be assigned to VLANs as they are physical ports. Any packet which enters the DAP-2553 without a VLAN tag will have a VLAN tag inserted with a PVID. The VLAN List tab displays the current VLANs. VLAN Status: Use the radio button to toggle to Enable.
DAP-2553 User’s Manual Using the Configuration Menu Home > Advanced Settings > VLAN > Port List The Port List tab displays the current ports. If you want to configure the guest and internal networks on a Virtual LAN (VLAN), the switch and DHCP server you are using must also support VLANs. As a prerequisite step, configure a port on the switch for handling VLAN tagged packets as described in the IEEE 802.1Q standard. VLAN Status: Use the radio button to toggle to Enable.
DAP-2553 User’s Manual Using the Configuration Menu Home > Advanced Settings > VLAN > Add/Edit VLAN The Add/Edit VLAN tab is used to configure VLANs. Once you have made the desired changes, click the Apply button to let your changes take effect. VLAN Status: Use the radio button to toggle to Enable. VLAN ID (VID): Provide a number between 1 and 4094 for the Internal VLAN. VLAN Name: Enter the VLAN to add or modify.
DAP-2553 User’s Manual Using the Configuration Menu Home > Advanced Settings > VLAN > PVID Setting The PVID Setting tab is used to enable/disable the Port VLAN Identifier Auto Assign Status as well as to configure various types of PVID settings. Click the Apply button to let your changes take effect. VLAN Status: Use the radio button to toggle to Enable. PVID Auto Assign Status: Use the radio button to toggle PVID auto assign status to Enable.
DAP-2553 User’s Manual Using the Configuration Menu Home > Advanced Settings > Intrusion The Wireless Intrusion Protection window is used to set APs as All, Valid, Neighborhood, Rogue, and New. Click the Apply button to let your changes take effect. AP List: The choices include All, Valid, Neighbor, Rogue, and New. Detect Click this button to initiate a scan of the network.
DAP-2553 User’s Manual Using the Configuration Menu Home > Advanced Settings > Schedule The Wireless Schedule Settings window is used to add and modify scheduling rules on the device. Click the Apply button to let your changes take effect. Wireless Schedule: Use the pull-down menu to enable the device’s scheduling feature. Name: Enter a name for the new scheduling rule in the field provided. Day(s): Toggle the radio button between All Week and Select Days(s).
DAP-2553 User’s Manual Using the Configuration Menu Home > Advanced Settings > QoS Quality of Service (QoS) enhances the experience of using a network by prioritizing the traffic of different applications. A QoS Rule identifies a specific message flow and assigns a priority to that flow. For most applications, the priority classifiers ensure the right priorities and specific QoS Rules are not required. QoS supports overlaps between rules.
DAP-2553 User’s Manual Using the Configuration Menu Automatic: When enabled, this option causes the access point to automatically attempt to prioritize traffic streams that it doesn’t otherwise recognize, based on the behavior that the streams exhibit. This acts to de-prioritize streams that exhibit bulk transfer characteristics, such as file transfers, while leaving interactive traffic, such as gaming or VoIP, running at a normal priority Name: Enter a name for the new QoS rule in the field provided.
DAP-2553 User’s Manual Using the Configuration Menu Home > Advanced Settings > DHCP Server > Dynamic Pool Settings The DHCP address pool defines the range of the IP address that can be assigned to stations in the network. A Dynamic Pool allows wireless stations to receive an available IP with lease time control. Function Enable/ Dynamic Host Configuration Protocol (DHCP) assigns dynamic Disable: IP addresses to devices on the network.
Using the Configuration Menu DAP-2553 User’s Manual Gateway: Enter the IP address of the gateway on the network. WINS: Specify the Windows Internet Naming Service (WINS) server address for the wireless network. WINS is a system that determines the IP address of a network computer that has a dynamically assigned IP address. DNS: Enter the IP address of the Domain Name System (DNS) server. The DNS server translates domain names such as www.dlink.com into IP addresses.
DAP-2553 User’s Manual Using the Configuration Menu Home > Advanced Settings > DHCP Server > Static Pool Setting The DHCP address pool defines the range of IP addresses that can be assigned to stations on the network. A static pool allows specific wireless stations to receive a fixed IP without time control. Function Enable/ Dynamic Host Configuration Protocol (DHCP) assigns IP addresses Disable: to wireless devices on the network.
DAP-2553 User’s Manual Using the Configuration Menu SubMask: Define the submask of the IP address specified in the “IP Assigned From” field. Gateway: Specify the Gateway address for the wireless network. WINS: Specify the Windows Internet Naming Service (WINS) server address for the wireless network. WINS is a system that determines the IP address of a network computer with a dynamically assigned IP address, if applicable. DNS: Enter the Domain Name System (DNS) server address for the wireless network.
DAP-2553 User’s Manual Using the Configuration Menu Home > Advanced Settings > DHCP Server > Current IP Mapping List This window displays information about the current assigned DHCP dynamic and static IP address pools. This information is available when you enable DHCP server on the AP and assign dynamic and static IP address pools. Current DHCP Dynamic Pools: These are IP address pools the DHCP server has assigned using the dynamic pool setting.
DAP-2553 User’s Manual Using the Configuration Menu Binding MAC Address: The MAC address of a device on the network that is assigned an IP address from the DHCP dynamic pool. Assigned IP Address: The current corresponding DHCP-assigned static IP address of the device.
Using the Configuration Menu DAP-2553 User’s Manual Home > Advanced Settings > Filters > Wireless MAC ACL Wireless Band: 'LVSOD\V WKH FXUUHQW ZLUHOHVV EDQG UDWH Access Control List: Select Disable to disable the filters function. Select Accept to accept only those devices with MAC addresses in the Access Control List. All other devices not on the list will be rejected. Select Reject to reject the devices with MAC addresses on the Access Control List. All other devices not on the list will be accepted.
Using the Configuration Menu DAP-2553 User’s Manual Home > Advanced Settings > Filters > WLAN Partition Wireless Band: Displays the current wireless band rate. Internal Station Connection: The default value is Enable, which allows stations to inter-communicate by connecting to a target AP. When disabled, wireless stations cannot exchange data through the AP. Ethernet to WLAN Access: The default is Enable. When disabled, all data from the Ethernet to associated wireless devices will be blocked.
DAP-2553 User’s Manual Using the Configuration Menu Home > Status > Device Information Device Information: This read-only window displays the configuration settings of the DAP-2553, including the firmware version and the device's MAC address.
Using the Configuration Menu DAP-2553 User’s Manual Home > Status > Client Information Client Information: This window displays the wireless client information for clients currently connected to the DAP-2553. T h e fo l l ow i n g i n fo r m a t i o n i s ava i l a bl e fo r e a c h c l i e n t c o m m u n i c a t i n g w i t h t h e DAP-2553. SSID: Displays the SSID of the client. MAC: Displays the MAC address of the client. Band: Displays the wireless band that the client is connected to.
Using the Configuration Menu DAP-2553 User’s Manual Home > Status > WDS Information WDS Information: This window displays the Wireless Distribution System information for clients currently connected to the DAP-2553. T h e fo l l ow i n g i n fo r m a t i o n i s ava i l a bl e fo r e a c h c l i e n t c o m m u n i c a t i n g w i t h t h e DAP-2553. Name: Displays the name of the client. MAC: Displays the MAC address of the client. Authentication: Displays the type of authentication being used.
Using the Configuration Menu DAP-2553 User’s Manual Home > Status > Stats > Ethernet Ethernet Traffic Statistics: This page displays transmitted and received count statistics for packets and bytes.
DAP-2553 User’s Manual Using the Configuration Menu Home > Status > Stats > WLAN WLAN Traffic This page displays wireless network statistics for data throughStatistics: put, transmitted and received frames, and frame errors.
DAP-2553 User’s Manual Using the Configuration Menu Home > Status > Log > View Log View Log: The AP’s embedded memory displays system and network messages including a time stamp and message type. The log information includes but is not limited to the following items: cold start AP, upgrading firmware, client associate and disassociate with AP, and web login. The web page holds up to 500 logs.
DAP-2553 User’s Manual Using the Configuration Menu Home > Status > Log > Log Settings Log Server/IP Address: Enter the IP address of the server you would like to send the DAP-2553 log to. Log Type: Check the box for the type of activity you want to log. There are three types: System Activity, Wireless Activity, and Notice.
DAP-2553 User’s Manual Using the Configuration Menu Maintenance > Administrator Settings Check one or more of the five main categories to display the various hidden administrator parameters and settings displayed on the next five pages.
DAP-2553 User’s Manual Using the Configuration Menu Maintenance > Administrator Settings > Limit Administrator Confirm New Confirm by re-entering your new password here. Password: Each of the five main categories display various hidden administrator parameters and settings. Limit Administrator Limit Administrator VLAN ID: Check the box provided and the enter the specific VLAN ID that the administrator will be allowed to log in from. Limit Administrator IP: Check to enable the Limit Administrator IP address.
DAP-2553 User’s Manual Using the Configuration Menu Maintenance > Administrator Settings > System Name Confirm New Confirm by re-entering your new password here. Password: Each of the five main categories display various hidden administrator parameters and settings. System Name Settings System Name: The name of the device. The default name is D-Link DAP-2553. Location: The physical location of the device, e.g. 72nd Floor, D-Link HQ.
DAP-2553 User’s Manual Using the Configuration Menu Maintenance > Administrator Settings > Login Settings Confirm New Confirm by re-entering your new password here. Password: Each of the five main categories display various hidden administrator parameters and settings. Login Settings User Name: Enter a user name. The default is admin. Old Password: When changing your password, enter the old password here. New Password: When changing your password, enter the new password here.The password is case-sensitive.
DAP-2553 User’s Manual Using the Configuration Menu Maintenance > Administrator Settings > Console Settings Confirm New Confirm by re-entering your new password here. Password: Each of the five main categories display various hidden administrator parameters and settings. Console Settings Status: Status is enabled by default. Uncheck the box to disable the console. Console Protocol: Select the type of protocol you would like to use, Telnet or SSH.
DAP-2553 User’s Manual Using the Configuration Menu Maintenance > Administrator Settings > SNMP Settings Confirm New Confirm by re-entering your new password here. Password: Each of the five main categories display various hidden administrator parameters and settings. SNMP Settings Status: Check the box to enable the SNMP functions. This is enabled by default. Public Community String: Enter the public SNMP community string. Private Community String: Enter the private SNMP community string.
DAP-2553 User’s Manual Using the Configuration Menu Maintenance > Firmware and SSL Certification Upload Upload Firmware From The current firmware version is displayed above the file location Local Hard Drive: field. After downloading the most recent version of firmware for the DAP-2553 from http://support.dlink.com to your local computer, use the Browse button to locate the firmware file on your computer. Click Upload to update the firmware version. Please don’t turn the power off while upgrading.
DAP-2553 User’s Manual Using the Configuration Menu Maintenance > Configuration File Upload File: Click the Browse button to locate a previously saved configuration file on your local computer. After selecting the file, click Upload to apply the configuration settings to the DAP-2553. Download Click Download to save the current DAP-2553 configuration to Configuration File: your local computer.
DAP-2553 User’s Manual Using the Configuration Menu Maintenance > Time and Date Current Time: Time Zone: Enable Daylight Saving: Displays the current time and date settings. Use the pull-down menu to select your correct Time Zone. Check the box to Enable Daylight Saving Time. Daylight Saving Offset: Use the pull-down menu to select the correct Daylight Saving offset. Daylight Saving Dates: Use the pull-down menu to select the correct Daylight Saving offset.
DAP-2553 User’s Manual Using the Configuration Menu System > System Settings Restart the Click Restart to restart the DAP-2553. Device: Restore to Factory Click Restore to restore the DAP-2553 back to factory default Default Settings: settings.
Using the Configuration Menu DAP-2553 User’s Manual Help Help: Scroll down the Help page for topics and explanations.
DAP- 2533 User’s Manual Troubleshooting Troubleshooting This chapter provides solutions to problems that can occur during the installation and operation of the DAP-2553 Wireless Access Point.We will cover various aspects of the network setup, especially the network adapters. Please read the following if you are having any technical difficulties. Note: It is recommended that you use an Ethernet connection to configure the DAP-2553. 1.
DAP-2553 User’s Manual Troubleshooting 2. The wireless client cannot access the Internet within Infrastructure mode. Make sure the wireless client is associated and joined with the correct access point. To check this connection, right-click on the Local Area Connection icon in the taskbar and select View Available Wireless Networks. The Connect to Wireless Network screen will appear. Please make sure you have selected the correct available network, as shown in the illustrations below.
DAP-2553 User’s Manual Troubleshooting 3. What variables may cause my wireless products to lose reception? D-Link products let you access your network from virtually anywhere you want, however, the positioning of the products within your environment will affect its wireless range. 4. Why does my wireless connection keep dropping? Antenna Orientation - try different antenna orientations for the DAP-2553. Try to keep the antenna at least 6 inches away from the wall or other objects. If you are using 2.
DAP- 2533 User’s Manual Technical Specifications Technical Specifications Standards • IEEE 802.11a • IEEE 802.11b • IEEE 802.11g • IEEE 802.11n (draft) • IEEE 802.3 • IEEE 802.3u • IEEE 802.3ab • IEEE 802.3af Network Management • Web Browser interface HTTP Secure HTTP (HTTPS) • AP Manager II • SNMP Support D-View Module Private MIB • Command Line Interface Telnet Secure SSH Telnet Data Rates* For 802.11a: • 54, 48, 36, 24, 18, 12, 9, and 6 Mbps For 802.11b: • 11, 5.5, 2, and 1 Mbps For 802.
DAP-2553 User’s Manual Technical Specifications Radio and Modulation Type For 802.11a/g/n: BPSK, QPSK, 16QAM, and 64QAM with OFDM For 802.11b: DQPSK, DBPSK, DSSS, and CCK Operating Frequency** For 802.11a: 5.15 ~ 5.85 GHz For 802.11b/g: 2400 ~ 2483.5 MHz ISM band For 802.11n: 2.4 GHz Band: 2.4 ~ 2.4835 GHz 5 GHz Band: 5.15 ~ 5.85 GHz Dipole Antenna 3dBi Gain @2.4 GHz 5dBi Gain @5 GHz LEDs • Power • LAN • 2.
Warranty DAP-2553 User’s Manual Warranty Subject to the terms and conditions set forth herein, D-Link Systems, Inc. (“D-Link”) provides this Limited Warranty: • Only to the person or entity that originally purchased the product from D-Link or its authorized reseller or distributor, and • Only for products purchased and delivered within the fifty states of the United States, the District of Columbia, U.S. Possessions or Protectorates, U.S. Military Installations, or addresses with an APO or FPO.
DAP-2553 User’s Manual Warranty D-Link and its suppliers under this Limited Warranty will be, at D-Link’s option, to replace the non-conforming Software (or defective media) with software that substantially conforms to DLink’s functional specifications for the Software or to refund the portion of the actual purchase price paid that is attributable to the Software.
DAP-2553 User’s Manual Warranty • The customer is responsible for all in-bound shipping charges to D-Link. No Cash on Delivery (“COD”) is allowed. Products sent COD will either be rejected by D-Link or become the property of D-Link. Products shall be fully insured by the customer and shipped to D-Link Systems, Inc., 17595 Mt. Herrmann, Fountain Valley, CA 92708. D-Link will not be held responsible for any packages that are lost in transit to D-Link.
DAP-2553 User’s Manual Warranty Limitation of Liability: TO THE MAXIMUM EXTENT PERMITTED BY LAW, D-LINK IS NOT LIABLE UNDER ANY CONTRACT, NEGLIGENCE, STRICT LIABILITY OR OTHER LEGAL OR EQUITABLE THEORY FOR ANY LOSS OF USE OF THE PRODUCT, INCONVENIENCE OR DAMAGES OF ANY CHARACTER, WHETHER DIRECT, SPECIAL, INCIDENTAL OR CONSEQUENTIAL (INCLUDING, BUT NOT LIMITED TO, DAMAGES FOR LOSS OF GOODWILL, LOSS OF REVENUE OR PROFIT, WORK STOPPAGE, COMPUTER FAILURE OR MALFUNCTION, FAILURE OF OTHER EQUIPMENT OR COMPUTER
DAP-2553 User’s Manual Warranty FCC Statement: This equipment has been tested and found to comply with the limits for a Class B digital device, pursuant to part 15 of the FCC Rules. These limits are designed to provide reasonable protection against harmful interference in a residential installation.This equipment generates, uses, and can radiate radio frequency energy and, if not installed and used in accordance with the instructions, may cause harmful interference to radio communication.
DAP-2553 User’s Manual Warranty Industry Canada Notice: This device complies with RSS-210 of the Industry Canada Rules. Operation is subject to the following two conditions: (1) This device may not cause harmful interference, and (2) this device must accept any interference received, including interference that may cause undesired operation. IMPORTANT NOTE: Radiation Exposure Statement: This equipment complies with IC radiation exposure limits set forth for an uncontrolled environment.
Registration DAP-2553 User’s Manual Registration Product registration is entirely voluntary and failure to complete or return this form will not diminish your warranty rights. Version 1.
Technical Support DAP-2553 User’s Manual Technical Support You can find software updates and user documentation on the D-Link website. U.S. and Canadian customers can contact D-Link technical support through our website, or by phone. Tech Support for customers within the United States: D-Link Technical Support over the Telephone: (877) 354-6555 D-Link Technical Support over the Internet: http://support.dlink.