
Quick Installation Guide

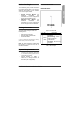


Connecting Wirelessly
1. Connect the management computer to the
default SSID of the DAP-2622, “dlink”.
2. Manage the access point from a
computer. Enter dap2622.local in
the address field of your browser.
3. Log in to the administration user interface.
The default login information is
Username: admin
Password: admin
Mounting
Mounting on a Solid Wall
For optimal coverage, mount the DAP-
2622 on the wall. An Ethernet cable
running through an electrical wall box
should be pre-installed before mounting.
screws to secure the mounting plate
to the surface.
ENGLISH
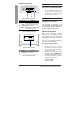
PoE
Figure 5: Attaching the Cable
4. Plug the Ethernet cable into the LAN (PoE)
port on the rear panel of the device.
PoE
Figure 4: Attaching the Mounting Plate
1. Place the mounting plate over an
electrical wall box and mark the
location where to drill the holes in
the wall. The Ethernet cable should
pass through the mounting plate.
2. Drill holes on the markings and place the
included anchors into the drilled holes.
3. Align and place the mounting plate on top
of the anchors and use the included
Figure 5: Mounting the Device
5. Attach the DAP-2622 to the
mounting plate by snapping the
device onto the plate and use the
Allen key to lock it in at the top.
Ø 4.5mm 1.3mm 8mm
Ø 2mm
DAP-2622 Quick Installation Guide 3