Table of Contents DAP-3520 User’s Manual Table of Contents Package Contents 4 Introduction 5 Features and Benefits 6 Wireless Basics 7 Five Operational Modes 10 Getting Started 11 Using the Configuration Menu 14 Home > Basic Settings > Wireless > Access Point mode 16 Home > Basic Settings > Wireless > WDS with AP mode 18 Home > Basic Settings > Wireless > WDS mode 20 Home > Basic Settings > Wireless > Wireless Client mode 22 Home > Basic Settings > Wireless > WISP Client Router mode 24 Home > Basic Settin
DAP-3520 User’s Manual Table of Contents Home > Advanced Settings > Router Settings > Advanced Network Home > Status > Device Information Home > Status > Client Information Home > Status > WDS Information Home > Status > Stats > Ethernet Home > Status > Stats > WLAN Home > Status > Log > View Log Home > Status > Log > Log Settings Maintenance > Administrator Settings Maintenance > Administrator Settings > Limit Administrator Maintenance > Administrator Settings > System Name Settings Maintenance > Adminis
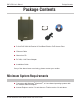
DAP-3520 User’s Manual Package Contents Package Contents D-Link DAP-3520 AirPremier N Dual Band Exterior PoE Access Point Ethernet Cable Manual on CD DC 48V, 0.4A Power Adapter Installation Guide If any of the above items are missing, please contact your reseller. Minimum System Requirements Computers with Windows®, Macintosh®, or Linux-based operating systems with an installed Ethernet adapter Internet Explorer version 7.0 and above or Firefox version 3.0 and above.
DAP-3520 User’s Manual Introduction Introduction The DAP-3520 802.11a/n or b/g/n switchable AP increases productivity by allowing you to work faster and more efficiently. With the DAP-3520, bandwidth-intensive applications like graphics or multimedia will benefit significantly because large files are now able to move across the network quickly.
DAP-3520 User’s Manual Features and Benefits Features and Benefits Five different operation modes - Capable of operating in one of five different operation modes to meet your wireless networking needs: Access Point, WDS with AP, WDS, Wireless Client, or WISP Client Router. Faster wireless networking with the 802.11n (draft) standard to provide a maximum wireless signal rate of up to 300 Mbps*. Compatible with the 802.
DAP-3520 User’s Manual Wireless Basics Wireless Basics D-Link wireless products are based on industry standards to provide high-speed wireless connectivity that is easy to use within your home, business or public access wireless networks. D-Link wireless products provides you with access to the data you want, whenever and wherever you want it. Enjoy the freedom that wireless networking can bring to you.
DAP-3520 User’s Manual Wireless Basics Standards-Based Technology The DAP-3520 Wireless Access Point utilizes the 802.11a, 802.11b, 802.11g, and 802.11n (draft) standards. The IEEE 802.11n (draft) standard is an extension of the 802.11a, 802.11b, and 802.1g standards that came before it. It increases the maximum wireless signal rate up to 300 Mbps�������������� * within both the 2.4 GHz and the 5 GHz bands, utilizing OFDM technology.
DAP-3520 User’s Manual Wireless Basics Installation Considerations The D-Link DAP-3520 lets you access your network, using a wireless connection, from virtually anywhere within its operating range. Keep in mind, however, that the number, thickness and location of walls, ceilings, or other objects that the wireless signals must pass through, may limit the range. Typical ranges vary depending on the types of materials and background RF (radio frequency) noise in your home or business.
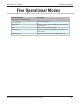
DAP-3520 User’s Manual Five Operational Modes Five Operational Modes Operation Mode Function Access Point (AP) Create a wireless LAN WDS with AP Wirelessly connect multiple networks while still functioning as a wireless AP WDS Wirelessly connect multiple networks Wireless Client AP acts as a wireless network adapter for your Ethernetenabled device WISP Client Router Transforms your wireless AP into a WISP Client router (Only supports 1 mode at a time) D-Link AirPremier N Dual Band Exterior Po
DAP-3520 User’s Manual Getting Started Getting Started 1 You will need broadband Internet access. 2 Consult with your cable or DSL provider for proper installation of the modem. 3 Connect the cable or DSL modem to a router. See the printed Install Guide included with your router. 4 See the printed Install Guide included with the DAP-3520. 5 If you are connecting a desktop computer to your network, install a wireless PCI adapter into an available PCI slot on your desktop computer.
DAP-3520 User’s Manual Getting Started Connecting PoE (Power over Ethernet) Connect one end of an Ethernet cable (included with your package) to the LAN port on the DAP-3520 and the other end of the Ethernet cable to either your computer or to your PoE switch. The AP can be powered on by a PoE switch or by the power adapter shipped with the AP.
Getting Started DAP-3520 User’s Manual Reading the LEDs LED Color Status Description Power Green Solid Green The device is ready. Light Off Blinking Red Solid Green Blinking Green Light Off Solid Green Blinking Green Light Off The device is powering off. The device is booting up. The link is up. Data is being transmitted. The link is down. Wireless is ready. Data is being transmitted. Wireless is off.
DAP-3520 User’s Manual Using the Configuration Menu Using the Configuration Menu To configure the DAP-3520, use a computer that is connected to the DAP-3520 with an Ethernet cable (see the Network Layout diagram). First, disable the Access the Internet using a proxy server function. To disable this function, go to Control Panel > Internet Options > Connections > LAN Settings and uncheck the enable box. Start your web browser program (Internet Explorer, Mozilla Firefox).
Using the Configuration Menu DAP-3520 User’s Manual After successfully logging into the DAP-3520 the following screen will appear: When making changes on most of the configuration screens in this section, use the Apply button at the bottom of each screen to save your configuration changes. Click the Apply button to configure changes.
DAP-3520 User’s Manual Using the Configuration Menu Home > Basic Settings > Wireless > Access Point mode Wireless Band: Select either 2.4 GHz or 5 GHz from the pull-down menu. Mode: Select Access Point from the pull-down menu. The other four choices are WDS with AP, WDS, Wireless Client, and WISP Client Router. Network Name (SSID): Service Set Identifier (SSID) is the name designated for a specific wireless local area network (WLAN). The SSID’s factory default setting is dlink.
DAP-3520 User’s Manual Using the Configuration Menu Channel: All devices on the network must share the same channel. To change the channel, first toggle the Auto Channel Selection setting to Disable, and then use the pull-down menu to make the desired selection. (Note: The wireless adapters will automatically scan and match the wireless settings.) Channel Width: Allows you to select the channel width you would like to operate in. Select 20 MHz if you are not using any 802.11n wireless clients.
DAP-3520 User’s Manual Using the Configuration Menu Home > Basic Settings > Wireless > WDS with AP mode In WDS with AP mode, the DAP-3520 wirelessly connects multiple networks while still functioning as a wireless AP. Wireless Band: Select either 2.4 GHz or 5 GHz from the pull-down menu. Mode: WDS with AP mode is selected from the pull-down menu. Network Name (SSID): Service Set Identifier (SSID) is the name designated for a specific wireless local area network (WLAN).
Using the Configuration Menu DAP-3520 User’s Manual Auto Channel Enabling this feature automatically selects the channel that will proSelection: vide the best wireless performance. This feature is not supported in WDS with AP mode. The channel selection process only occurs when the AP is booting up. Channel: All devices on the network must share the same channel. To change the channel, use the pull-down menu to make the desired selection.
DAP-3520 User’s Manual Using the Configuration Menu Home > Basic Settings > Wireless > WDS mode In WDS mode, the DAP-3520 wirelessly connects multiple networks, without functioning as a wireless AP. Wireless Band: Select either 2.4 GHz or 5 GHz from the pull-down menu. Mode: WDS is selected from the pull-down menu. Network Name (SSID): Service Set Identifier (SSID) is the name designated for a specific wireless local area network (WLAN). The SSID’s factory default setting is dlink.
Using the Configuration Menu DAP-3520 User’s Manual Auto Channel Enabling this feature automatically selects the channel that will provide Selection: the best wireless performance. This feature is not supported in WDS mode. Channel: All devices on the network must share the same channel. To change the channel, use the pull-down menu to make the desired selection. Channel Width: Use the pull-down menu to choose 20 MHz or Auto 20/40 MHz.
DAP-3520 User’s Manual Using the Configuration Menu Home > Basic Settings > Wireless > Wireless Client mode Wireless Band: Select either 2.4 GHz or 5 GHz from the pull-down menu. Mode: Wireless Client is selected from the pull-down menu. Network Name (SSID): Service Set Identifier (SSID) is the name designated for a specific wireless local area network (WLAN). The SSID’s factory default setting is dlink. The SSID can be easily changed to connect to an existing wireless network.
Using the Configuration Menu DAP-3520 User’s Manual Channel: The channel used will be displayed, and follow the root AP. Channel Width: Use the pull-down menu to choose 20 MHz or Auto 20/40 MHz. Site Survey: Click on the Scan button to search for available wireless networks, then click on the available network that you want to connect with. Authentication: Use the pull-down menu to choose Open System or WPA-Personal. Select Open System to communicate the key across the network.
DAP-3520 User’s Manual Using the Configuration Menu Home > Basic Settings > Wireless > WISP Client Router mode Wireless Band: Select either 2.4 GHz or 5 GHz from the pull-down menu. Mode: WISP Client Router is selected from the pull-down menu. Network Name (SSID): Service Set Identifier (SSID) is the name designated for a specific wireless local area network (WLAN). The SSID’s factory default setting is dlink. The SSID can be easily changed to connect to an existing wireless network.
Using the Configuration Menu DAP-3520 User’s Manual Channel: The channel used will be displayed, and follow the root AP. Channel Width: Use the pull-down menu to choose 20 MHz or Auto 20/40 MHz. Site Survey: Click on the Scan button to search for available wireless networks, then click on the available network that you want to connect with. Authentication: Use the pull-down menu to choose Open System or WPA-Personal. Select Open System to communicate the key across the network.
Using the Configuration Menu DAP-3520 User’s Manual Home > Basic Settings > Wireless > Open System or Shared Key authentication Encryption: Use the radio button to disable or enable encryption. Key Type*: Select HEX or ASCII. Key Size: Select 64 Bits or 128 Bits. Key Index (1~4): Select the 1st through the 4th key to be the active key. Key: Input up to four keys for encryption. You will select one of these keys in the Key Index pull-down menu.
DAP-3520 User’s Manual Using the Configuration Menu Home > Basic Settings > Wireless > WPA-Personal authentication WPA Mode: When WPA-Personal is selected for Authentication type, you must also select a WPA mode from the pull-down menu: AUTO (WPA or WPA2), WPA2 Only, or WPA Only. WPA and WPA2 use different algorithms. AUTO (WPA or WPA2) allows you to use both WPA and WPA2. Cipher Type: When you select WPA-Personal, you must also select AUTO, AES, or TKIP from the pull down menu.
DAP-3520 User’s Manual Using the Configuration Menu Home > Basic Settings > Wireless > WPA-Enterprise authentication WPA Mode: When WPA-Enterprise is selected, you must also select a WPA mode from the pull-down menu: AUTO (WPA or WPA2), WPA2 Only, or WPA Only. WPA and WPA2 use different algorithms. AUTO (WPA or WPA2) allows you to use both WPA and WPA2. Cipher Type: When WPA-Enterprise is selected, you must also select a cipher type from the pull-down menu: Auto, AES, or TKIP.
DAP-3520 User’s Manual Using the Configuration Menu Network Access Protection: Enable or disable Microsoft Network Access Protection. RADIUS Server: Enter the IP address of the primary RADIUS server. You must also configure RADIUS port and RADIUS secret. In addition to a primary RADIUS server, the AP allows you to set up an optional backup RADIUS server. RADIUS Port: Enter the RADIUS port. RADIUS Secret: Enter the RADIUS secret.
DAP-3520 User’s Manual Using the Configuration Menu Home > Basic Settings > LAN LAN is short for Local Area Network. This is considered your internal network. These are the IP settings of the LAN interface for the DAP-3520. These settings may be referred to as private settings. You may change the LAN IP address if needed. The LAN IP address is private to your internal network and cannot be seen on the Internet. Get IP From: Static IP (Manual) is chosen here.
DAP-3520 User’s Manual Using the Configuration Menu Home > Basic Settings > Internet Connection > Static IP Select Static IP if all WAN IP information is provided to you by your ISP. You will need to enter in the IP address, subnet mask, gateway address, and DNS address(es) provided to you by your ISP. Each IP address entered in the fields must be in the appropriate IP form, which are four octets separated by a dot (x.x.x.x). The DAP-3520 will not accept the IP address if it is not in this format.
Using the Configuration Menu DAP-3520 User’s Manual ISP Gateway: Enter the IP address of the gateway in your network. If there is a gateway in your network, please enter an IP address within the range of your network. Primary DNS Enter the Primary DNS server IP address assigned by your ISP. Address: Secondary DNS Enter the Secondary DNS server IP address. This is optional. Address: MTU: You may need to change the Maximum Transmission Unit for optimal performance with your specific ISP.
DAP-3520 User’s Manual Using the Configuration Menu Home > Basic Settings > Internet Connection > Dynamic IP (DHCP) Select Dynamic IP (DHCP) to obtain IP address information automatically from your ISP. Select this option if your ISP does not give you any IP numbers to use. This option is commonly used for Cable modem services. Internet Use the drop-down menu to choose Dynamic IP (DHCP). The other Connection Type: three choices are Static IP, PPPoE, and PPTP.
Using the Configuration Menu DAP-3520 User’s Manual MTU: You may need to change the Maximum Transmission Unit for optimal performance with your specific ISP. The default MTU is 1500. Enable: The default MAC address is set to the WAN’s physical interface MAC address on the DAP-3520. You can tick this Clone MAC Address Enable check box to copy the MAC address of the Ethernet Card installed by your ISP and replace the WAN MAC address with the MAC address of the DAP-3520.
DAP-3520 User’s Manual Using the Configuration Menu Home > Basic Settings > Internet Connection > PPPoE Choose PPPoE (Point to Point Protocol over Ethernet) if your ISP uses a PPPoE connection. Your ISP will provide you with a username and password. This option is typically used for DSL services. Make sure to remove your PPPoE software from your computer. The software is no longer needed and will not work through a router. Internet Use the drop-down menu to choose PPPoE.
Using the Configuration Menu DAP-3520 User’s Manual User Name: Enter your PPPoE user name. Password: Enter your PPPoE password. Retype Password: Retype your PPPoE password. Service Name: Enter the ISP Service Name (optional). IP Address: Enter the IP address (Static PPPoE only). Get DNS from: Toggle between Receive DNS from ISP and Enter DNS Manually depending on how you will obtain your Domain Name Server information.
DAP-3520 User’s Manual Using the Configuration Menu Home > Basic Settings > Internet Connection > PPTP Choose PPTP (Point-to-Point-Tunneling Protocol ) if your ISP uses a PPTP connection. Your ISP will provide you with a username and password. This option is typically used for DSL services. Internet Use the drop-down menu to choose PPTP. The other three choices Connection Type: are Static IP, Dynamic IP (DHCP), and PPPoE. PPTP Mode: Select Dynamic IP (DHCP) (most common) or Static IP.
Using the Configuration Menu DAP-3520 User’s Manual IP Address: Enter the IP address (Static IP only). Subnet Mask: Enter the subnet mask (Static IP only). Gateway: Enter the gateway IP address provided by your ISP. DNS Address: The DNS server information will be supplied by your ISP (Internet Service Provider). Server IP/Name: Enter the server IP provided by your ISP (optional). PPTP Acount: Enter your PPTP account name. PPTP Password: Enter your PPTP password.
DAP-3520 User’s Manual Using the Configuration Menu Home > Advanced Settings > Performance Wireless: Use the pull-down menu to turn the wireless function On or Off. Wireless Mode: The different combination of clients that can be supported include Mixed 802.11n, 802.11g and 802.11b, Mixed 802.11g and 802.11b and 802.11n Only in the 2.4 GHz band and Mixed 802.11n, 802.11a, 802.11a only, and 802.11n Only in the 5 GHz band. Please note that when backwards compatibility is enabled for legacy (802.
DAP-3520 User’s Manual Using the Configuration Menu Beacon Interval Beacons are packets sent by an access point to synchronize a (25-500): wireless network. Specify a value in milliseconds. The default (100) is recommended. Setting a higher beacon interval can help to save the power of wireless clients, while setting a lower one can help a wireless client connect to an access point faster. DTIM Interval Select a Delivery Traffic Indication Message setting between 1 and (1-15): 15.
DAP-3520 User’s Manual Using the Configuration Menu Connection Limit: Select Enable or Disable. This is an option for load balancing. This determines whether to limit the number of users accessing this device. The exact number is entered in the User Limit field below. This feature allows the user to share the wireless network traffic and the client using multiple APs. If this function is enabled, when the number of users exceeds this value, the DAP-3520 will not allow clients to associate with the AP.
DAP-3520 User’s Manual Using the Configuration Menu Home > Advanced Settings > Multi-SSID The device supports up to eight multiple Service Set Identifiers. You can set the Primary SSID in the Basic > Wireless section. The SSID’s factory default setting is dlink. The SSID can be easily changed to connect to an existing wireless network or to establish a new wireless network. Enable Multi-SSID: Check to enable support for multiple SSIDs. Band: This read-only value is the current band setting.
Using the Configuration Menu DAP-3520 User’s Manual SSID: Service Set Identifier (SSID) is the name designated for a specific wireless local area network (WLAN). The SSID’s factory default setting is dlink. The SSID can be easily changed to connect to an existing wireless network or to establish a new wireless network. SSID Visibility: Enable or Disable SSID visibility. Enabling this feature broadcasts the SSID across the network, thus making it visible to all network users.
DAP-3520 User’s Manual Using the Configuration Menu Confirm PassPhrase: When you select WPA-Personal, please re-enter the PassPhrase entered in the previous item in the corresponding field. RADIUS Server: When you select WPA-Enterprise, enter the IP address of the primary RADIUS server. You must also configure RADIUS port and RADIUS secret. In addition to a primary RADIUS server, the AP allows you to set up an optional backup RADIUS server. RADIUS Port: Enter the RADIUS port.
DAP-3520 User’s Manual Using the Configuration Menu Home > Advanced Settings > VLAN > VLAN List The DAP-3520 supports VLANs. VLANs can be created with a Name and VID. Mgmt (TCP stack), LAN, Primary/Multiple SSID, and WDS connection can be assigned to VLANs as they are physical ports. Any packet which enters the DAP-3520 without a VLAN tag will have a VLAN tag inserted with a PVID. The VLAN List tab displays the current VLANs. VLAN Status: Use the radio button to toggle to Enable.
DAP-3520 User’s Manual Using the Configuration Menu Home > Advanced Settings > VLAN > Port List The Port List tab displays the current ports. If you want to configure the guest and internal networks on a Virtual LAN (VLAN), the switch and DHCP server you are using must also support VLANs. As a prerequisite step, configure a port on the switch for handling VLAN tagged packets as described in the IEEE 802.1Q standard. VLAN Status: Use the radio button to toggle to Enable.
DAP-3520 User’s Manual Using the Configuration Menu Home > Advanced Settings > VLAN > Add/Edit VLAN The Add/Edit VLAN tab is used to configure VLANs. Once you have made the desired changes, click the Apply button to let your changes take effect. VLAN Status: Use the radio button to toggle to Enable. VLAN ID (VID): Provide a number between 1 and 4094 for the Internal VLAN. VLAN Name: Enter the VLAN to add or modify.
DAP-3520 User’s Manual Using the Configuration Menu Home > Advanced Settings > VLAN > PVID Setting The PVID Setting tab is used to enable/disable the Port VLAN Identifier Auto Assign Status as well as to configure various types of PVID settings. Click the Apply button to let your changes take effect. VLAN Status: Use the radio button to toggle to Enable. PVID Auto Assign Status: Use the radio button to toggle PVID auto assign status to Enable.
DAP-3520 User’s Manual Using the Configuration Menu Home > Advanced Settings > Intrusion The Wireless Intrusion Protection window is used to set APs as All, Valid, Neighborhood, Rogue, and New. Click the Apply button to let your changes take effect. AP List: The choices include All, Valid, Neighbor, Rogue, and New. Detect Click this button to initiate a scan of the network.
DAP-3520 User’s Manual Using the Configuration Menu Home > Advanced Settings > Schedule The Wireless Schedule Settings window is used to add and modify scheduling rules on the device. Click the Apply button to let your changes take effect. Wireless Schedule: Use the pull-down menu to enable the device’s scheduling feature. Name: Enter a name for the new scheduling rule in the field provided. Day(s): Toggle the radio button between All Week and Select Days(s).