DI-604 Express EthernetworkTM Broadband Router Manual Rev.
Contents Package Contents .................................................................. 3 Introduction ................................................................................... 4 Using the Configuration Wizard Using the Configuration Menu .............................. 9 ................................ 13 Troubleshooting ...................................................................... 27 Networking Basics ..............................................................
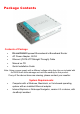
Package Contents Contents of Package: • • D-Link DI-604 Express EthernetworkTM Broadband Router AC Power Adapter, 5V/2A • • • Ethernet (CAT5-UTP/Straight-Through) Cable Manual on CD Quick Installation Guide Note: Using a power supply with a different voltage rating than the one included with the DI-604 will cause damage and void the warranty for this product. If any of the above items are missing, please contact your reseller.
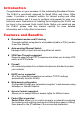
Introduction Congratulations on your purchase of this outstanding Broadband Router. The DI-604 is specifically designed for Small Office and Home Office needs. It provides a complete solution for Internet surfing and office resources sharing, and it is easy to configure and operate for even nontechnical users. Instructions for installing and configuring the DI-604 can be found in the enclosed Quick Install Guide.
Virtual Server supported Enables you to expose WWW, FTP and other services on your LAN to be accessible to Internet users. User-Definable Application Sensing Tunnel User can define the attributes to support special applications requiring multiple connections, like Internet gaming, video conferencing, Internet telephony and so on. The DI-604 can sense the application type and open a multi-port tunnel for it.
prevent unauthorized Internet users from accessing private networks or corporate LAN’ s and Intranets. A firewall watches all of the information moving to and from your network and analyzes each piece of data. Each piece of data is checked against a set of criteria that the administrator configures. If any data does not meet the criteria, that data is blocked and discarded. If the data meets the criteria, the data is passed through. This method is called packet filtering.
Virtual Private Networking (VPN) uses a publicly wired network (the Internet) to securely connect two different networks as if they were the same network. For example, an employee can access the corporate network from home using VPN, allowing the employee to access files and printers. Here are several different implementations of VPN that can be used. Point-to-Point Tunneling Protocol (PPTP) PPTP uses proprietary means of connecting two private networks over the Internet.
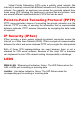
CONNECTIONS LAN ports (1-4) WAN port Reset Power jack Getting Started The Infrastructure Network example shown contains the following D-Link network devices: Express EthernetworkTM Broadband Router - D-Link DI-604 A laptop computer with an Ethernet adapter - D-Link DFE-670TXD A desktop computer with an Ethernet adapter - D-Link DFE-530TX+ A Cable modem - D-Link DCM-200 8
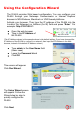
Using the Configuration Wizard The DI-604 provides Web based configuration. You can configure your DI-604 through your Netscape Communicator or Internet Explorer browser in MS Windows, Macintosh or UNIX based platforms. Activate your browser. Then type the IP address of the DI-604 into the Location (for Netscape) or Address (for IE) field and press “Enter.” For example: http://192.168.0.1. • • Open the web browser Type in the IP Address of the DI-604 http://192.168.0.
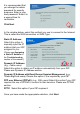
It is recommended that you change the admin password for security purposes. Enter in your new password. Enter it in a second time for verification. Click Next In the window below, select the method you use to connect to the Internet. This is called the WAN connection or WAN Type. Static IP Address: Select this option to manually input the IP address that your ISP assigned to you. (Please see Assigning a Static IP Address in the Troubleshooting section of this manual.) Dynamic IP Address: (e.g.
Static IP Address If you selected Static IP Address, you will see the following page. Enter in the IP address information provided to you by your ISP. You will need to enter in WAN IP Address, WAN Subnet Mask, WAN Gateway, and Primary DNS. Click Next Dynamic IP Address If you selected Dynamic IP Address, you will see the following page. If your ISP requires you to enter a specific host name or specific MAC address, please enter it in.
PPPoE If you select PPP over Ethernet (PPPoE), you will see the following page. Enter in the username and password provided to you by your ISP. Enter in the Service Name if your ISP uses a Service Name for the PPPoE connection. Click Next PPTP If you selected PPTP, fill out the required information, provided to you by your ISP.
At this point, the Setup Wizard has completed. Click Restart to save the settings and reboot the DI-604. The DI-604 will save the changes and reboot. You have completed the Setup Wizard. You can now access the Internet. Whenever you choose to make changes or additions to the configuration of the DI-604, you can access the Configuration menu by typing the IP Address of the DI-604 into the address line of your web browser and pressing “ enter.” Read more about the Configuration menu in the following chapter.
WAN WAN is short for Wide Area Network. The WAN settings can be referred to as the Public settings. All IP information in the WAN settings are public IP addresses which are accessible on the Internet. The WAN settings consist of these options: Dynamic IP Address, Dynamic IP (w/RoadRunner,) Static IP Address, PPPoE, and PPTP. Select the appropriate option and fill in the information needed to connect to your ISP.
HOME > WAN > STATIC IP ADDRESS Choose Static IP Address if all WAN IP information is provided to you by your ISP. You will need to enter in the IP address, subnet mask, gateway address, and DNS address(es) provided to you by your ISP. Each IP address entered in the fields must be in the appropriate IP form, which are four IP octets separated by a dot (x.x.x.x). The Router will not accept the IP address if it is not in this format. WAN IP Address: Public IP address provided by your ISP.
HOME > WAN > PPPOE Choose PPPoE (Point to Point Protocol over Ethernet) if your ISP uses PPPoE connection. Your ISP will provide you with a username and password. This option is typically used for DSL services.
HOME > LAN LAN is short for Local Area Network. This is considered your internal network. These are the IP settings of the LAN interface for the DI-604. These settings may be referred to as Private settings. You may change the LAN IP address if needed. The LAN IP address is private to your internal network and cannot be seen on the Internet. LAN IP Address: The IP address of the LAN interface. The default IP address is 192.168.0.1.
ADVANCED > VIRTUAL SERVER The firewall filters out unrecognized packets to protect your LAN (local area network); so all computers networked with the DI-604 are invisible to the outside world. If you wish, you can make some of them accessible by enabling the Virtual Server Mapping. A virtual server is defined as a Service Port, and all requests to this port will be redirected to the computer specified by the Server IP. For example, if you have an FTP server (port 21) at 192.168.0.
ADVANCED > APPLICATIONS Some applications require multiple connections, like Internet games, Video conferencing, Internet telephony and so on. Due to the firewall function, these applications cannot work without some intervention. Special Applications makes some of these applications work with the DI-604. If Special Applications is still insufficient to allow an application to function correctly, try the DMZ Host in the Miscellaneous Items options.
ADVANCED>FILTER MAC Address Control allows you to assign different access rights for different users and to assign a specific IP address to a certain MAC address. MAC Address Control: Check Enable to enable the MAC Address Control. All of the settings in this page will take effect only when Enable is checked. Connection control: Check Connection control to control what wired and wireless clients can connect to this device.
Near the bottom of the MAC Address Control window, the following pull-down menu and button will help you to input the MAC address. Select a specific client in the “DHCP clients” pull-down menu. Click on the “Copy to” button to copy the MAC address of the DHCP client you select to the ID selected in the “ID” pull-down menu. Previous page and Next Page: At the bottom of the MAC Address Control window you will find these two buttons.
ADVANCED > FIREWALL The Firewall enables you to control what packets are allowed to pass the router. Outbound filter applies on all outbound packets. However, Inbound filter applies on packets that are destined for Virtual Servers or DMZ host only. You can select one of the two filtering policies: 1. Allow all to pass except those that match the specified rules 2. Deny all to pass except those that match the specified rules You can specify 8 rules for inbound or outbound.
• Destination port address For source or destination IP address, you can define a single IP address (e.g., 4.3.2.1) or a range of IP addresses (e.g., 4.3.2.1-4.3.2.254). An empty fields implies all IP addresses. For source or destination port, you can define a single port (e.g., 80) or a range of ports (e.g., 1000-1999). Each rule can be enabled or disabled individually. Inbound Filter: To enable the Inbound Packet Filter, click the check box next to Enable in the Inbound Packet Filter field.
ADVANCED > SNMP In brief, SNMP, the Simple Network Management Protocol, is a protocol designed to give a user the capability to remotely manage a computer network by polling and setting terminal values and monitoring network events. To enable SNMP click the check box next to Local or Remote in the Enable SNMP field.
ADVANCED > DDNS Dynamic DNS To host your server on a changing IP address, you have to use dynamic domain name service (DDNS). Anyone wishing to reach your host only needs to know the name of it. Dynamic DNS will map the name of your host to your current IP address, which changes each time you connect to your Internet service provider. Before you enable Dynamic DNS, you need to register an account on one of these Dynamic DNS servers that we list in the provider field.
ADVANCED > ROUTING Routing allows you to determine which physical interface address to use for outgoing IP data grams. If you have more than one router and subnet, you will need to enable the routing table to allow packets to find the proper routing path and allow different subnets to communicate with each other. To enable the Routing Table, click the check box next to Enable in the related field.
Troubleshooting If you do not wish to set the static IP address on your PC, you will need to configure your PC to request an IP address from the gateway. Click the Start button, select Settings, and select Control Panel. Double-click the Network icon. In the configuration tab, select the TCP/IP protocol line that has been associated with your network card/adapter. If there is no TCP/IP line listed, you will need to install TCP/IP now. Click the Properties button.
Choose the IP ADDRESS tab. Select Obtain an IP automatically. After clicking OK, windows might ask you to restart the PC. Click Yes. CONFIRM YOUR PC’ S IP CONFIGURATION There are two tools which are great for finding out a computer’ s IP configuration: MAC address and default gateway. WINIPCFG (for Windows 95/98) Inside the windows 95/98 Start button, select Run and type winipcfg. In the example below this computer has an IP address of 192.168.0.100 and the default gateway is 192.168.0.1.
IPCONFIG (for Windows 2000/NT/XP) At the command prompt type IPCONFIG and press Enter. Your PC IP information will be displayed as shown below.
Assigning a Static IP Address Note: Residential Gateways/Broadband Routers will automatically assign IP Addresses to the computers on the network, using DHCP (Dynamic Host Configuration Protocol) technology. If you are using a DHCP-capable Gateway/Router you will not need to assign Static IP Addresses.
Right-click on Local Area Connections. Click Properties Highlight Internet Protocol (TCP/IP) DFE-530TX+ Click Properties Select Use the following IP address in the Internet Protocol (TCP/IP) Properties window.
Input your IP address and subnet mask. (The IP Addresses on your network must be within the same range. For example, if one computer has an IP Address of 192.168.0.2, the other computers should have IP Addresses that are sequential, like 192.168.0.3 and 192.168.0.4. The subnet mask must be the same for all the computers on the network.) • Input your DNS server addresses The DNS server information will be provided by your ISP (Internet Service Provider.
Networking Basics Using the Network Setup Wizard in Windows XP In this section you will learn how to establish a network at home or work, using Microsoft Windows XP. Note: Please refer to websites such as http://www.homenethelp.com and http://www.microsoft.com/windows2000 for information about networking computers using Windows 2000, ME or 98. Go to Start>Control Panel>Network Connections Select Set up a home or small office network When this screen appears, click Next.
Networking Basics Please follow all the instructions in this window: Click Next In the following window, select the best description of your computer. If your computer connects to the internet through a gateway/router, select the second option as shown.
Networking Basics Enter a Computer description and a Computer name (optional.) Click Next Enter a Workgroup name. All computers on your network should have the same Workgroup name.
Networking Basics Please wait while the Network Setup Wizard applies the changes. When the changes are complete, click Next. Please wait while the Network Setup Wizard configures the computer. This may take a few minutes.
Networking Basics In the window below, select the best option. In this example, Create a Network Setup Disk has been selected. You will run this disk on each of the computers on your network. Click Next. Insert a disk into the Floppy Disk Drive, in this case drive A. Format the disk if you wish, and click Next.
Networking Basics Please wait while the Network Setup Wizard copies the files. Please read the information under Here’ s how in the screen below. After you complete the Network Setup Wizard you will use the Network Setup Disk to run the Network Setup Wizard once on each of the computers on your network. To continue click Next.
Networking Basics Please read the information on this screen, then click Finish to complete the Network Setup Wizard. The new settings will take effect when you restart the computer. Click Yes to restart the computer. You have completed configuring this computer. Next, you will need to run the Network Setup Disk on all the other computers on your network. After running the Network Setup Disk on all your computers, your new wireless network will be ready to use.
Networking Basics Naming your Computer To name your computer, please follow these directions: In Windows XP: • Click Start (in the lower left corner of the screen) • Right-click on My Computer • Select Properties and click • Select the Computer Name Tab in the System Properties window. You may enter a Computer description if you wish, this field is optional.
Networking Basics Naming your Computer • In this window, enter the Computer name. • Select Workgroup and enter the name of the Workgroup. • All computers on your network must have the same Workgroup name.
Networking Basics Checking the IP Address in Windows XP/2000 Type Command Click OK Checking the IP Address in Windows XP/2000 Type ipconfig /all at the prompt. Click Enter. All the configuration settings are displayed as shown below.
Networking Basics Checking the IP Address in Windows XP/2000 Type ipconfig /renew at the prompt to get a new IP Address. Click Enter. The new IP Address is shown below. (Windows 98/ME users: go to Start > Run. Type Command. Type winipcfg at the prompt. Click Release and Renew to obtain a new IP Address.
Networking Basics Assigning a Static IP Address • Double-click on Network Connections • Right-click on Local Area Connections.
Networking Basics Assigning a Static IP Address • • • • • Highlight Internet Protocol (TCP/IP) D-Link DFE-530TX+ Click Properties Select Use the following IP address in the Internet Protocol (TCP/IP) Properties window, Input your IP address and subnet mask. (The IP Addresses on your network must be within the same range. For example, if one computer has an IP Address of 192.168.0.2, the other computers should have IP Addresses that are sequential, like 192.168.0.3 and 192.168.0.4.
Technical Specifications Standards: • • • • • IEEE 802.3 10BASET-T Ethernet IEEE 802.3u 100BASE-TX Fast Ethernet IEEE 802.3x Flow Control IEEE 802.1p Priority Queue ANSI/IEEE 802.
Contacting Technical Support You can find the most recent software and user documentation on the D-Link website. D-Link provides free technical support for customers within the United States for the duration of the warranty period on this product. U.S. customers can contact D-Link technical support through our web site or by phone. D-Link Technical Support over the Internet: http://support.dlink.com D-Link Technical Support over the Telephone: Phone: 877-453-5465 24 hours a day, seven days a week.
media on which D-Link delivers the Software will be free of physical defects. D-Link’ s sole obligation shall be to replace the non-conforming Software (or defective media) with software that substantially conforms to D-Link’ s functional specifications for the Software. Except as otherwise agreed by D-Link in writing, the replacement Software is provided only to the original licensee, and is subject to the terms and conditions of the license granted by D-Link for the Software.
Trademarks Copyright® 2002 D-Link Corporation. Contents subject to change without prior notice. D-Link is a registered trademark of D-Link Corporation/D-Link Systems, Inc. All other trademarks belong to their respective proprietors. Copyright Statement No part of this publication may be reproduced in any form or by any means or used to make any derivative such as translation, transformation, or adaptation without permission from D-Link Corporation/D-Link Systems Inc.