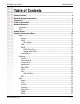
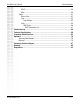
DI-LB604 User’s Manual Table of Contents Table of Contents Package Contents ............................................................................... 4 Minimum System Requirements .............................................................. 4 Introduction ...................................................................................... 5 Features and Benefits .......................................................................... 6 Hardware Overview .........................................
DI-LB604 User’s Manual Table of Contents UPnP ............................................................................................................38 Misc ..............................................................................................................39 Status .................................................................................................................41 Device Info....................................................................................................
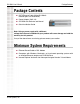
DI-LB604 User’s Manual Package Contents Package Contents CAT-5 Ethernet Cable (All the DI-LB604’s Ethernet ports are Auto-MDIX) Power Adapter (5.0V, 2A) CD-ROM with Software and Manual Quick Installation Guide Note: Using a power supply with a different voltage than the one included with your product will cause damage and void the warranty for this product. If any of the above items are missing, please contact your reseller.
DI-LB604 User’s Manual Introduction Introduction The D-Link Express EtherNetwork DI-LB604 is a 4-port Ethernet Broadband Router. The D-Link DI-LB604 enables users to quickly and easily share a high speed Internet connection. The D-Link DI-LB604 also incorporates many advanced features, traditionally found in more expensive routers.
DI-LB604 User’s Manual Features and Benefits Features and Benefits Connects multiple computers to a Broadband (Cable or DSL) modem to share the Internet connection. Allows you to quickly and easily share an Internet connection with multiple computers and devices. Supports multiple and concurrent IPSec and PPTP pass-through sessions, so multiple users behind the DI-LB604 can access corporate networks through various VPN clients more securely.
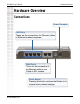
Hardware Overview DI-LB604 User’s Manual Hardware Overview Connections Power Receptor LAN Ports These are the connections for Ethernet cables to Ethernet enabled computers. WAN Ports This is for the connection of an Ethernet cable to your Cable or DSL modem. Reset Button Pressing this button restores the Router to its original factory default settings. D-Link Systems, Inc.
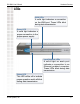
Hardware Overview DI-LB604 User’s Manual LEDs WAN LEDs A solid light indicates a connection on the WAN port. These LEDs blink during data transmission. Power LED A solid light indicates a proper connection to the proper power supply. Local Network LEDs A solid light on each por t indicates a connection to an Ethernet enabled computer. These LEDs blink during data transmission. Status LED This LED will be off to indicate proper operation and it will blink during data transmission.
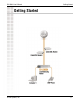
DI-LB604 User’s Manual Getting Started Getting Started D-Link Systems, Inc.
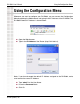
Using the Configuration Menu DI-LB604 User’s Manual Using the Configuration Menu Whenever you want to configure your DI-LB604, you can access the Configuration Menu by opening the Web-browser and typing in the IP Address of the DI-LB604. The DI-LB604’s default IP Address is shown below: http://192.168.0.1 Open the Web browser. Type in the IP Address of the Router (http://192.168.0.1). Note: if you have changed the default IP Address assigned to the DI-LB604, make sure to enter the correct IP Address.
Using the Configuration Menu DI-LB604 User’s Manual Home The Home tab provides the following configuration options: Wizard, WAN, LAN, DHCP and Load Balance Wizard The Home>Wizard screen will appear. Please refer to the Quick Installation Guide for more information regarding the Setup Wizard. Home > Wizard These buttons appear on most of the configuration screens in this section. Please click on the appropriate button at the bottom of each screen after you have made a configuration change.
Using the Configuration Menu DI-LB604 User’s Manual WAN Home > WAN Connection Connection Mode: There are three connection modes for each WAN port, Enable, Disable and Backup. Set to Disable if there is no modem connected to the WAN port. If both WAN ports are used, one is set to Enable and the other is set to Backup, the backup line will automatically be used when the other line is disconnected. Static IP: Select this if you want to specify a fixed IP address for the WAN port.
Using the Configuration Menu DI-LB604 User’s Manual Address Information Address Information: If you choose the connection type Static IP, then you have to fill in the information, IP address, Subnet Mask, and Gateway, provided by your ISP. PPTP Dialup Username / Password: These 2 fields must be completed if you are using PPPoE or PPTP dialup. If you are using PPTP dialup, remember you must select Static IP or Dynamic IP on Connection Type setup.
Using the Configuration Menu DI-LB604 User’s Manual Port Options Home > WAN > Port Options Interface WAN Port: MTU: Select the WAN port that you would like these port options to apply to. The largest amount of data that can be transferred across a given physical network. Connection Health Check Connection Health Check: D-Link Systems, Inc. There are three methods, ICMP, HTTP and Traffic, provided for device to check if WAN interfaces are connected to internet or not.
Using the Configuration Menu DI-LB604 User’s Manual Method: ICMP: The health checking is performed by sending an ICMP echo request packet to the specific destination. The specific destination (“Alive Indicator”) could be either : 1. if the input box is filled (NAME or IP address): the host is used. 2. if the input box is left blank: gateway of wan interface will be used. If one ICMP echo reply packet from Alive Indicator or gateway is received, the connection is considered OK.
Using the Configuration Menu DI-LB604 User’s Manual LAN Home > LAN LAN Settings IP Address: This is the LAN IP address for this broadband router unit. Other computers on this LAN will see it as their gateway. Subnet Mask: The subnet mask address must be the same as PCs onyour LAN. The default subnet mask address is 255.255.255.0 DHCP Home > DHCP DHCP Server DHCP Server: To activate DHCP Server function.
Using the Configuration Menu DI-LB604 User’s Manual Lease Time: The amount of time for a DHCP server leased a IP address to a client. DNS Server 1 IP for Client: The IP address of the first default DNS server for the client requsting DHCP. DNS Server 2 IP for Client: The IP address of the second default DNS server for the client requsting DHCP. View DHCP List: This button is linked to the page DHCP client List. Setting Static DHCP: Click here to configure static DHCP.
Using the Configuration Menu DI-LB604 User’s Manual Setting Static DHCP Home > DHCP > Setting Static DHCP Static DHCP Host Name: MAC Address: Reserved IP Address: D-Link Systems, Inc. This should be your computer name. This is your computer’s network adapter address. You can find this address by typing ipconfig /all under the command prompt mode of window NT /2000/XP, or winipcfg under window/95/98/ Me’s command prompt mode. The IP address you wish to assign to this host.
Using the Configuration Menu DI-LB604 User’s Manual Load Balance Home > Load Balance Load Balance Configuration Load Balance: To determine how the traffic is shared among the WAN ports. Enable: This will allow you enable or disable the load balance feature. Load Balance Base on: Loading Share: NAT Statistics NAT Statistics: Interface Statistics: D-Link Systems, Inc. Select the desired option to measure traffic. Enter the desired percent of traffic load for each WAN port.
Using the Configuration Menu DI-LB604 User’s Manual Advanced The Advanced tab provides the following configuration options: Host IP, Static Routing, Virtual Server, Applications, Multi DMZ, Filters, QoS and NAT. Host IP Advanced > Host IP Host IP Host IP: Host Network Identity Host Name: The main purpose of this section is to define hosts on your LAN, and assign them to groups. Groups are used by the Access Filter and Block URL features.
DI-LB604 User’s Manual Host Network binding Host Network binding: Using the Configuration Menu This is used only if you have multiple PPPoE sessions. Use this to ensure that a particular host always uses the same PPPoE session. Strict Binding: Only the bound interface is allowed to send packets for the specified host. If the bound interface is not available, no packet from the specified host can be sent.
Using the Configuration Menu DI-LB604 User’s Manual Static Routing Advanced > Static Routing Static Routing Static Routing: If there is more than one router on a network, this Routing table must be configured because the router needs to know what packet goes to which router. A routing table entry is required for each LAN segment on the network. Network Address: Network Address is the address of the destination network segment.
Using the Configuration Menu DI-LB604 User’s Manual Virtual Server Advanced > Virtual Server Virtual Server Virtual Server: Enable: Server Name: This feature allows the servers (web server, mail server, FTP server, DNS, ... etc) on your LAN to be accessed from the Internet. To activate or deactivate current entry. An unique name to identify the virtual server. Private IP: Enter the IP address of the server on the device’s LAN side.
Using the Configuration Menu DI-LB604 User’s Manual Public Port Range: The range of port numbers for users in public to access the virtual server. If only one port number is used, fill the same number in both starting and ending fields. Allowed Remote IP: The range of IP addresses that are allowed to access the virtual server. Applications Advanced > Applications Special Application Special Application: There are many special network applications that normally do not work behind a firewall.
Using the Configuration Menu DI-LB604 User’s Manual Trigger Type: The protocol to trigger the Special Application. Public Port Range: The port range used in the connection from the Special Application server. Public Type: The protocol used in the connection from the Special Application server. Special Application List Special Application List: Lists all the entries that have been created. Multi-DMZ Advanced > Multi DMZ Multi DMZ Multi DMZ (De-Militarized Zone): Enable: D-Link Systems, Inc.
Using the Configuration Menu DI-LB604 User’s Manual WAN: Name: PPPoE Sess: Private IP (LAN): Access Group: Direction: The WAN port applied for current DMZ entry. To identify current DMZ entry. The PPPoE session that current DMZ entry is bound to. The IP address of the server in DMZ. To specify which Access Group will be applied. Each Access Group has its own access rules. To specify that the Access Group will be applied in which way.
Using the Configuration Menu DI-LB604 User’s Manual Select One Group: The Group that current rule is applied to. No Filtering: To allow all Internet access to LAN users. Allow Selected Access only: Block All Access: Block Selected Items: ICMP Filters ICMP Filters: Block Selected Packet Types: Packet Types: To apply the rules defined in User-Defined Ports To Filter. To prohibit all Internet access to LAN users. To apply the rules defined in User-Defined Ports To Block.
Using the Configuration Menu DI-LB604 User’s Manual QoS Advanced > QoS QoS Setup Enable QoS: Users can choose to Enable QoS (Quality of Service). If set to “enable” QoS, the QoS will allow higher priority packets to pass through the device. Queuing Method: The methods for managing your queue. “Priority Queuing” is one of the first queuing variations to be widely implemented.
DI-LB604 User’s Manual Using the Configuration Menu QoS Set Policy Advanced > QoS > Set Policy Setting the QoS policy can assign received packets a higher/lower priority (based on your configuration) to pass through this device. You can define some policies which classify received packets based on local/remote IP addresses, ports and protocol type.
Using the Configuration Menu DI-LB604 User’s Manual NAT Advanced > Nat NAT Configuration: NAT Routing: To enable or disable NAT routing by checking or unchecking the checkbox. If you disable NAT routing, this device will act as a Bridge or Static Router. Most features, including Load Balance, will be unavailable. If some packets whose port number cannot be translated for special applications, you must input value in port range for Disable Port Translation.
Using the Configuration Menu DI-LB604 User’s Manual NAT Port Options Port Range: The Source Port Number Range for TCP and UDP protocol. Non-PortTranslation: To keep the source port number unchanged for TCP/UDP sessions on the specified Port Range. Some special applications do not allow the source port number to be translated. Specific TCP / UDP Timeout: To define specific Timeout for TCP/UDP sessions on the specified Port Range. Set NAT Alias Set NAT Alias: The link to NAT Alias setting page.
Using the Configuration Menu DI-LB604 User’s Manual Tools The Tools tab provides the following options: Admin, Time, System, Firmware, Email Alert, SNMP, DDNS, UPNP and Misc. Admin Tools > Admin Administrator Settings New Password / Confirm Password: Remote Management Remote Upgrade: This administrator password protects the configuration for this broadband router. It is recommended that you set a password to prevent other people change the router’s configuration.
Using the Configuration Menu DI-LB604 User’s Manual Time NTP Configuration Time Zone: NTP Servers: To specify one time zone from the time zone list that lists all time differences between GMT and each local time zone. Up to 3 NTP servers can be used for the device to receive the time and date in Greenwich Mean Time (GMT), you can enter its IP or Domain address here. System Tools > System D-Link Systems, Inc.
Using the Configuration Menu DI-LB604 User’s Manual System Setting Save Settings To Local Hard Drive: Load Settings Load Settings: User Name / Password: Load Settings From Local Hard Drive: Restore To Factory Default Settings: You can save current system configuration as a text file on a local hard disk, and then use the saved configuration file to upgrade another device later. You can Load the Settings through this web page.
Using the Configuration Menu DI-LB604 User’s Manual Email Alert Tools > Email Alert Global Settings Notification on Email Alert Enable: To enable or disable the Email Alert in case that one of the WAN ports is disconnected. Excessive Ping: This function is useful to prevent ICMP packets attacks, from WAN or LAN, on the device. It will drop the packets if the ping times are excessive the threshold value Max. Pings Before Notification.
Using the Configuration Menu DI-LB604 User’s Manual Recipient Address: Send Test E-mail: The email address of the receiver. Click this button will send a test e-mail in order to verify the settings are correct. SNMP Tools >SNMP SNMP (Simple Network Management Protocol) SNMP: This page only useful if you an SNMP program which you can use to access the Router and receive the trap alerts. System Information: This is the system information which will identify this device.
Using the Configuration Menu DI-LB604 User’s Manual DDNS Tools > DDNS Dynamic DNS Dynamic DNS: This is a technology that people can use to connect to your router using a domain name, instead of an IP address, even if you have a dynamic IP address from your ISP(instead of a static IP address). Dynamic DNS Service Service: To specify the service provider. Server Name: The name of the DDNS server. User Name: The username to login to the DDNS server.
Using the Configuration Menu DI-LB604 User’s Manual Enable Backup MX: Mail Exchanger: WAN Port Binding WAN Port Binding: Enable Backup to allow the use of Mail Exchanger. Define mail exchanger for the domain name. If omitted, the mail exchanger will be set to the domain name. If bound on the WAN port, the domain name will be mapped to the IP address of the WAN port. UPnP Tools >UPnP UPnP Option UPnP Option: UPnP Port Mapping List: D-Link Systems, Inc.
Using the Configuration Menu DI-LB604 User’s Manual Misc. Tools >Misc External Filters Configuration External Filters To limit the packets passing through the device from WAN side to Configuration: LAN side. IDENT Port: This port provides a means to determine the identity of a user on a particular TCP connection. By defult, the device is stealth for this port. Enable to make this port closed, not stealth.
Using the Configuration Menu DI-LB604 User’s Manual Packet Types: System Restart System Restart: DNS Loopback DNS Loopback: Interface Binding SMTP Binding: SMTP Binding Port: The types of the ICMP packets that could be blocked. The link to the page to restart system. If there is any domain in your private network. You can setup the mapping table of Domain Name & Private IP for DNS query. To determine if the SMTP packets are bound on the WAN port.
Using the Configuration Menu DI-LB604 User’s Manual Status The Status tab provides the following options: Device Info, Log, and Stats Device Info Status > Device Information Device Information Device Information: This page describes the device’s interfaces (WAN ports and LAN port) settings and status. •Connect/Disconnect: Connect or disconnect PPPoE session immediately. •Force Renew: Renew DHCP lease immediately. D-Link Systems, Inc.
Using the Configuration Menu DI-LB604 User’s Manual Log Status > Log View Log View Log: The device keeps a running log of events and activities occurring on the device. The log will display up to 100 recent logs. Newer log activities will overwrite the older logs. When the device is rebooted, the logs are automatically cleared. Log Settings Status > Log > Log Settings D-Link Systems, Inc.
Using the Configuration Menu DI-LB604 User’s Manual Syslog Delivery Sending Out: Keep Sent Messages: Syslog Servers: If checked, device will send syslog messages to other machine (log servers). Note: Even you uncheck it, the system will generate log messages. If checked, the sent messages will be kept on device, otherwise the sent message will be deleted. •IP Address: Up to 3 syslog servers can be used. •Enable: If checked, the log message will be sent to the server.
Using the Configuration Menu DI-LB604 User’s Manual Stats Status > Statistics Refresh Refresh: Restart Counters Restart Counters: Check NAT Detail: Get the newest statistics data. Clear all the statistics counters to 0. The link to NAT Status page. NAT Statistics Connection Status: Check if WAN1 and WAN2 ports are connected or disconnected. Default Loading Share: Display the default traffic loading between WAN1 and WAN2 ports.
DI-LB604 User’s Manual Interface Statistics Interface Statistics: Using the Configuration Menu This section displays cumulative statistics. Load Share: Current traffic loading in percent, including the traffic for device itself, on each WAN port. Overall Statistics: •Received: Current incoming traffic loading in KByte, including the traffic for device itself, on each WAN port. •Transmited: Current outgoing traffic loading in KByte, including the traffic for device itself, on each WAN port.
Using the Configuration Menu DI-LB604 User’s Manual NAT Status Status > Statistics > NAT Status NAT Status Refresh: View Connection List: NAT Timeouts: D-Link Systems, Inc. Get the newest status information. The link to NAT Connection List page. This displays the current timeout values for TCP and UDP connections.
Using the Configuration Menu DI-LB604 User’s Manual TCP Property: This displays the MSS (Maximum Segment Size) and Maximum Windows size for TCP packets. NAT Traffic: This section displays statistics for both outgoing (LAN to Internet) and Incoming (Internet to Local) traffic. Connections: This displays the current number of active connections. For further details, click the View Connection list button. Errors: Statistics are displayed for Checksum errors, number of retries, and number of bad packets.
DI-LB604 User’s Manual Troubleshooting Troubleshooting This Chapter provides solutions to problems that can occur during the installation and operation of the DI-LB604 QoS Router. We cover various aspects of the network setup, including the network adapters. Please read the following if you are having problems. Note: It is recommended that you use an Ethernet connection to configure the DI-LB604 QoS Router. The computer used to configure the DI-LB604 cannot access the Configuration menu.
DI-LB604 User’s Manual Troubleshooting To hard-reset the DI-LB604 to Factory Default Settings, please do the following: Locate the Reset button on the back of the DI-LB604. Use a paper clip to press the Reset button. Hold for about 10 seconds and then release. After the DI-LB604 reboots (this may take a few minutes) it will be reset to the factory Default settings.
DI-LB604 User’s Manual Technical Specifications Technical Specifications VPN Pass Through/ Multi-Sessions PPTP IPSec Device Management Web-Based- Internet Explorer v6 or later; Netscape Navigator v7 or later; or other Java-enabled browsers DHCP Server and Client Advanced Firewall Features NAT with VPN Passthrough (Network Address Translation) MAC Filtering URL Filtering Scheduling Operating Temperature 32ºF to 131ºF (0ºC to 55ºC) Humidity: 95% maximum (non-condensing) Safety and Emission
DI-LB604 User’s Manual Technical Specifications Power Input: Ext. Power Supply DC 5V, 3A Weight: 10.8 oz. (0.3kg) Warranty: 1 year D-Link Systems, Inc.
DI-LB604 User’s Manual Frequently Asked Questions Frequently Asked Questions 1 Why can’t I access the Web-based configuration? When entering the IP Address of the DI-LB604 (192.168.0.1), you are not connecting to the Internet or have to be connected to the Internet. The device has the utility builtin to a ROM chip in the device itself. Your computer must be on the same IP subnet to connect to the web-based utility. To resolve difficulties accessing a Web utility, please follow the steps below.
DI-LB604 User’s Manual Frequently Asked Questions What´s the difference between a crossover cable and a straight-through cable? The wiring in crossover and straight-through cables are different. The two types of cable have different purposes for different LAN configurations. EIA/TIA 568A/568B define the wiring standards and allow for two different wiring color codes as illustrated in the following diagram.
DI-LB604 User’s Manual Frequently Asked Questions Step 2: Disable any Internet security software running on the computer. Software firewalls like Zone Alarm, Black Ice, Sygate, Norton Personal Firewall, etc. might block access to the configuration pages. Check the help files included with your firewall software for more information on disabling or configuring it. Step 3: Configure your Internet settings. Go to Start>Settings>Control Panel. Double click the Internet Options Icon.
DI-LB604 User’s Manual Frequently Asked Questions Nothing should be checked. Click OK. Go to the Advanced tab and click the button to restore these settings to their defaults. Click OK. Go to the desktop and close any open windows. Step 4: Check your IP Address. Your computer must have an IP Address in the same range of the device you are attempting to configure. Most D-Link devices use the 192.168.0.X range. How can I find my IP Address in Windows 95, 98, or ME? Click on Start, then click on Run.
DI-LB604 User’s Manual Frequently Asked Questions The IP Configuration window will appear, displaying your Ethernet Adapter Information. Select your adapter from the drop down menu. If you do not see your adapter in the drop down menu, your adapter is not properly installed. After selecting your adapter, it will display your IP Address, subnet mask, and default gateway. Click OK to close the IP Configuration window. How can I find my IP Address in Windows 2000/XP? Click on Start and select Run.
DI-LB604 User’s Manual Frequently Asked Questions From the Command Prompt, enter ipconfig. It will return your IP Address, subnet mask, and default gateway. Type exit to close the command prompt. Make sure you take note of your computer´s Default Gateway IP Address. The Default Gateway is the IP Address of the D-Link router. By default, it should be 192.168.0.
DI-LB604 User’s Manual Frequently Asked Questions Click Specify an IP Address. Enter in an IP Address that is on the same subnet as the LAN IP Address on your router. Example: If the router´s LAN IP Address is 192.168.0.1, make your IP Address 192.168.0.X where X is between 2-99. Make sure that the number you choose is not in use on the network. Click on the Gateway tab. Enter the LAN IP Address of your router here (192.168.0.1). Click Add when finished. D-Link Systems, Inc.
DI-LB604 User’s Manual Frequently Asked Questions Click on the DNS Configuration tab. Click Enable DNS. Type in a Host (can be any word). Under DNS server search order, enter the LAN IP Address of your router (192.168.0.1). Click Add. Click OK twice. When prompted to reboot your computer, click Yes. After you reboot, the computer will now have a static, private IP Address. D-Link Systems, Inc.
DI-LB604 User’s Manual Frequently Asked Questions How can I assign a Static IP Address in Windows 2000? Right-click on My Network Places and select Properties. Right-click on the Local Area Connection which represents your network card and select Properties. Highlight Internet Protocol (TCP/IP) and click Properties. Click Use the following IP Address and enter an IP Address that is on the same subnet as the LAN IP Address on your router. Example: If the router´s LAN IP Address is 192.168.0.
Frequently Asked Questions DI-LB604 User’s Manual The Secondary DNS is not needed or enter a DNS server from your ISP. Click OK twice. You may be asked if you want to reboot your computer. Click Yes. How can I assign a Static IP Address in Windows XP? Click on Start > Control Panel > Network and Internet Connections > Network connections. See the second step for assigning a static IP address in Windows 2000 and continue from there. Step 5: Access the Web management.
DI-LB604 User’s Manual Frequently Asked Questions Step 2: Click the Home tab and click the WAN button. Dynamic IP Address is the default value, however, if Dynamic IP Address is not selected as the WAN type, select Dynamic IP Address by clicking on the radio button. Click on Apply and then Continue to save the changes. Step 3: Power cycle the cable modem and router. Turn the cable modem off (first) . Turn the router off Leave them off for 2 minutes.** Turn the cable modem on (first).
Frequently Asked Questions DI-LB604 User’s Manual Static Cable Connection Step 1: Log into the web based configuration by typing in the IP Address of the router (default:192.168.0.1) in your web browser. The username is admin (all lowercase) and the password is blank (nothing). Step 2: Click the Home tab and click the WAN button. Select Static IP Address and enter your static settings obtained from the ISP in the fields provided. If you do not know your settings, you must contact your ISP.
DI-LB604 User’s Manual Frequently Asked Questions 3 How can I setup my router to work with DSL or any PPPoE connection? Make sure you disable or uninstall any PPPoE software such as WinPoet or Enternet 300 from your computer or you will not be able to connect to the Internet. Step 1: Upgrade Firmware if needed. (Please visit the D-Link tech support website at: http://support.dlink.com for the latest firmware upgrade information.) Step 2: Take a paperclip and perform a hard reset.
DI-LB604 User’s Manual Frequently Asked Questions Step 9: Turn off your DSL modem for 2-3 minutes. Turn back on. Once the modem has established a link to your ISP, plug the power back into the D-Link router. Wait about 30 seconds and log back into the router. Step 10: Click on the Status tab in the web configuration where you can view the device info. Under WAN, click Connect. Click Continue when prompted.
DI-LB604 User’s Manual Frequently Asked Questions 4 Can I use my D-Link Broadband Router to share my Internet connection provided by AOL DSL Plus? In most cases yes. AOL DSL+ may use PPPoE for authentication bypassing the client software. If this is the case, then our routers will work with this service. Please contact AOL if you are not sure. To set up your router: Step 1: Log into the web-based configuration (192.168.0.1) and configure the WAN side to use PPPoE.
DI-LB604 User’s Manual Frequently Asked Questions Step 3: Check Enabled to activate entry. Step 4: Enter a name for your virtual server entry. Step 5: Next to Private IP, enter the IP Address of the computer on your local network that you want to allow the incoming service to. Step 6: Choose Protocol Type - either TCP or UDP. Step 7: Enter the port information next to Private Port and Public Port. The private and public ports are usually the same.
DI-LB604 User’s Manual Frequently Asked Questions 6 What is DMZ? Demilitarized Zone: In computer networks, a DMZ (demilitarized zone) is a computer host or small network inserted as a neutral zone between a company´s private network and the outside public network. It prevents outside users from getting direct access to a server that has company data. (The term comes from the geographic buffer zone that was set up between North Korea and South Korea following the UN police action in the early 1950s.
DI-LB604 User’s Manual Frequently Asked Questions Step 2: Log into the web based configuration of the router by typing in the IP Address of the router (default:192.168.0.1) in your web browser. The username is admin (all lowercase) and the password is blank (nothing) Step 3: Click the Advanced tab and then click on the DMZ button. Select Enable and type in the IP Address you found in step 1. Step 4: Click Apply and then Continue to save the changes.
DI-LB604 User’s Manual Frequently Asked Questions 8 How do I open a range of ports on my DI-LB604 using Firewall rules? Step 1: Access the router’s Web configuration by entering the router’s IP Address in your Web browser. The default IP Address is 192.168.0.1. Login using your password. The default username is “admin” and the password is blank. If you are having difficulty accessing Web management, please see the first question in this section.
Frequently Asked Questions DI-LB604 User’s Manual Because our routers use NAT (Network Address Translation), you can only open a specific port to one computer at a time. For example: If you have 2 web servers on your network, you cannot open port 80 to both computers. You will need to configure 1 of the web servers to use port 81. Now you can open port 80 to the first computer and then open port 81 to the other computer.
DI-LB604 User’s Manual Frequently Asked Questions Step 3: Enter the information as seen below. The Private IP is the IP Address of the computer on your local network that you want to connect to. Step 4: The first entry will read as shown above. Step 5: Click Apply and then click Continue. Step 6: Create a second entry as shown below: D-Link Systems, Inc.
DI-LB604 User’s Manual Frequently Asked Questions Step 7: Click Apply and then click Continue. Step 8: Run PCAnywhere from the remote site and use the WAN IP Address of the router, not your computer´s IP Address. 11 How can I use eDonkey behind my D-Link Router? You must open ports on your router to allow incoming traffic while using eDonkey.
DI-LB604 User’s Manual Frequently Asked Questions Step 3: Create a new firewall rule: Click Enabled. Enter a name (edonkey). Click Allow. Next to Source, select WAN under interface. In the first box, enter an *. Leave the second box empty. Next to Destination, select LAN under interface. Enter the IP Address of the computer you are running eDonkey from. Leave the second box empty. Under Protocol, select *. In the port range boxes, enter 4661 in the first box and then 4665 in the second box.
DI-LB604 User’s Manual Frequently Asked Questions 12 How do I configure my router for KaZaA and Grokster? The following is for KaZaA, Grokster, and others using the FastTrack P2P file sharing system. In most cases, you do not have to configure anything on the router or on the Kazaa software. If you are having problems, please follow steps below: Step 1: Enter the IP Address of your router in a web browser (192.168.0.1). Step 2: Enter your username (admin) and your password (blank by default).
DI-LB604 User’s Manual Frequently Asked Questions 13 How do I configure my router to play Warcraft 3? You must open ports on your router to allow incoming traffic while hosting a game in Warcraft 3. To play a game, you do not have to configure your router. Warcraft 3 (Battlenet) uses port 6112. Step 1: Open your web browser and enter the IP Address of your router (192.168.0.1). Enter username (admin) and your password (leave blank). Step 2: Click on Advanced and then click Virtual Server.
DI-LB604 User’s Manual Frequently Asked Questions You will need to change the port information within the Warcraft 3 software for computers #2 and up. Configure the Game Port information on each computer: Start Warcraft 3 on each computer, click Options > Gameplay. Scroll down and you should see Game Port. Enter the port number as you entered in the above steps. 14 How do I use NetMeeting with my D-Link Router? Unlike most TCP/IP applications, NetMeeting uses DYNAMIC PORTS instead of STATIC PORTS.
Appendix DI-LB604 User’s Manual Appendix Securing Your Network 1. Change Admin Password Changing the password to access your new router is the first step in securing your network. This can done through the Wizard or on the Admin Page of the Tools tab. There is no password by default and hackers will know this when trying to access your network. Make sure that the password you choose is not commonly known or something that is easy to guess such as your last name or your pet’s name.
DI-LB604 User’s Manual Appendix Glossary A Access Control List - ACL. Database of network devices that are allowed to access resources on the network. Access Point - AP. Device that allows wireless clients to connect to it and access the network Ad-hoc network - Peer-to-Peer network between wireless clients Address Resolution Protocol - ARP. Used to map MAC addresses to IP addresses so that conversions can be made in both directions.
DI-LB604 User’s Manual Appendix Broadcast – Transmitting data in all directions at once Browser – A program that allows you to access resources on the web and provides them to you graphically C Cable modem – A device that allows you to connect a computer up to a coaxial cable and receive Internet access from your Cable provider CardBus – A newer version of the PC Card or PCMCIA interface.
DI-LB604 User’s Manual Appendix Direct Sequence Spread Spectrum – DSSS. Modulation technique used by 802.11b wireless devices DNS – Domain Name System. Translates Domain Names to IP addresses DOCSIS – Data Over Cable Service Interface Specifications. The standard interface for cable modems Domain name – A name that is associated with an IP address Download – To send a request from one computer to another and have the file transmitted back to the requesting computer DSL – Digital Subscriber Line.
DI-LB604 User’s Manual Appendix H H.323 – A standard that provides consistency of voice and video transmissions and compatibility for videoconferencing devices Half-duplex – Data cannot be transmitted and received at the same time Hashing – Transforming a string of characters into a shorter string with a predefined length Hexadecimal – Characters 0-9 and A-F HomePNA – Networking over telephone lines HomeRF – Networking standard that combines 802.
DI-LB604 User’s Manual Appendix IPsec – Internet Protocol Security IPv6 – Internet Protocol Version 6 uses 128-bit addresses and was developed to solve the problem that we face of running out of IP version 4 addresses IPX – Internetwork Packet Exchange is a networking protocol developed by Novell to enable their Netware clients and servers to communicate ISP – Internet Service Provider J Java – A programming language used to create programs and applets for web pages K Kbps – Kilobits per second Kbyte -
DI-LB604 User’s Manual Appendix Multicast – Sending data from one device to many devices on a network N NAT – Network Address Translation allows many private IP addresses to connect to the Internet, or another network, through one IP address NetBEUI – NetBIOS Extended User Interface is a Local Area Network communication protocol.
DI-LB604 User’s Manual Appendix Preamble – Used to synchronize communication timing between devices on a network Q QoS – Quality of Service R RADIUS – Remote Authentication Dial-In User Service allows for remote users to dial into a central server and be authenticated in order to access resources on a network Rendezvous – Apple’s version of UPnP, which allows for devices on a network to discover each other and be connected without the need to configure any settings Repeater – Retransmits the signal of an
DI-LB604 User’s Manual Appendix TFTP – Trivial File Transfer Protocol is a utility used for transferring files that is simpler to use than FTP but with less features Throughput – The amount of data that can be transferred in a given time period Traceroute – A utility displays the routes between you computer and specific destination U UDP – User Datagram Protocol UNC – Universal Naming Convention allows for shares on computers to be identified without having to know what storage device it’s on Unicast – Comm
DI-LB604 User’s Manual Contacting Technical Support Contacting Technical Support You can find software updates and user documentation on the D-Link website. D-Link provides free technical support for customers within the United States and within Canada for the duration of the warranty period on this product. U.S. and Canadian customers can contact D-Link technical support through our web site, or by phone.
DI-LB604 User’s Manual Getting Started Warranty Subject to the terms and conditions set forth herein, D-Link Systems, Inc. (“D-Link”) provides this Limited warranty for its product only to the person or entity that originally purchased the product from: · D-Link or its authorized reseller or distributor and · Products purchased and delivered within the fifty states of the United States, the District of Columbia, U.S. Possessions or Protectorates, U.S. Military Installations, addresses with an APO or FPO.
DI-LB604 User’s Manual Warranty Warranty as described herein, notwithstanding anything stated herein to the contrary. Submitting A Claim: The customer shall return the product to the original purchase point based on its return policy.
DI-LB604 User’s Manual Warranty Limitation of Liability: TO THE MAXIMUM EXTENT PERMITTED BY LAW, D-LINK IS NOT LIABLE UNDER ANY CONTRACT, NEGLIGENCE, STRICT LIABILITY OR OTHER LEGAL OR EQUITABLE THEORY FOR ANY LOSS OF USE OF THE PRODUCT, INCONVENIENCE OR DAMAGES OF ANY CHARACTER, WHETHER DIRECT, SPECIAL, INCIDENTAL OR CONSEQUENTIAL (INCLUDING, BUT NOT LIMITED TO, DAMAGES FOR LOSS OF GOODWILL, LOSS OF REVENUE OR PROFIT, WORK STOPPAGE, COMPUTER FAILURE OR MALFUNCTION, FAILURE OF OTHER EQUIPMENT OR COMPUTER
DI-LB604 User’s Manual Warranty FCC Caution: Any changes or modifications not expressly approved by the party responsible for compliance could void the user’s authority to operate this equipment. IMPORTANT NOTE: FCC Radiation Exposure Statement: This equipment complies with FCC radiation exposure limits set forth for an uncontrolled environment. This equipment should be installed and operated with minimum distance 20cm between the radiator & your body.
Registration DI-LB604 User’s Manual Registration Product registration is entirely voluntary and failure to complete or return this form will not diminish your warranty rights. 10/10/2005 D-Link Systems, Inc.