D-Link DBT-120 Bluetooth USB Adapter Manual Version 3.
Contents Package Contents .............................................................. 4 Introduction ..................................................................... 5 Installing the Bluetooth Software ....................................... 6 Using the Bluetooth Configuration Wizard .......................... 10 Introduction to Bluetooth Software .................................. Bluetooth Tray ................................................ Access My Bluetooth Places ............................
Contents (cont’d) Bluetooth Configuration (cont’d) Dial-up Networking .......................................... 27 Fax ................................................................ 28 Headset .......................................................... 28 File Transfer.................................................... 29 Network Access ................................................ 31 PIM ............................................................... 32 Printer .....................................
Package Contents These items are included with your purchase: • D-Link DBT-120 USB Bluetooth Adapter • USB Extension Cable • Installation CD with Driver, Manual, & Bluetooth Software • Installation Guide If any of the above items are missing, please contact your reseller. System Requirements • • • Windows XP/Me/2000/98SE or Macintosh OS X v10.
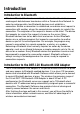
Introduction Introduction to Bluetooth The term “Bluetooth” refers to a worldwide standard for the wireless exchange of data between two devices within a Personal Area Network. In order to exchange data, two Bluetooth devices must establish a connection. Before a connection is established, one device must request a connection with another, where the second device accepts (or rejects) the connection. The originator of the request is known as the client.
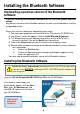
Installing the Bluetooth Software Uninstalling a previous version of the Bluetooth software: If you are installing the Bluetooth software for the first time, please skip this section. Any previous versions of the Bluetooth software must be uninstalled before installing an upgraded version. Please uninstall the software by completing these steps: 1) Close any open programs and insert the Driver CD into your CD-ROM Drive. 2) The Autorun screen will appear. Click on Install Bluetooth Software.
Installing the Bluetooth Software Click Next Click Accept Click Next Click Next 7 (cont’d)
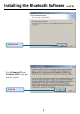
Installing the Bluetooth Software Click Install Only Windows XP and Windows 2000 Users will see this screen.
Installing the Bluetooth Software (cont’d) When this screen appears, connect the DBT-120 to an available USB port on your USB host adapter or USB hub. Click OK A 32-digit security code is included with your DBT-120 and is located on the back flap of your driver CD cover *. Carefully enter the security code to access the software**. Click OK *If you have misplaced or lost the security code included with your DBT-120, you can obtain the security code from this site: http://66.45.42.85/dlink/.
Installing the Bluetooth Software Click Finish Only Windows 2000, Windows Me, and Windows 98SE Users will see this screen. Click Yes Using the Bluetooth Configuration Wizard After you have completed the driver and software installation and reboot your computer, a Bluetooth icon will appear on your desktop and in the bottom right hand corner of your desktop screen (systray). The Bluetooth icon gives you access to My Bluetooth Places, for configuring your Bluetooth settings.
Using the Bluetooth Configuration Wizard (cont’d) The Bluetooth Configuration Wizard launches the first time that you double click on My Bluetooth Places. Click Next Type a unique name for your Computer.
Using the Bluetooth Configuration Wizard Select the Services that your DBT120 will provide to other Bluetooth products. Click Next You can choose to configure your other Bluetooth devices at this point. Otherwise, click Skip to finish the configuration for your DBT-120.
Introduction to the Bluetooth Software Bluetooth Tray The Bluetooth tray resides in the Windows system tray, which is normally located in the lower-right corner of the screen. The Bluetooth tray provides fast access to most Bluetooth operations. From the Bluetooth tray you can: · Access My Bluetooth Places—double-click the Bluetooth icon, or right-click the Bluetooth icon and then select Explore My Bluetooth Places. · Access the Bluetooth Setup Wizard.
Introduction to the Bluetooth Software (cont’d) Icons Used for Bluetooth Devices and Services Bluetooth icons provide at-a-glance feedback about a device or service’s status by changing appearance. The Bluetooth icon in the Windows system tray provides feedback about Bluetooth status.
Introduction to the Bluetooth Software (cont’d) Icons Used for Bluetooth Devices and Services (cont’d) Name Audio Gateway Service Icons for Windows 9x, Me and 2K Normal Connected Not Available* Dial-up Networking Fax Headset Network Access PIM Item Transfer PIM Synchronization Public Folder Serial Port *Services may be unavailable because they are in use or because the necessary hardware is not installed.
Introduction to the Bluetooth Software (cont’d) Icons Used for Bluetooth Devices and Services (cont’d) Figure 5: Service Icons for Windows XP Name Audio Gateway Service Icons for Windows XP Normal Connected Not Available* Dial-up Networking Fax Headset Network Access PIM Item Transfer PIM Synchronization Public Folder Serial Port *Services may be unavailable because they are in use or because the necessary hardware is not installed.
Bluetooth Software Basic Operations Start or Stop Bluetooth To start Bluetooth: in the Windows system tray, right-click the Bluetooth icon and select Start the Bluetooth Device. The Bluetooth icon is blue in color with a white insert when Bluetooth is running. To stop Bluetooth: in the Windows system tray, right-click the Bluetooth icon and select Stop the Bluetooth Device. The Bluetooth icon is blue in color with a red insert when Bluetooth is stopped.
Bluetooth Software Basic Operations (cont’d) Create a Connection From Entire Bluetooth Neighborhood From Windows Explorer: • In the Folders pane, select Entire Bluetooth Neighborhood, right-click a device name and select “Connect …” the desired service.
Bluetooth Software Basic Operations (cont’d) Find A Service The process of determining the services that a device provides is called Service Discovery. To initiate a Service Discovery, in the Folders pane of My Bluetooth Places, right-click a device name and select Discover Available Services from the shortcut menu. Bluetooth services are those things that this computer can do for remote Bluetooth devices.
Bluetooth Software Basic Operations (cont’d) • PIM Synchronization—allows two Bluetooth devices to synchronize Personal Information Manager data. • Network Access—allows a device to access a Local Area Network via a second Bluetooth device that is physically connected to the network or allows a remote device to become part of an ad hoc network provided by the Bluetooth server.
Bluetooth Software Basic Operations (cont’d) Send to Bluetooth This feature is used to send information to another Bluetooth device. Data types include: • Files from Windows Explorer • Documents from Microsoft Office applications, including: • Word • • • • Excel Access PowerPoint. Microsoft Outlook items, including: • • • • • Contacts Appointments Tasks Messages Notes. To use Send to Bluetooth 1. In the application: a) Windows Explorer—select one or more files to be transferred.
Bluetooth Configuration Access the Bluetooth Configuration Panel The Bluetooth Configuration Panel provides access to settings for Bluetooth services, client applications, hardware, security, discovery, accessibility, default paths, event notification and other Bluetooth related items.
Bluetooth Configuration (cont’d) Applications > Overview General Configuration Settings General Configuration Settings The settings on the General tab of the Bluetooth Configuration Panel determine information that is displayed to remote devices. Identity • Computer Name-enter a unique name to identify this computer to other Bluetooth devices in the vicinity; this field cannot be left blank.
Bluetooth Configuration (cont’d) Applications > Human Interface Device (HID) General Configuration All of the built-in Bluetooth applications allow you to rename the application and to require a secure connection when using the application.
Bluetooth Configuration (cont’d) Applications > HID, Audio Gateway NOTE: HIDs usually have a button, which is sometimes difficult to find, that must be pressed before other Bluetooth devices can locate the HID. Even after the button is pressed, the HID can only be discovered for a limited time, and then the button must be pressed again. The time period can be as short as 30 seconds or as long as 180 seconds. Read the documentation that accompanies the HID before you attempt to connect to the device.
Bluetooth Configuration (cont’d) Applications > Serial Port Configure The Bluetooth Configuration Panel > Client Applications > Audio Gateway > General tab provides options to configure: • The application name—to change it, highlight the existing name and enter the new name. • Enable or disable secure connection. To enable secure connection, place a checkmark in the box.
Bluetooth Configuration (cont’d) Applications > Dial-up Networking Dial-up Networking Overview The Bluetooth Dial-up Networking application allows this computer to use a modem that is physically connected to a remote device to access the Internet, log on to a remote network.
Bluetooth Configuration (cont’d) Applications > Fax, Headset Fax Overview The Bluetooth Fax service allows this computer to send a fax using a Fax/ Modem that is physically connected to a remote device. To Send a Fax 1. Open a connection to the Fax service that is provided by another Bluetooth device, using one of these techniques: • • • Windows system tray, Bluetooth icon From My Bluetooth Places Using the Bluetooth Setup Wizard 2.
Bluetooth Configuration (cont’d) Applications > Headset, File Transfer Create a Headset connection Establish a connection using one of these techniques: • Windows system tray, Bluetooth icon • • From My Bluetooth Places Using the Bluetooth Setup Wizard NOTE: Most Bluetooth headsets “ring” when a connection is attempted; answer the ring to complete the connection and begin using the headset as the audio input/output device for this computer.
Bluetooth Configuration (cont’d) Applications > File Transfer (cont’d) Use drag-and-drop to copy any file or folder contained in the Public Folder of the remote device to the desired folder on this computer. You can also drag-and-drop files or folders from this computer to the Public Folder (and its sub-folders) of the remote device. Other file operations Right-click a file or folder in the remote device’s Public Folder for a context sensitive menu.
Bluetooth Configuration (cont’d) Applications > Network Access Network Access Overview The Bluetooth Network Access application makes it possible for this computer: • To connect to a Local Area Network via a physical connection on a remote Bluetooth device. or • To connect to an ad hoc network provided by a remote Bluetooth device. The type of network connection that is available is determined by the configuration of the remote Bluetooth device.
Bluetooth Configuration (cont’d) Applications > PIM PIM Synchronization Overview The PIM Synchronization Application is used to synchronize the Personal Information Manager (PIM) database of this computer with the PIM database of a remote Bluetooth device. The supported PIMs are: • Microsoft Outlook • Microsoft Outlook Express • Lotus Notes. The supported data types are: • Business cards • Calendar items • Email (with or without attachments) • Notes.
Bluetooth Configuration (cont’d) Applications > PIM (cont’d) • Synchronize Microsoft Outlook-this item type will be synced with its matching entry in Microsoft Outlook, regardless of the PIM that contains this entry on the remote device. If a matching Outlook entry does not exist, it will be created • Synchronize Outlook-Express-this item type will be synced with its matching entry in Express, regardless of the PIM that contains this entry on the remote device.
Bluetooth Configuration (cont’d) Applications > PIM (cont’d) 2. From Windows Explorer, My Bluetooth Places, highlight the PIM Item Transfer service on a remote device, and then, from the Bluetooth menu on the Windows menu bar, select the appropriate action. In addition to the business card options listed above, you can also send Notes (*.vnt), Email (*.vmg) and Calendar (*.vcs) items from this menu. 3.
Bluetooth Configuration (cont’d) Applications > Printer NOTE: The selected Received Business Cards option does not influence the settings on other PIM-related property pages. For example, even if the PIM Item Transfer service business card option on this computer is configured to “Do Not Accept,” the PIM Item Transfer application will still accept business cards that the application has specifically requested via its “Receive” or “Exchange” functions. • Email attachments.
Bluetooth Configuration (cont’d) Bluetooth Services Option Two: 1. From the Windows Control Panel, select Printers > Add Printer > Next > Local printer > Next 2. On the Select the Printer Port screen of the wizard: a) Select Create a new port b) In the Type shortcut menu, select Bluetooth Printer Port, and then click Next 3. On the next screen, select the printer by name, and then click Connect. 4. Install the driver: when asked to select a printer make and model, do so.
Bluetooth Configuration (cont’d) Services > Notifications Notifications Overview There are three types of notification: • Authentication request, also called a PIN code request—this notification appears automatically in a balloon over the Windows system tray if a Personal Identification Code is required before a connection can proceed. An audio file can also be associated with the notification.
Bluetooth Configuration (cont’d) Services > Notifications, Audio Gateway After two devices are paired (step 1, above), the authentication notification will no longer appear when a connection is attempted. If “Always allow…” is enabled during the authorization process (step 2, above), the authorization notification will not appear on future connection attempts. Connection notification (step 3, above) only happens if it has been enabled on the Notifications tab of the individual service being accessed.
Bluetooth Configuration (cont’d) Services > Bluetooth Serial Port Bluetooth Serial Port The Bluetooth Serial Port service allows a remote Bluetooth device to establish a wireless serial connection with this computer. The wireless serial connection may be used by applications as though a physical serial cable connected the devices. To establish a Bluetooth Serial Port connection The connection must be initiated from the remote device by the Bluetooth Serial Port application.
Bluetooth Configuration (cont’d) Services > Dial-up, Fax, File Transfer Dial-up Networking Service The Bluetooth Dial-up Networking service makes it possible for a remote Bluetooth device to use a modem that is physically connected to this computer. The remote device can then access the Internet or log on to a remote network.
Bluetooth Configuration (cont’d) Services > Headset NOTE: “Public Folder” is not available, the remote device is not configured to allow remote file operations. Use drag-and-drop to copy any file or folder contained in the Public Folder of the remote device to the desired folder on this computer. You can also drag-and-drop files or folders from this computer to the Public Folder (and its sub-folders) of the remote device.
Bluetooth Configuration (cont’d) Services > Network Access Network Access The Bluetooth Network Access service makes it possible for a remote Bluetooth device to access a Local Area Network that is physically attached to this computer or allows a remote device to become part of an ad hoc network provided by this computer.
Bluetooth Configuration (cont’d) Services > Network Access, PIM 4. Right-click Local Area Connection, select Properties and then select the Sharing tab. 5. Select Enable Internet Connection Sharing for this connection, click OK, and then click YES in the confirmation dialog box. Configure for Group Ad Hoc Networking: 1. From the Windows system tray, right-click the Bluetooth icon and select Advanced Configuration from the shortcut menu. 2.
Bluetooth Configuration (cont’d) Services > PIM (cont’d) Configure In addition to the configuration options common to all Bluetooth services, this service also has settings that determine: • How business card requests are handled. The options are: • • Never send my business card—ignore the request • Always send the same business card—when a request is received always send the same business card.
Bluetooth Configuration (cont’d) Services > PIM (cont’d) Default Business Card Selection When the “Always send the same business card” option is selected, a dialog box appears to allow the selection of a default business card. The first time the dialog box appears it provides a way to choose the Personal Information Manager that stores the default business card. Click the downarrow in the PIM shortcut menu and select the PIM to be used.
Bluetooth Configuration (cont’d) Services > PIM (cont’d) PIM Synchronization The PIM Synchronization service can be used by a remote device to synchronize its Personal Information Manager (PIM) database with the PIM database of this computer.. Four data types are supported: • • • • Business cards Calendar items Email messages Notes Whether an individual item is accepted and where it is stored, when accepted, is configured in the PIM Item Transfer service.
Bluetooth Configuration (cont’d) Hardware Settings The Hardware tab of the Bluetooth Configuration Panel provides basic information about the Bluetooth hardware installed on this computer and access to the Advanced Settings dialog box, if required: • Devices: • Name: the name of the device, e.g., WIDCOMM Bluetooth Device • • • Type: the type of device, e.g., USB. Device Properties: • Device status: indicates that the device is operating properly or that there is a problem/conflict.
Bluetooth Configuration (cont’d) Advanced Settings When available, this dialog box is reached from the Hardware tab of the Bluetooth Configuration Panel. NOTE: Depending on the country in which the hardware is sold and/or in which it will be used, the Advanced button may not be present. From this dialog box you can set the: • Country Code: • • • North America, Europe (except France), and Japan France and China Maximum Transmission Power: • • • High Medium Low Click Apply to implement the changes.
Bluetooth Configuration (cont’d) Accessibility Settings The Accessibility tab of the Bluetooth Configuration Panel lets you specify whether remote devices may access this computer, which remote devices have access, and whether an audio warning is played when a Personal Identification Number (PIN code) is required. Allow other devices to discover this computer Select “Let other Bluetooth devices discover this computer” to permit remote Bluetooth devices to find and report this computer.
Bluetooth Configuration (cont’d) Accessibility Settings (cont’d) Add a device to the list 1. Click Add Device 2. In the Devices with access... dialog box select the desired device(s) and click OK. NOTE: Multiple devices may be selected using SHIFT + click and/or CTRL + click. Delete a device from the list In the list of devices allowed to access this computer, select the device to be removed from the list, and then click Delete.
Bluetooth Configuration (cont’d) Discovery Settings (cont’d) Discover Specific Devices The type of device(s) that this computer looks for and reports when it is searching for other Bluetooth devices can be limited. Limit the remote devices reported Bluetooth can report only specific devices, specific class(es) of device(s), or specific type(s) of device(s) within a class. • Specific devices: an individual computer or Bluetooth cellular telephone are examples of specific devices.
Security Authentication Authentication is used to verify identity; it requires a passkey or link key from the remote device. When a remote device attempts access, a visual and/or audio warning notifies the local operator. If the notification is ignored, access is denied after a preset timeout. When devices are “paired,” those devices automatically exchange a link key and Authentication is carried out without operator intervention.
Security (cont’d) Pairing Devices Pairing allows you to avoid entering access information each time a connection is attempted. Paired devices share a unique link key, which they exchange each time they connect. NOTE: The mate of a pair always appears in My Bluetooth Places, even if the mate is not turned on or is out of connection range. Paired devices remain paired even when • One of the devices is not on • • A service connection is interrupted or the service stopped One or both devices are rebooted.
Troubleshooting Cannot discover/detect the DBT-120. If the screen “No Local Bluetooth Device was detected” appears and you have checked that your DBT-120 is connected and configured correctly, the software code may not have been entered correctly. To change the security code, go to C:\Program Files\WIDCOMM\Bluetooth Software\bin\BTFaeSec.exe and double click on BTFaeSec. Carefully enter the security code in the dialog box and click OK.
Troubleshooting (cont’d) Determine the Bluetooth Device Address (BDA) of my hardware device In the Bluetooth Configuration Panel, on the Hardware tab, in the Devices section, select the device you want to determine the address of. In the Device Properties section of the dialog box, the fourth entry, Device Address, is the BDA of the selected Bluetooth device.
Troubleshooting (cont’d) Internet Connection Sharing Does Not Work 2. Re-enable Sharing for the Ethernet adapter; repeat Step 1.c.), and select (check) the sharing box. If offered an option to select an adapter, select “Bluetooth network adapter.” (This option will not appear unless more than one adapter is available.) If asked to reboot the computer, do so.
Technical Support You can find software updates and user documentation on the D-Link website. D-Link provides free technical support for customers within the United States and within Canada for the duration of the warranty period on this product. U.S. and Canadian customers can contact D-Link technical support through our website, or by phone. Tech Support for customers within the United States: D-Link Technical Support over the Telephone: (877) 453-5465 24 hours a day, seven days a week.
Subject to the terms and conditions set forth herein, D-Link Systems, Inc. (“D-Link”) provides this Limited warranty for its product only to the person or entity that originally purchased the product from: • • D-Link or its authorized reseller or distributor and Products purchased and delivered within the fifty states of the United States, the District of Columbia, U.S. Possessions or Protectorates, U.S. Military Installations, addresses with an APO or FPO.
Submitting A Claim: The customer shall return the product to the original purchase point based on its return policy. In case the return policy period has expired and the product is within warranty, the customer shall submit a claim to D-Link as outlined below: • The customer must submit with the product as part of the claim a written description of the Hardware defect or Software nonconformance in sufficient detail to allow D-Link to confirm the same.
Limitation of Liability: TO THE MAXIMUM EXTENT PERMITTED BY LAW, D-LINK IS NOT LIABLE UNDER ANY CONTRACT, NEGLIGENCE, STRICT LIABILITY OR OTHER LEGAL OR EQUITABLE THEORY FOR ANY LOSS OF USE OF THE PRODUCT, INCONVENIENCE OR DAMAGES OF ANY CHARACTER, WHETHER DIRECT, SPECIAL, INCIDENTAL OR CONSEQUENTIAL (INCLUDING, BUT NOT LIMITED TO, DAMAGES FOR LOSS OF GOODWILL, LOSS OF REVENUE OR PROFIT, WORK STOPPAGE, COMPUTER FAILURE OR MALFUNCTION, FAILURE OF OTHER EQUIPMENT OR COMPUTER PROGRAMS TO WHICH DLINK’S PRODUCT