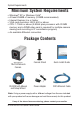
System Requirements Minimum System Requirements • • • • • Windows® XP or Windows Vista® At least 256MB of memory (512MB recommended) Internet Explorer 6.x or higher VGA card resolution: 800 x 600 or above CPU: 1.7GHz or above (2.
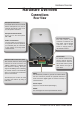
Hardware Overview Hardware Overview Connections Rear View Microphone Connector The DCS-3415 has an internal built-in microphone. To use an external microphone, plug it into the microphone connector. Microphone On/Off Switch Select to turn the microphone On or Off. DC Power Connector The DC power input connector is located on the back panel. This is labeled “12V DC” with a single socket to supply power to the Network Camera. Audio Out Connector Use the Audio Out connector for 2-way audio connection.
Hardware Overview LEDs Front View LED and Built-in Microphone Status LED Blinking Red: indicates power is being supplied to the camera. Solid Green: indicates that a connection has been established via Ethernet port. Built-in Microphone Blinking Green: indicates Ethernet traffic in the camera. If the Ethernet connection is not established the Status LED will not be lit. Compact Flash Card Slot CF card slot CompactFlash (CF) is a mass storage device format used in portable electronic devices.
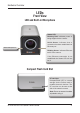
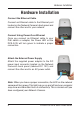
Hardware Installation Hardware Installation Connect the Ethernet Cable Connect an Ethernet cable to the Ethernet port located on the Network Camera’s back panel and connect the other end to your network. Connect Using Power-Over-Ethernet Once you connect an Ethernet cable to your PoE switch or adapter, the Power LED on the DCS-3415 will turn green to indicate a proper connection.
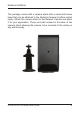
Hardware Installation The package comes with a camera stand with a swivel ball screw head that can be attached to the Network Camera’s bottom socket cavity. Attach the camera stand to the Network Camera and place it for your application. There are holes located in the base of the camera stand allowing the camera to be mounted to the ceiling or any wall securely.
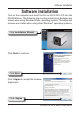
Software Installation Software Installation Turn on the computer and insert the D-Link DCS-3415 CD into the CD-ROM drive. The following step-by-step instructions displayed are shown when using Windows Vista® operating system. The steps and screens are similar when using other Windows® operating systems. Click Installation Wizard Click Next to continue. Click Next Click I Agree to accept the License Agreement.
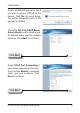
Software Installation To start the installation click Install. Note: The installation may take several minutes to complete. Click Install Click Finish to complete the installation.
Configuration Configuring Your Camera with the Installation Wizard Click on the D-Link Installation Wizard icon that was created in your Windows Start menu. The Installation Wizard will appear and show the MAC address of your DCS-3415 and an IP Address (which may or may not be correct depending on what you have your DCS-3415 connected to). If you have a DHCP server on your network, there will be a valid IP Address displayed here.
Configuration A new window will pop up to ask if you want to setup a PPPoE for the device. Click No for quick setup. For further information refer to the manual for details. Check the Get IP by DHCP Server Automatically box to obtain a new IP address every time the camera starts up. Click Next to continue. Click Next Select UPnP Port Forwarding if your router supports this function. If not, choose Manual to manually enter your port numbers. Click Next to continue.
Configuration Click Next to continue. Click Next A window will pop up asking you if you want to access the DCS-3415 via mobile phone. Clicking Yes will set the video resolution to 176x144. Click Apply to save and activate the settings listed in the window to the device. Application may take a few minutes to process.
Configuration A window will pop up to confirm that the application was successfully configured. Click OK to continue. A new window will pop up displaying the links/addresses to access your device. Click Add to my favorite to save the address and then click Exit to complete the installation. Click Exit Double-click the DCS-3415 to launch the camera’s web configuration page. Note: Please refer to the user manual for more information.
Configuration Enter admin as the default username and leave the password blank. Click OK to continue. This section shows your camera’s live video. You can control your settings using the buttons at the bottom. For more information on using the web configuration, please refer to the user manual.
D-ViewCam Installation D-ViewCam Installation D-ViewCam software is included for the administrator to manage up to 32 D-Link IP cameras remotely. The administrator can use the software to configure the advanced settings for the camera. D-ViewCam is a complete management tool and includes all configurative settings. Insert the CD-ROM into the CD-ROM drive. A menu screen will appear as shown below. Click D-ViewCam D-ViewCam provides English, Traditional Chinese and Simplified Chinese language versions.
D-ViewCam Installation Click Next to continue. Click Next Click Browse if you would like to choose a specific folder for the installation, otherwise click Next to continue. Click Next Click Next to start the installation. Note: The D-ViewCam installation process may take several minutes to complete.
D-ViewCam Installation Click Finish to complete the installation.
Adding a Camera Add a Camera To start D-ViewCam, click on Start > All Programs > D-Link > D-Link D-ViewCam. Use admin as the default user name and leave the password blank. Click the (Check Box) to continue. Click The D-ViewCam screen will appear as shown below. Click (Next) to begin the Add Camera wizard.
Adding a Camera Choose either to add camera(s) by automatically searching for camera(s) or to add camera(s) manually. If you select Auto Discovery, the system will search all available cameras that are located in the same subnet within the same LAN. The system will place all found cameras under the default map called My Map. Click Next to continue. If you choose Add Manually, you will need to enter the IP address of the camera. Click Next to continue.
Adding a Camera D-ViewCam shows the detected IP camera(s) information. You can choose and schedule the recording for each camera(s). • 24/7 Continuous Recording: Continuously record 24 hours a day, 7 days a week. • 24/7 Motion Detection Recording: Continuously monitor, but ONLY record when motion is detected. • Office Hours Only: Continuously monitor during office hours (08:00 AM to 06.00 PM), and ONLY record when motion is detected.
D-ViewCam Installation Select Yes to add another camera, or select No to continue. Note: After you have finished adding your camera(s), click Close to view your camera(s).
Notes Notes 21 D-Link DCS-3415 Quick Install Guide
Notes Notes D-Link DCS-3415 Quick Install Guide 22
Notes Notes 23 D-Link DCS-3415 Quick Install Guide
Technical Support D-Link’s website contains the latest user documentation and software updates for D-Link products. U.S. and Canadian customers can contact D-Link Technical Support through our website or by phone. United States Telephone (877) 453-5465 World Wide Web http://support.dlink.com Canada Telephone (800) 361-5265 World Wide Web http://support.dlink.com Version 1.00 May 20, 2008 625005800G Copyright ©2008 D-Link Corporation/D-Link Systems, Inc. All rights reserved.