Version 1.
Manual Overview D-Link reserves the right to revise this publication and to make changes in the content hereof without obligation to notify any person or organization of such revisions or changes. Information in this document may become obsolete as our services and websites develop and change. Please refer to the www.mydlink.com website for the most current information. Manual Revisions Revision Date 1.0 November 04, 2010 Description DCS-932L Revision A1 with firmware version 1.
Table of Contents Table of Contents Manual Overview............................................................... 2 Manual Revisions........................................................................... 2 Trademarks...................................................................................... 2 Product Overview............................................................... 5 Package Contents.......................................................................... 5 System Requirements.......
Table of Contents Wireless Security..............................................................42 What is WEP?.................................................................................42 What is WPA?.................................................................................43 Configuring the DCS-932L with a Router....................44 Troubleshooting...............................................................50 Wireless Basics..............................................................
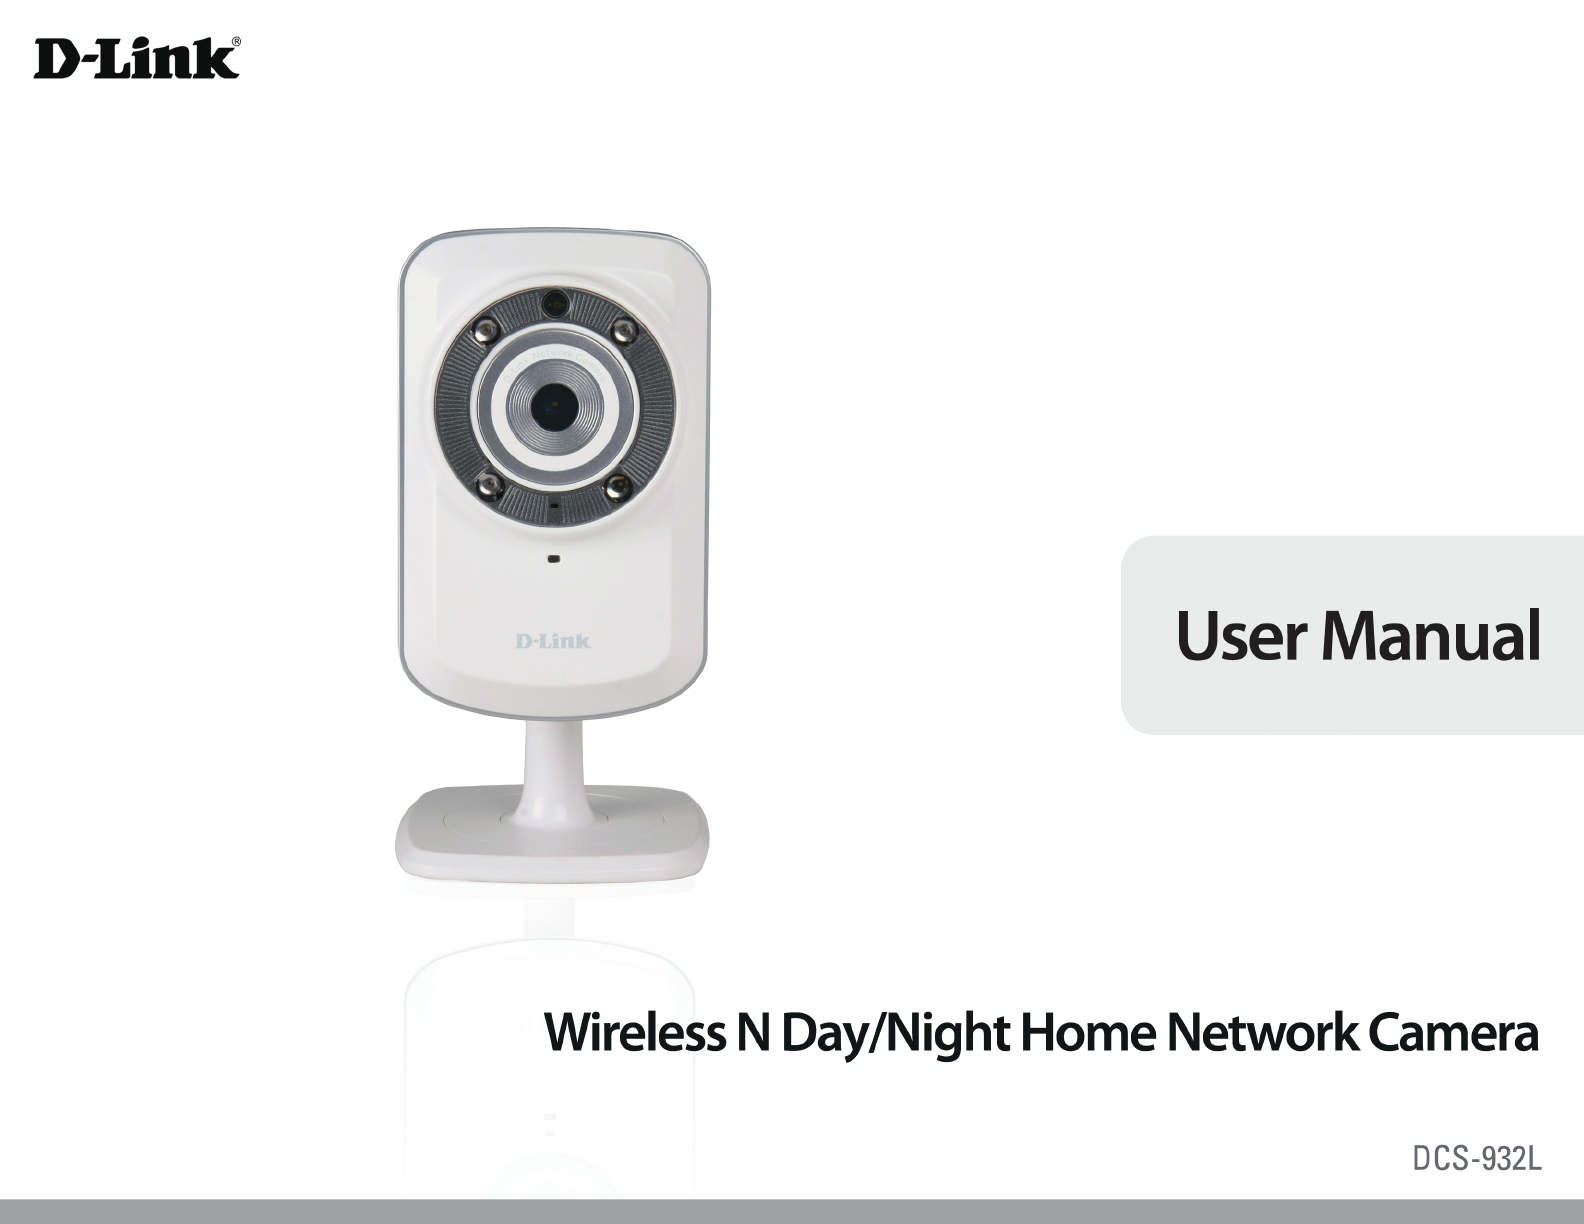
Section 1 - Product Overview Product PackageOverview Contents • • • • • • DCS-932L Wireless N Day/Night Home Network Camera CAT5 Ethernet Cable Power Adapter Manual and Software on CD Quick Install Guide Mounting Kit Note: Using a power supply with a different voltage than the one included with your product will cause damage and void the warranty for this product. If any of the above items are missing, please contact your reseller.
Section 1 - Product Overview Introduction Congratulations on your purchase of the DCS-932L Wireless N Day/Night Home Network Camera. The DCS-932L is a versatile and unique solution for your small office or home. Unlike a standard webcam, the DCS-932L is a complete system with a builtin CPU and web server that transmits high quality video images for security and surveillance. The IR LED provides around the clock surveillance regardless of the lighting conditions.
Section 1 - Product Overview Features Simple to Use The DCS-932L is a stand-alone system with a built-in CPU, requiring no special hardware or software such as PC frame grabber cards. The DCS-932L supports both ActiveX mode for Internet Explorer and Java mode for other browsers such as Firefox® and Safari®. Supports a Variety of Platforms Supporting TCP/IP networking, HTTP, and other Internet related protocols.
Section 1 - Product Overview Hardware Overview Front View Light Sensor IR LED Camera Lens Microphone Power and Link LED D-Link DCS-932L User Manual 8
Section 1 - Product Overview Rear View Power Receptor Ethernet Port Reset WPS LED WPS Button Camera Stand D-Link DCS-932L User Manual 9
Section 2 - Installation Installation Hardware Installation Connect the Ethernet Cable Connect the included Ethernet cable to the network cable connector located on the back panel of the DCS-932L and attach it to the network. Attach the External Power Supply Attach the external power supply to the DC Power receptor located on the rear back panel of the DCS-932L and connect it to your wall outlet or power strip.
Section 2 - Installation Wireless Installation Considerations The D-Link Wireless Network Camera lets you access your network using a wireless connection from anywhere within the operating range of your wireless network. However, the number, thickness and location of walls, ceilings, or other objects that the wireless signals must pass through, may limit the range. Typical ranges vary depending on the types of materials and background RF (radio frequency) noise in your home or business.
Section 2 - Installation Camera Installation Wizard Insert the Installation CD-ROM into your computer’s optical drive to start the autorun program. The CD-ROM will open the Camera Installation Wizard. Simply click Start to go through the Installation Wizard, which will guide you through the installation process from connecting your hardware to configuring your camera.
Section 2 - Installation WPS - Push Button Setup Alternatively, you may create a secure wireless connection using the WPS Button on the back of the camera. To create a WPS connection: Step 1 Press and hold the WPS button for three seconds. The blue WPS status LED above the button will blink. Step 2 Press the WPS button on your router within 60 seconds. The WPS button is usually on the front or side of your router.
Section 3 - mydlink Portal mydlink Portal After registering your DCS-932L camera with a mydlink account in the Camera Installation Wizard. You will be able to remotely access your camera from the www.mydlink.com website.
Section 3 - mydlink Portal Camera Status Here, you can see the online status of each of your cameras. Your online status may be one of the following: A green checkmark indicates that your camera is online and ready to use. A yellow exclamation point indicates that your camera is online, but the camera password has changed. You will need to enter your new camera password to access your camera again. A red x indicates that your camera is offline and currently cannot be accessed remotely.
Section 3 - mydlink Portal Live Video In the main part of the screen, the Live Video tab will be selected by default. If the camera is available, a Live Video feed will be displayed. Video will be shown at VGA resolution (640x480) if viewing your camera from a PC on the same local network, or at QVGA resolution (320x240) if viewing your camera from a PC on a remote network.
Section 3 - mydlink Portal Camera Settings The Camera Settings tab allows you to access your camera’s configuration interface. To open your camera’s configuration interface, click Camera web page and enter the password exactly as listed on the Camera Settings page.
Section 3 - mydlink Portal Camera Info The Camera Info tab shows you various information about your camera. Device Name: The Device Name is a unique name that you can give to your device to help you identify it. Clicking on the Device Name will open a window for you to log in to your camera’s configuration interface. Then, it will open the Maintenance > Admin page where you can change your Device Name. Camera Password: Displays the current password for your camera’s configuration interface.
Section 4 - Web Configuration WEB Configuration Using the WEB Configuration Menu After completing the Camera Installation Wizard, you are ready to use your camera. The camera’s built-in Web configuration utility is designed to allow you to easily access and configure your DCS-932L. At the end of the wizard, click Go To Camera, or enter the IP address of your camera into a web browser, such as Internet Explorer®. To log in, use the User name admin and the password you created in the Installation Wizard.
Section 4 - Web Configuration Please make sure that you have the latest version of Java application installed on your computer to ensure proper operation when viewing the video in Java mode. The Java application can be downloaded at no cost from Sun’s web site (http://www.java.com). When you connect to the home page of your camera, you will be prompted to download ActiveX. If you want to use ActiveX to view your video images instead of Java, then you must download ActiveX.
Section 4 - Web Configuration Live Video ActiveX: For Windows® Users that do not have Java installed, please choose this option to view video streaming on the Live Video page. Java: Select Java when using other Internet browsers such as Safari, Firefox or Chrome that support Java to view video streaming on the live video page. Setup Wizard You may choose to configure your network by using the Internet Connection Setup Wizard that includes step-by-step instructions.
Section 4 - Web Configuration Internet Connection Setup Wizard This wizard will guide you through a step-by-step process to configure your new D-Link Camera and connect the camera to the Internet. Click Next to continue. • DHCP Connection (by default), where your DHCP server will automatically assign dynamic IP to your device. • Static IP Address allows you to manually enter your network settings for the camera.
Section 4 - Web Configuration Click Next to continue. If you have a Dynamic DNS account and would like the camera to update your IP address automatically, enable DDNS and enter your host information. Click Next to continue. Enter a name for your camera. Click Next to continue. Configure the correct time to ensure that all events triggered, captured and scheduled at the right time. Click Next to continue. This page displays your configured settings.
Section 4 - Web Configuration Network Setup This section allows you to configure your network settings. DHCP: Select this connection if you have a DHCP server running on your network and would like a dynamic IP address to be updated to your camera automatically. Static IP Client: You may obtain a static or fixed IP address and other network information from your network administrator for your camera. A static IP address will ease you for accessing your camera in the future.
Section 4 - Web Configuration Wireless This section allows you to setup and configure the wireless settings on your camera. SSID: Service Set Identifier, an identifier for your wireless network. Channel: The default setting is channel 6. Select the same channel that is being used by other wireless devices within your network. When there is an interference from the wireless networks that overlap with one another, you may change the channel to obtain maximum performance for your connection.
Section 4 - Web Configuration DDNS This section allows you to configure the DDNS setting for your camera. DDNS will allow all users to access your camera using a domain name instead of an IP address. DDNS: (Dynamic Domain Name Server) will hold a DNS host name and synchronize the public IP address of the modem when it has been modified. The username and password are required when using the DDNS service. Enable: Click to enable the DDNS function.
Section 4 - Web Configuration Image Setup This section allows you to configure the image settings for your camera. Enable Antiflicker: Select this box to enable antiflicker. Flip Image: Select this box to vertically flip the video. If the camera is installed upside down, Flip Image and Mirror should both be checked. Mirror: Horizontally flip the video. Brightness Control: Allows you to adjust the brightness level. Contrast Control: Allows you to adjust the contrast level.
Section 4 - Web Configuration Video This section allows you to configure the video settings for your camera. Video Configuration Video Profile: This section allows you to change the Encode Type, Resolution, FPS, and Quality. Encode Type: The compression format used when viewing your camera. Resolution: Select the desired video resolution from three formats: 640x480, 320x240, and 160x120. The higher setting can obtain better quality. However, it will use more resource within your network.
Section 4 - Web Configuration Audio Enabling audio setting will allow you to listen to audio from the camera through your PC’s audio output. Note: Please wait a few seconds for the camera to adjust the audio after the setting has been selected. Audio Settings: You may Enable or Disable the camera audio feed. Volume Settings: Select the desired volume percentage level.
Section 4 - Web Configuration Motion Detect Enabling Video Motion will allow your camera to use the motion detection feature. You may draw a finite motion area that will be used for monitoring. Motion Select this box to enable the motion detection feature of your Detection: camera. Sensitivity: Specifies the measurable difference between two sequential images that would indicate motion. Please enter a value between 0 and 100.
Section 4 - Web Configuration Mail This section allows you to configure the email notification settings for your camera. SMTP Server This is the domain name or IP address of your external e-mail server. Address: Sender e-mail This is the e-mail address of the person sending the camera snapshots. Address: Receiver e-mail This is the e-mail address of the recipient. Address: User Name: If the SMTP server uses authentication, you must enter your user name here.
Section 4 - Web Configuration Time Schedule Enable e-mail image Choosing Always will start sending snapshots to the recipient’s e-mail account right away. Choosing Schedule will allow you to to e-mail account: schedule when to start and stop the sending of snapshots to the recipient’s e-mail account. Select Motion Detection if you would like the camera to send images to the recipient’s e-mail account when the motions are detected.
Section 4 - Web Configuration FTP This section allows you to configure a FTP server to receive images from the camera. Host Address: This is the IP address of the FTP server that you will be connecting to. Port Number: Default is port 21. If changed, external FTP client program must change the server connection port accordingly. User Name: Specifies the user name to access the external FTP server.
Section 4 - Web Configuration Time Schedule Enable upload image to Checking this box will enable video uploads to the FTP server you have selected. FTP server: Always: Selecting this option allows snapshots to be uploaded to your FTP as soon as you click Apply. Schedule: Selecting this option allows you to configure specific times when you want the snapshots to be uploaded to your FTP server. Image Frequency: Users can select in frames per second (1, 2, 3 or auto, in auto this could go to 4).
Section 4 - Web Configuration Time and Date This section allows you to configure the settings of the internal system clocks for your camera. Time Zone: Select the time zone for your region from the drop down menu. Synchronize NTP Server: Network Time Protocol will synchronize your camera with an Internet time server. Choose the one that is closest to your camera. Copy your Computer’s Click to synchronize the time information from Time Settings: your PC.
Section 4 - Web Configuration Day/Night Mode This section allows you to configure the settings of Day/Night mode switch method. Day/Night mode feature provides good video illumination in both day and night environments. Auto: Camera automatically switches Day/Night mode. The camera normally works on Day mode. It automatically changes to Night mode in a dark place. Manual: User can manually control the camera work in Day or Night mode at the LIVE VIDEO page.
Section 4 - Web Configuration Maintenance Admin This section allows you to change the administrator’s password and configure the server settings for your camera. You can also manage the user account(s) that access to your camera. Camera Name: Specify a name for your camera LED Control: Select Normal to enable the LED on the front of the device, or select off to disable the LED.
Section 4 - Web Configuration System This section allows you to save and restore your configuration, restore the factory settings, and/or restart the camera.
Section 4 - Web Configuration Firmware Upgrade Your current firmware version and date will be displayed on your screen. You may go to the D-Link Support Page to check for the latest firmware versions available. To upgrade the firmware on your DCS-932L, please download and save the latest firmware version from the D-Link Support Page to your local hard drive. Locate the file on your local hard drive by using the Browse button. Then, click the “Upload” button to start the firmware upgrade.
Section 4 - Web Configuration Device Info This section displays all the detailed information about your device and network settings.
Section 4 - Web Configuration Active User This page lists all the active user’s information including the User Name, IP address, and the time that camera access began.
Section 5 - Security Wireless Security This section will show you the different levels of security you can use to protect your data from intruders. The DCS-932L offers the following types of security: • WPAZ-PSK (Pre-Shared Key) • WEP (Wired Equivalent Privacy) What is WEP? WEP stands for Wired Equivalent Privacy. It is based on the IEEE 802.11 standard and uses the RC4 encryption algorithm.
Section 5 - Security What is WPA? WPA, or Wi-Fi Protected Access, is a Wi-Fi standard that was designed to improve the security features of WEP (Wired Equivalent Privacy). The 2 major improvements over WEP: Improved data encryption through the Temporal Key Integrity Protocol (TKIP). TKIP scrambles the keys using a hashing algorithm and, by adding an integrity-checking feature, ensures that the keys haven’t been tampered with. WPA2 is based on 802.11i and uses Advanced Encryption Standard instead of TKIP.
Section 5 - Security Configuring the DCS-932L with a Router D-Link’s DCS-932L is a versatile and cost effective Network Camera offering both video and audio monitoring. It can also serve as a powerful surveillance system in security applications. The DCS-932L can be used with any wired or 802.11n/g wireless router. This section explains how to view the camera from either the Internet or from inside your internal network.
Section 5 - Security 1. Assign a Local IP Address to Your Camera Run the setup wizard from the CD included with the DCS-932L. Follow the steps in the Quick Installation Guide to configure the DCS-932L. The camera will be assigned a local IP Address that allows it to be recognized by the router. Write down this IP Address for future reference. 2. View the Network Camera Using Your Internet Explorer Web Browser Run your Internet Explorer Web browser.
Section 5 - Security The Setup > Network Setup page displays the port settings for your camera. If necessary, these ports can be changed if they are already in use by other devices (e.g. in a multiple camera environment). Note: The HTTP port is required to be opened for the DCS-932L.
Section 5 - Security Router Set-Up and Installation The following steps generally apply to any router that you have on your network. The D-Link DIR-655 is used as an example to clarify the configuration process. Configure the initial settings of the DIR-655 by following the steps outlined in the DIR-655 Quick Installation Guide. 3. Access the Router with Your Web Browser If you have cable or DSL Internet service, you will most likely have a dynamically assigned WAN IP Address.
Section 5 - Security Note: Because a dynamic WAN IP can change from time to time depending on your ISP, you may want to obtain a Static IP address from your ISP. A Static IP address is a fixed IP address that will not change over time and will be more convenient for you to use to access your camera from a remote location. The Static IP Address will also allow you to access your camera attached to your router over the Internet. 4.
Section 5 - Security Important: Some ISPs block access to port 80 and other commonly used Internet ports to conserve bandwidth. Check with your ISP so that you can open the appropriate ports accordingly. If your ISP does not pass traffic on port 80, you will need to change the port the camera uses from 80 to something else, such as 800. Not all routers are the same, so refer to your user manual for specific instructions on how to open ports. Enter valid ports in the Virtual Server section of your router.
Section 6 - Troubleshooting Troubleshooting This chapter provides solutions to problems that can occur during the installation and operation of the DCS-932L. Read the following descriptions if you are having problems. (The examples below are illustrated in Windows Vista® and XP. If you have a different operating system, the screenshots on your computer will look similar to the following examples.) 1.
Section 6 - Troubleshooting Yes, you can access your camera over the Internet through the following URL after successfully installing your camera through the Camera Installation Wizard: http://[mydlink No.].mydlink.com For example, if your camera’s mydlink No. was 12345678, you would be able to access your camera remotely by opening your web browser and going to http://12345678.mydlink.com This URL will open a webpage where you will be asked to log in by entering your camera’s password.
Section 6 - Troubleshooting 7. Why does a series of broad vertical white lines appear through out the image? It could be that the CMOS sensor (a square panel situated behind the lens that measures the light signals and changes it into a digital format so your computer can present it into an image that you are familiar with) has become overloaded when it has been exposed to bright lights such as direct exposure to sunlight or halogen lights.
Wireless Basics Wireless Basics D-Link wireless products are based on industry standards to provide easy-to-use and compatible high-speed wireless* connectivity within your home, business or public access wireless networks. Strictly adhering to the IEEE standard, the D-Link wireless family of products will allow you to securely access the data you want, when and where you want it. You will be able to enjoy the freedom that wireless networking delivers.
Wireless Basics What is Wireless? Wireless or WiFi technology is another way of connecting your computer to the network without using wires. WiFi uses radio frequency to connect wirelessly, so you have the freedom to connect computers anywhere in your home or office network. Why D-Link Wireless? D-Link is the worldwide leader and award winning designer, developer, and manufacturer of networking products. D-Link delivers the performance you need at a price you can afford.
Wireless Basics Who uses wireless? Wireless technology as become so popular in recent years that almost everyone is using it, whether it’s for home, office, business, D-Link has a wireless solution for it.
Wireless Basics Where is wireless used? Wireless technology is expanding everywhere not just at home or office. People like the freedom of mobility and it’s becoming so popular that more and more public facilities now provide wireless access to attract people. The wireless connection in public places is usually called “hotspots”.
Wireless Basics Wireless Modes There are basically two modes of networking: • Infrastructure – All wireless clients will connect to an access point or wireless router. • Ad-Hoc – Directly connecting to another computer, for peer-to-peer communication, using wireless network adapters on each computer, such as two or more DCS-932L wireless network Cardbus adapters. An Infrastructure network contains an Access Point or wireless router.
Networking Basics Networking Basics Check your IP address After you install your new D-Link adapter, by default, the TCP/IP settings should be set to obtain an IP address from a DHCP server (i.e. wireless router) automatically. To verify your IP address, please follow the steps below. Click on Start > Run. In the run box type cmd and click OK. At the prompt, type ipconfig and press Enter. This will display the IP address, subnet mask, and the default gateway of your adapter. If the address is 0.0.0.
Networking Basics Statically Assign an IP Address If you are not using a DHCP capable gateway/router, or you need to assign a static IP address, please follow the steps below: Step 1 Windows® Vista - Click on Start > Control Panel > Network and Internet > Network and Sharing Center > Manage Network Connections. Windows XP - Click on Start > Control Panel > Network Connections. Step 2 Right-click on the Local Area Connection which represents your D-Link network adapter and select Properties.
Technical Specifications Technical Specifications System Requirements • Operating System: Microsoft Windows XP, Vista, Windows 7 • Internet Explorer 6 or above , Firefox 3.5 or above, Safari 4 Networking Protocol • IPV4, ARP, TCP, UDP, ICMP • DHCP Client • NTP Client (D-Link) • DNS Client • DDNS Client (Dyndns and D-Link) • SMTP Client • FTP Client • HTTP Server • PPPoE • UPnP Port Forwarding Built-In Protocol • 10/100BASE-TX Fast Ethernet • 802.11b/g/n WLAN Wireless Connectivity • 802.
Technical Specifications Digital Zoom • Up to 4x 3A Control • AGC (Auto Gain Control) • AWB (Auto White Balance) • AES (Auto Electronic Shutter) Emission (EMI), Safety & Other Certifications • FCC Class B • IC • C-Tick • CE Power • Input: 100-240 V AC, 50/60 Hz • Output: 5 V DC, 1.2 A • External AC-to-DC switching power adapter Dimensions (W x D x H) • Including the bracket and stand: 65.8 x 65 x 126 mm • Camera only: 27.2 x 60 x 96 mm Weight • 76.
Contacting Technical Support Contacting Technical Support U.S. and Canadian customers can contact D-Link technical support through our web site or by phone. Before you contact technical support, please have the following ready: • Model number of the product (e.g. DCS-932L) • Hardware Revision (located on the label on the bottom of the Network Camera (e.g. rev A1)) • Serial Number (s/n number located on the label on the bottom of the Network Camera).
Warranty Warranty Subject to the terms and conditions set forth herein, D-Link Systems, Inc. (“D-Link”) provides this Limited Warranty: • Only to the person or entity that originally purchased the product from D-Link or its authorized reseller or distributor, and • Only for products purchased and delivered within the fifty states of the United States, the District of Columbia, U.S. Possessions or Protectorates, U.S. Military Installations, or addresses with an APO or FPO.
Warranty Limited Software Warranty: D-Link warrants that the software portion of the product (“Software”) will substantially conform to D-Link’s then current functional specifications for the Software, as set forth in the applicable documentation, from the date of original retail purchase of the Software for a period of ninety (90) days (“Software Warranty Period”), provided that the Software is properly installed on approved hardware and operated as contemplated in its documentation.
Technical Specifications • After an RMA number is issued, the defective product must be packaged securely in the original or other suitable shipping package to ensure that it will not be damaged in transit, and the RMA number must be prominently marked on the outside of the package. Do not include any manuals or accessories in the shipping package. DLink will only replace the defective portion of the product and will not ship back any accessories.
Technical Specifications • The customer is responsible for all in-bound shipping charges to D-Link. No Cash on Delivery (“COD”) is allowed. Products sent COD will be rejected by D-Link. Products shall be fully insured by the customer and shipped to D-Link Networks, Inc., 2525 Meadowvale Boulevard Mississauga, Ontario, L5N 5S2 Canada. D-Link will not be held responsible for any packages that are lost in transit to D-Link.
Technical Specifications IF ANY IMPLIED WARRANTY CANNOT BE DISCLAIMED IN ANY TERRITORY WHERE A PRODUCT IS SOLD, THE DURATION OF SUCH IMPLIED WARRANTY SHALL BE LIMITED TO THE DURATION OF THE APPLICABLE WARRANTY PERIOD SET FORTH ABOVE. EXCEPT AS EXPRESSLY COVERED UNDER THE LIMITED WARRANTY PROVIDED HEREIN, THE ENTIRE RISK AS TO THE QUALITY, SELECTION AND PERFORMANCE OF THE PRODUCT IS WITH THE PURCHASER OF THE PRODUCT.
Warranty CE Mark Warning: This is a Class B product. In a domestic environment, this product may cause radio interference, in which case the user may be required to take adequate measures. FCC Statement: This equipment has been tested and found to comply with the limits for a Class B digital device, pursuant to part 15 of the FCC Rules. These limits are designed to provide reasonable protection against harmful interference in a residential installation.
Warranty For detailed warranty information applicable to products purchased outside the United States, please contact the corresponding local D-Link office. Industry Canada Statement: This device complies with RSS-210 of the Industry Canada Rules. Operation is subject to the following two conditions: (1) This device may not cause harmful interference, and (2) this device must accept any interference received, including interference that may cause undesired operation.
Registration Registration Product registration is entirely voluntary and failure to complete or return this form will not diminish your warranty rights. Version 1.