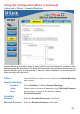
Using the Configuration Menu (continued) Advanced > Filters > Domain Blocking Domain Blocking is used to allow or deny LAN (Local Area Network) computers from accessing specific domains on the Internet. Domain blocking will deny all requests to a specific domain such as http and ftp. It can also allow computers to access specific sites and deny all other sites. FiltersDomain Blocking- Select the filter you wish to use; in this case, Domain Blocking was chosen.
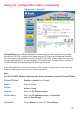
Using the Configuration Menu (continued) Advanced > Firewall Firewall Rules is an advanced feature used to deny or allow traffic from passing through the DI-524. It works in the same way as IP Filters with additional settings. You can create more detailed access rules for the DI-524. When virtual services are created and enabled, it will also display in Firewall Rules. Firewall Rules contain all network firewall rules pertaining to IP (Internet Protocol).
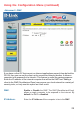
Using the Configuration Menu (continued) Advanced > DMZ If you have a client PC that cannot run Internet applications properly from behind the DI-524, then you can set the client up for unrestricted Internet access. It allows a computer to be exposed to the Internet. This feature is useful for gaming purposes. Enter the IP address of the internal computer that will be the DMZ host.
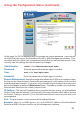
Using the Configuration Menu (continued) Advanced > Performance Wireless PerformanceDisplayed in this window are the Wireless Performance features for the Access Point portion of the DI-524. Beacon Interval- Beacons are packets sent by an Access Point to synchronize a wireless network. Specify a value. 100 is the default setting and is recommended. RTS Threshold- This value should remain at its default setting of 2432. If inconsistent data flow is a problem, only a minor modification should be made.
Using the Configuration Menu (continued) Tools> Admin At this page, the DI-524 administrator can change the system password. There are two accounts that can access the Broadband Router’s Web-Management interface. They are admin and user. Admin has read/write access while user has read-only access. User can only view the settings but cannot make any changes. Administrator- admin is the Administrator login name. Password- Enter the password and enter again to confirm. User- user is the User login name.
Using the Configuration Menu (continued) Tools > Time Time ZoneDefault NTP Server- Select the Time Zone from the pull-down menu. NTP is short for Network Time Protocol. NTP synchronizes computer clock times in a network of computers. This field is optional. Set the Time- To manually input the time, enter the values in these fields for the Year, Month, Day, Hour, Minute, and Second. Click Set Time.
Using the Configuration Menu (continued) Tools > System Browse The current system settings can be saved as a file onto the local hard drive. The saved file or any other saved setting file can be loaded back on the Broadband Router. To reload a system settings file, click on Browse to browse the local hard drive and locate the system file to be used. You may also reset the Broadband Router back to factory settings by clicking on Restore.
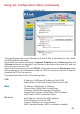
Using the Configuration Menu (continued) Tools > Firmware Browse You can upgrade the firmware of the Router here. Make sure the firmware you want to use is on the local hard drive of the computer. Click on Browse to browse the local hard drive and locate the firmware to be used for the update. Please check the D-Link support site for firmware updates at http://support.dlink.com. You can download firmware upgrades to your hard drive from the D-Link support site.
Using the Configuration Menu (continued) Tools > Misc Ping Test- The Ping Test is used to send Ping packets to test if a computer is on the Internet. Enter the IP Address that you wish to Ping, and click Ping. Restart Device- Click Reboot to restart the DI-524. Block WAN Ping- If you choose to block WAN Ping, the WAN IP Address of the DI-524 will not respond to pings. Blocking the Ping may provide some extra security from hackers. Discard Ping from WAN sideClick Enabled to block the WAN ping.
Using the Configuration Menu (continued) Status > Device Info This page displays the current information for the DI-524. It will display the LAN, WAN, and MAC address information. If your WAN connection is set up for a Dynamic IP address then a Release button and a Renew button will be displayed. Use Release to disconnect from your ISP and use Renew to connect to your ISP. If your WAN connection is set up for PPPoE, a Connect button and a Disconnect button will be displayed.
Using the Configuration Menu (continued) Status > Log DI-754 The Broadband Router keeps a running log of events and activities occurring on the Router. If the device is rebooted, the logs are automatically cleared. You may save the log files under Log Settings. View Log- First Page - The first page of the log. Last Page - The last page of the log. Previous - Moves back one log page. Next - Moves forward one log page. Clear - Clears the logs completely.
Using the Configuration Menu (continued) Status > Log > Log Settings Not only does the Broadband Router display the logs of activities and events, it can setup to send these logs to another location. SMTP Server/ IP Address Email Address - The address of the SMTP server that will be used to send the logs. The email address to which the logs will be sent. Click on Send Mail Now to send the email.
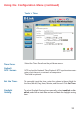
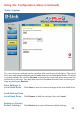
Using the Configuration Menu (continued) Status > Stats The screen above displays theTraffic Statistics. Here you can view the amount of packets that pass through the DI-524 on both the WAN and the LAN ports. The traffic counter will reset if the device is rebooted. Status > Wireless The wireless client table displays a list of current connected wireless clients. This table also displays the connection time and MAC address of the connected wireless client. Click on Help at any time, for more information.
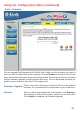
Networking Basics Using the Network Setup Wizard in Windows XP In this section you will learn how to establish a network at home or work, using Microsoft Windows XP. Note: Please refer to websites such as http://www.homenethelp.com and http://www.microsoft.com/windows2000 for information about networking computers using Windows 2000, ME or 98. Go to Start>Control Panel>Network Connections Select Set up a home or small office network When this screen appears, Click Next.
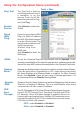
Networking Basics Please follow all the instructions in this window: Click Next In the following window, select the best description of your computer. If your computer connects to the internet through a gateway/router, select the second option as shown.
Networking Basics Enter a Computer description and a Computer name (optional.) Click Next Enter a Workgroup name. All computers on your network should have the same Workgroup name.
Networking Basics Please wait while the Network Setup Wizard applies the changes. When the changes are complete, click Next. Please wait while the Network Setup Wizard configures the computer. This may take a few minutes.
Networking Basics In the window below, select the option that fits your needs. In this example, Create a Network Setup Disk has been selected. You will run this disk on each of the computers on your network. Click Next. Insert a disk into the Floppy Disk Drive, in this case drive A. Click Next.
Networking Basics Please wait while the Network Setup Wizard copies the files. Please read the information under Here’s how in the screen below. After you complete the Network Setup Wizard you will use the Network Setup Disk to run the Network Setup Wizard once on each of the computers on your network. To continue click Next.
Networking Basics Please read the information on this screen, then click Finish to complete the Network Setup Wizard. The new settings will take effect when you restart the computer. Click Yes to restart the computer. You have completed configuring this computer. Next, you will need to run the Network Setup Disk on all the other computers on your network. After running the Network Setup Disk on all your computers, your new wireless network will be ready to use.
Networking Basics Naming your Computer To name your computer, please follow these directions:In Windows XP: Click Start (in the lower left corner of the screen). Right-click on My Computer. Select Properties and click. Select the Computer Name Tab in the System Properties window. You may enter a Computer Description if you wish; this field is optional. To rename the computer and join a domain, Click Change.
Networking Basics Naming your Computer In this window, enter the Computer name. Select Workgroup and enter the name of the Workgroup. All computers on your network must have the same Workgroup name. Click OK. Checking the IP Address in Windows XP The wireless adapter-equipped computers in your network must be in the same IP Address range (see Getting Started in this manual for a definition of IP Address Range.
Networking Basics Checking the IP Address in Windows XP This window will appear. Click the Support tab Click Close Assigning a Static IP Address in Windows XP/2000 Note: Residential Gateways/Broadband Routers will automatically assign IP Addresses to the computers on the network, using DHCP (Dynamic Host Configuration Protocol) technology. If you are using a DHCP-capable Gateway/Router you will not need to assign Static IP Addresses.
Networking Basics Assigning a Static IP Address in Windows XP/2000 Double-click on Network Connections Right-click on Local Area Connections Double-click on Properties 49
Networking Basics Assigning a Static IP Address in Windows XP/2000 Click on Internet Protocol (TCP/IP) Click Properties Input your IP address and subnet mask. (The IP Addresses on your network must be within the same range. For example, if one computer has an IP Address of 192.168.0.2, the other computers should have IP Addresses that are sequential, like 192.168.0.3 and 192.168.0.4. The subnet mask must be the same for all the computers on the network.