Wireless Internet Camera Wireless G Mobile USB 2.
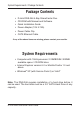
System Requirements / Package Contents Package Contents • • • • • • D-Link DNS-346 4-Bay ShareCenter Duo CD-ROM with Manual and Software Quick Installation Guide Power Adapter (19V 4.74A) Power Cable Clip CAT5 Ethernet Cable If any of the above items are missing, please contact your reseller. System Requirements • Computer with: 1GHz processor / 512MB RAM / 200MB available space / CD-ROM drive • Internet Explorer version 6.0 or Mozilla Firefox 1.
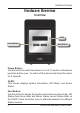
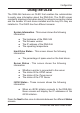
Hardware Overview Hardware Overview Front View OLED Power Button Next Button Power Button: Use this button to switch the device on or off. To switch on the device press the button once. To switch off the device hold the button down for 5 seconds. OLED: This screen displays System Information, HD Status, and Server Status. Next Button: Use this button to display the System Information (system state), HD Status (hard drive state) and Server Status (server status state) on the OLED.
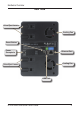
Hardware Overview Rear View Drive Eject Levers Cooling Fan Reset Button Power Receptacle Ethernet Port Cooling Fan Drive Eject Levers USB Port D-Link DNS-346 Quick Install Guide 4
Configuration Using the OLED The DNS-346 features an OLED that enables the administrator to easily view information about the DNS-346. The OLED screen constantly displays information about the network connection status and the number of hard drives installed and the bay ID’s they are installed in.
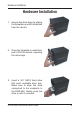
Hardware Installation Hardware Installation 1. Access the drive bays by sliding the faceplate up until it unlatches from the device. 2. Once the faceplate is unlatched, pull it off of the device, exposing the drive bays. 3. Insert a 3.5” SATA hard drive into each available drive bay. Make sure to align the drive connectors to the endpoints in the DNS-346. Gently push the drive in until it connects.
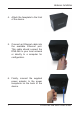
Hardware Installation 4. Attach the faceplate to the front of the device. 5. Connect an Ethernet cable into the available Ethernet port. This cable should connect the DNS-346 to your local network or directly to a computer for configuration. 6. Finally, connect the supplied power adapter to the power receptacle on the back of the device.
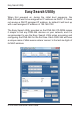
Easy Search Utility Easy Search Utility When first powered on, during the initial boot sequence, the DNS-346 will wait to be assigned an IP address via DHCP. If it does not receive a DHCP assigned IP address, by default it will boot up with a self-assigned IP address of 192.168.0.32.
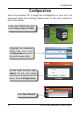
Configuration Configuration Insert the provided CD to begin the configuration of your unit. For advanced setup and settings, please refer to the user manual for more information. From the DNS-346 CD, select Easy Search Utility. Highlight an available DNS-346 and click Configuration to access the web-based utility. At the login screen, type admin for the user name and leave the password field blank. Click Configuration. Click Run Wizard.
Configuration When running the DNS-346 setup wizard, the welcome screen details the five steps of the wizard. Click Next to continue. It is recommended you set an admin password here. Enter the new password and re-enter it for confirmation. Click Next to continue. Set the appropriate time zone and click Next to continue.
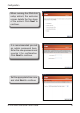
Configuration Configure the IP settings for your device. If you are using a DHCP server such as a router on your network, the DNS-346 will automatically obtain the IP settings. If you prefer to assign a Static IP address, select this option and type the IP settings for the device. Click Next to continue. The following screen allows you to choose your network type. If your nework is configured as a workgroup, click the Workgroup radio button.
Configuration If your DNS-346 will be connected to an Active Directory network, click the Active Directory radio button. Enter the following information about your Active Directory: • Username • Password • DNS1 • DNS2 • Host Name • Realm Name • Domain Controller Name Click Next to continue. When the wizard completes, click Back to go back and make changes or click Complete to save the current settings.
Configuration The DNS-346 will restart. When the login prompt appears, login using the new administrator password.
Configuration Mapping a Drive The Easy Search Utility makes it simple to map drives to your computer. To get started, insert the DNS-346 CD into your CD-ROM and launch the Easy Search Utility. Select an available DNS-346. Available volumes will be displayed under Drive Mapping. Highlight the drive you want to map. Select an available drive letter from the drop-down menu and click Connect. Once connected, your mapped drive(s) will appear in My Computer as network drives.
Notes Notes 15 D-Link DNS-346 Quick Install Guide
Technical Support Technical Support D-Link’s website contains the latest user documentation and software updates for D-Link products. U.S. and Canadian customers can contact D-Link Technical Support through our website or by phone. United States Telephone (877) 453-5465 World Wide Web http://support.dlink.com Canada Telephone (800) 361-5265 World Wide Web http://support.dlink.com Version 1.0 May 19, 2009 6NS346Q...A1G Copyright ©2009 D-Link Corporation/D-Link Systems, Inc. All rights reserved.