D-Link DPG-2000W Wireless Presentation Gateway Manual Version 1.
Contents Package Contents ...................................................................................................... 3 Introduction ................................................................................................................. 4 Features and Benefits ................................................................................................. 5 Connections and LEDs ................................................................................................
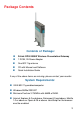
Package Contents Contents of Package: D-Link DPG-2000W Wireless Presentation Gateway 1 DC5V, 2A Power Adapter One 802.11g antenna CD with Manual and Software Quick Installation Guide If any of the above items are missing, please contact your reseller. System Requirements: IEEE 802.11g enabled computer Windows 98/Me/2000/XP Minimum Pentium 3 750MHz with 64MB of RAM. Internet Explorer 5.0 and above, Netscape 6.0 and above, Mozilla 1.0 or above or Opera 6.05 or above.
Introduction The DPG-2000W Presentation Gateway is a wireless adapter for your projector or monitor that enables communication with any wireless laptop or computer. The DPG-2000W supports IEEE 802.11g wireless standards with transfer speeds of up to 54Mbps for real time display of images, applications, and presentations on a monitor or via projector. In addition, the DPG-2000W connects via a standard VGA cable, making it compatible with virtually any presentation projector or monitor.
Features and Benefits Fully Compatible with IEEE 802.
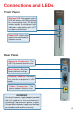
Connections and LEDs Front Panel Wireless LED: During boot-up this LED will remain unlit. While waiting for a connection the LED blinks amber rapidly. A solid green light indicates a connection with a PC has been established. Power LED: Lights solid green when connected to a power source. Rear Panel Antenna Connector: The 802.11g antenna attaches here. Reset button: Restores factory default settings. Projector / Monitor: Connects to a monitor or projector’s VGA cable.
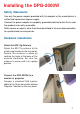
Installing the DPG-2000W Safety Statements Use only the power adapter provided with this product or the manufacturer’s authorized replacement power supply. Connect the power adapter to a properly grounded electrical outlet that is near the product and easily accessible. Refer service or repairs, other than those described in the user documentation, to a professional service person. Hardware Installation Attach the 802.11g Antenna Attach the 802.11g antenna to the antenna connector on the rear panel.
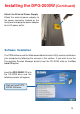
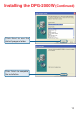
Installing the DPG-2000W (Continued) Attach the External Power Supply Attach the external power adapter to the power connector located on the rear panel and plug the power adapter to an AC power outlet. Software Installation The PSM software and the Web-based Administration Utility can be installed on your computer by following the screens in this section. If you wish to run the Presentation Session Manager directly from the CD-ROM, click on the Run from CD option.
Installing the DPG-2000W (Continued) Click Next to begin the software installation. Click Next to use the default destination folder. Click Next to proceed with the Typical install.
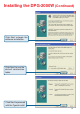
Installing the DPG-2000W (Continued) Click Next to use the default program folder. Click Finish to complete the installation.
Using the DPG-2000W Using the DPG-2000W in a Meeting Using the Presentation Session Manager (PSM) software provided, presenters can easily display their presentations with a single click from any wirelesslyenabled PC or laptop. The following steps demonstrate a typical scenario in an office setting: 1. Copies of the DPG-2000W installation CD are kept with the DPG-2000W in the meeting room. Prior to a meeting, participants can either run or install the PSM onto their system.
Using the DPG-2000W (Continued) Starting the DPG-2000W When the DPG-2000W is first turned on and connected to a projector or monitor, a boot up sequence will follow. After about 30 seconds, the DPG-2000W will display the following graphic. The wireless settings will be displayed on top of the graphic and consist of two lines. The top line displays the SSID and the channel number of the DPG2000W while the second line reports the channels currently in use by other 802.11g equipment around the DPG-2000W.
Using the DPG-2000W (Continued) Depending on the type of RF activity detected, you will see any one of the following messages displayed: RF activities detected on other channels (none). No other 802.11g channels detected in use other than the DPG-2000W. Your connection to the DPG-2000W should be smooth and error free. RF activities detected on other channels (8, 9). Existing 802.11b channels detected in use, but there is no interference. Your connection to the DPG-2000W should be smooth and error free.
Using the DPG-2000W (Continued) Using Your Wireless Configuration Utility The banner page on the projector/monitor screen will display the SSID and the channel that the DPG-2000W is currently set on. The channel number ranges from 1 – 11 for the US or 1 – 13 for Europe and Japan. The DPG-2000W operates as an Access Point (AP), with an SSID automatically assigned at each boot up. When the DPG-2000W starts up, its SSID will be displayed on the upper left corner of the monitor/projector.
Using the DPG-2000W (Continued) Windows XP Users To configure your Wireless Network Adapter for Windows XP, your Wireless Adapter must be natively supported under Windows XP. The easiest way to determine native support is by the network icon in your system tray as seen below. If your system tray looks like the figure shown above, your wireless card is natively supported under Windows XP.
Using the DPG-2000W (Continued) Click Wireless Networks. The window below should appear. Displayed is a list of available networks that are detected. You can also set your wireless card to automatically connect to the DPG-2000W in the Preferred Networks settings. Simply remove the other preferred networks in the list by selecting them and clicking “remove.
Using the DPG-2000W (Continued) A successful connection to the DPG-2000W is indicated by the screen shown below: Running the DPG-2000W Presentation Session Manager You have to start the DPG-2000W Presentation Session Manager (PSM) to control the DPG-2000W. There are two ways to run the DPG-2000W PSM. One is to run the DPG-2000W PSM directly from the utility CD while the other is to run a locally installed DPG-2000W PSM from a hard-drive.
Using the DPG-2000W (Continued) To run the locally installed PSM from a hard-drive, start the DPG-2000W PSM program located under the Programs Folder in the Windows Start menu. You can also double-click on the DPG-2000W shortcut on Windows desktop to start PSM. Go to: Start > Programs > D-Link Air Plus G DPG2000W Utility > DPG2000W to launch the PSM. When the DGS-2000W PSM starts, you will see the following screen: Check that you have configured your wireless card correctly and click “OK.
Using the DPG-2000W (Continued) There are three action buttons in the PSM: “Establish a Session”, “Release the Session”, and “Exit.” Clicking “Exit” will close the DPG-2000W PSM program. The functions of three other action buttons are described in the following sections. Start or Resume Your DPG-2000W Presentation Session Once you have successfully configured your wireless card to connect to the DPG-2000W, click “Establish a Session” to connect to the DPG-2000W.
Using the DPG-2000W (Continued) Various abnormal conditions, such as RF interference or network time-out, can cause the communication between the DPG-2000W and the PSM to be interrupted. If an interruption of session is detected, the DPG-2000W will automatically try to reconnect and keep the user in session. If the session is abnormally terminated, the DPG-2000W will return to the banner page and be reset for a new session.
Using the DPG-2000W (Continued) Not Available Screen: The following window will be displayed if your wireless card is unable to connect to the DPG-2000W at this time. You will need to check your wireless configuration settings. Release Your DPG-2000W Presentation Session To release your computer from the DPG-2000W, open the DPG-2000W PSM and click on the “Release a Session” button. The DPG-2000W is now reset for a new session, allowing you to easily switch between presenters. Click Release.
Using the DPG-2000W (Continued) Exit the DPG-2000W Presentation Session Manager Click “Exit” to terminate the DPG-2000W PSM program. Click Exit. The tray icon will disappear from your start menu. After exiting, the DPG-2000W software restores your wireless network adapter to its original settings if the adapter has been automatically configured. If not automatically configured, users have to manually configure the adapter to its original settings.
Web-Based Administration Utility Introduction to the Web-Based Administration Utility Along with the software-based PSM available on the install CD, the DPG-2000W also has a Web-Based Utility that allows you to configure other aspects of the DPG-2000W, such as: Change the banner page Change the wireless security/encryption settings of the DPG-2000W Upgrade the DPG-2000W firmware WARNING Do not power off or disconnect the DPG-2000W unit while modifying DPG-2000W settings.
Web-Based Administration Utility (Continued) Once the Administration manager starts, the following window will appear. Click “Launch Admin Web Interface” to launch the Administration Utility. Configuring the DPG-2000W Using the Web-Based Administration Utility When the Administration Utility is launched, a logon window will appear.
Web-Based Administration Utility (Continued) The Default User Name is admin and the Password is blank (empty field). Clicking “OK” will launch the admin webpage. Settings Page User Name You can change the default “Admin” user name in this field. There is a 16-character limit for this field. Enter New Password This allows you to change the password of the DPG2000W. By default, the paswsword is blank (empty field).
Web-Based Administration Utility (Continued) Radio Mode Select either Local Access Point or Infrastructure Station. Local access mode (default) allows the user to connect only to the DPG-2000W. Infrastructure Station mode enables the user to connect to the DPG-2000W and display internet content. WEP Enabled This check box allows users to enable or disable the WEP feature. The DPG-2000W currently supports the default (shared) WEP key scheme defined in the 802.11 standard, not the mapped key scheme.
Web-Based Administration Utility (Continued) Transmission Key Selection One of the four WEP keys needs to be selected for transmitting data frames. The DPG-2000W can de-encrypt received data encrypted in any one of the four keys, but uses only one of the WEP keys for transmitting data. Operation Mode Select Automatic or Manual. Automatic: By default, the DPG-2000W uses the automatic mode to automatically select an unused SSID and the clearest channel upon boot up.
Web-Based Administration Utility (Continued) Options Page When you click on the Options tab, you will see the page shown below. Upload Options You can choose either a firmware or banner page upload. File Path/Name If you click the browse button to the right of the field, file selection box will appear. To upload a firmware file, be sure that the file has a .tar.gz extension. To upload a banner file, be sure that the file has a .jpg extension. For the best picture on the DPG-2000W banner screen, the .
Web-Based Administration Utility (Continued) Once you have selected your Upload option and entered the File path/name, click “Apply” to begin the upload. The following page will appear. Click “OK” to continue. If you do not wish to continue the firmware or banner upload, click “Cancel” to restore the Options page. Reboot Click the Reboot button to reboot the DPG-2000W. The DPG-2000W will reboot and your wireless connection will terminate. The following page will appear. Click “OK” to continue.
Web-Based Administration Utility (Continued) Warning Please note that resetting the DPG-2000W to its factory default settings will erase all configurations and encryption information you may have set through the web interface. If you wish to edit any of your set options you can click “Cancel” to restore the Options page to its original settings. If you need help on any of the options on the Options page, you can click “Help” to go to the Help page for more information on each option.
Web-Based Administration Utility (Continued) Help Page When you click on the Help tab, you will see the page shown below. This page provides information for each of the settings in the Web-Based Administration Utility. The Help page can also be accessed through the Help Button available in the Settings and Options pages.
Troubleshooting You are Unable to Connect or Establish a Session with the DPG-2000W If you see the window below while trying to establish a session with DPG-2000W(s): Verify the SSID of the wireless adapter matches the SSID of the DPG-2000W displayed on the banner page on boot up. Ensure the computer’s wireless network adapter is set for Infrastructure mode. If the DPG-2000W’s encryption settings were modified, verify that the computer is using the same encryption settings.
Troubleshooting (Continued) With certain brands of 802.11g cards, it might take a bit longer to link with the DPG-2000W than with other brands of wireless cards. The reason for this is that the drivers and features set of each brand might cause the link up time between the DPG-2000W and the computer to take longer. Retry establishing a session with the DPG-2000W using the PSM. For more troubleshooting information, please refer to the Technical Manual on the CD-ROM.
Troubleshooting (Continued) Right-click on Network Connections and select Properties. Right-click on Local Area Connection. Double-click on Properties.
Troubleshooting (Continued) Click on Internet Protocol (TCP/IP). Click Properties. Input your IP Address and subnet mask. (The IP Addresses on your network must be within the same range. For example, if one computer has an IP Address of 192.168.0.2, the other computers should have IP Addresses that are sequential, like 192.168.0.3 and 192.168.0.4. The subnet mask must be the same for all the computers on the network.) Input your DNS server addresses.
Troubleshooting (Continued) The Presentation Screen Appears Frozen During a Presentation This indicates that the DPG-2000W has detected a link-loss. The DPG-2000W and DPG-2000W PSM have an intelligent built-in mechanism to detect the link-loss and can automatically restore the connection. When a link-loss has been detected, DPG-2000W PSM will display a message box and attempt to automatically restore the connection. If the auto-reconnection attempt is successful, the user does not need to do anything.
Troubleshooting (Continued) 2) If the current presenter failed to resume presentation by clicking “Establish a Session”, another presenter should try to “Establish a Session.” If this new presenter can successfully start a presentation, the problem was localized on the previous presenter’s computer and/ or its wireless card. Address that problem after the meeting. 3) If a second presenter also fails to “Establish a Session” to the DPG-2000W, a persistent abnormal condition has to be identified.
Reset to Factory Defaults The hardware reset button is located at the back of the DPG-2000W. You can use a bent paper clip to access the hardware reset button. The main function of the hardware-reset button is to reboot the DPG-2000W. To reboot the DPG-2000W, only a light tap on the reset button is required. Push Reset To reset the DPG-2000W back to the factory default settings, follow the steps below: 1. Turn on or reboot the DPG-2000W. 2.
Technical Specifications Model DPG-2000W Standard 802.11g Projector/Monitor Interface Standard 15-pin VGA connector Display resolution & color Automatically set to user’s display resolution up to XGA (1024x768) Automatically set to user’s color depth up to 16-bit TrueColor Software supplied User software run on Windows 98/ME/2000/XP Web-browser-based Administration Utility to allow user to upload customized banner page, set WEP, set channel and upload firmware upgrades Frequency 2.4GHz – 2.
Contacting Technical Support Techni cal Support echnical You can find software updates and user documentation on the D-Link website. D-Link provides free technical support for customers within the United States and within Canada for the duration of the warranty period on this product. U.S. and Canadian customers can contact D-Link technical support through our website, or by phone.
Subject to the terms and conditions set forth herein, D-Link Systems, Inc. (“D-Link”) provides this Limited warranty for its product only to the person or entity that originally purchased the product from: • • D-Link or its authorized reseller or distributor and Products purchased and delivered within the fifty states of the United States, the District of Columbia, U.S. Possessions or Protectorates, U.S. Military Installations, addresses with an APO or FPO.
Submitting A Claim: The customer shall return the product to the original purchase point based on its return policy. In case the return policy period has expired and the product is within warranty, the customer shall submit a claim to D-Link as outlined below: • The customer must submit with the product as part of the claim a written description of the Hardware defect or Software nonconformance in sufficient detail to allow D-Link to confirm the same.
Governing Law: This Limited Warranty shall be governed by the laws of the State of California. Some states do not allow exclusion or limitation of incidental or consequential damages, or limitations on how long an implied warranty lasts, so the foregoing limitations and exclusions may not apply. This limited warranty provides specific legal rights and the product owner may also have other rights which vary from state to state. Trademarks: D-Link is a registered trademark of D-Link Systems, Inc.
Registration Register online your D-Link product at http://support.dlink.