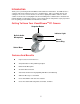
D-Link VisualStreamTM DSB-C310 300 Pixel PC Camera Manual Building Networks for People (10/07/04) 1
Contents Package Contents ------------------------------------------------------------------------------- 4 Introduction------------------------------------------------------------------------------------------------------------ 5 Getting To Know Your VisualStreamTM PC Camera --------------------------------------------------------- 5 Features And Benefits ---------------------------------------------------------------------------------------------- 5 Installing ArcSoft PhotoImpression and VideoImpression
Getting Started With VideoImpression 1.
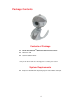
Package Contents Contents of Package D-Link VisualStreamTM DSB-C310 300K Pixel PC Camera Manual on CD Quick Installation Guide If any of the above items are missing, please contact your reseller.
Introduction Thank you for purchasing the D-Link DSB-C310 VisualStreamTM PC Camera. The DSB-C310 is a complete audio visual solution for all of your e-communications. Talk to your family, friends, and colleagues face-to-face over the Internet, create videos, digital photo albums, and more, all the software needed to start creating digital content and enabling video communication is included.
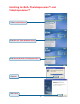
Installing ArcSoft® PhotoImpression™ and VideoImpression™ Click Install Software Click D-Link® VGA WebCam Driver Click Install ArcSoft® PhotoImpression™ Click OK Click Next 6
Click Yes Click Next Click Next Click Next Click Finish ArcSoft PhotoImpression is now ready to use. Please repeat these steps to install ArcSoft VideoImpression software.
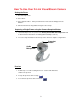
How To Use Your D-Link VisualStream Camera Setting the Focus 1. Start VideoImpression. 2. Select “New. “ 3. Select “Capture Video.” A live preview from the video camera will appear in the window. 4. Turn the manual focus ring until the image becomes sharp. Capturing a Single Frame using the Camera Snapshot Button 1. Start VideoImpression 1.6. (Refer to the Getting Started With VideoImpression 1.6 in this manual for instructions on working with VideoImpression 1.6) 2.
Record and Playback * Video Recording: 1. Follow steps 1~3 in the “Setting the Focus” section to enable a live preview. 2. To start video recording, click on “Record” ( 3. To stop video recording, click on “Stop” ( 4. To save captured video, click on “Save” ( * ). ) or ESC. ). Playback: 1. In VideoImpression, select “New.” 2. Select the source for playback by clicking on “Add” or from the drop down menu. The selected source appears in the album. 3.
After you run NetMeeting for the first time, you can modify the information you entered about yourself or the directory server name that you want to connect to. To do so, click Options on the Tools menu, click the General tab, and then enter the appropriate information. Also, you can run the Audio Tuning Wizard again, and to do so, click Audio Tuning Wizard on the Tools menu. Using Your PC Camera With Microsoft NetMeeting 1. Plug the PC camera into your PC first. 2.
Using Your PC Camera With MSN Messenger Plug the PC camera into your PC first. For Windows 98SE/Me/2000 Users Click “Messenger” to go to the main screen. You are now ready to have a Video Conversation with MSN Messenger. For Windows XP Users Click “Messenger” to go to the main screen, click Actions, click Start a Video Conversation and you are ready to have a Video Conversation with Messenger.
Options on the View Screen - starts a new project, opens an existing one, and displays your albums. - takes you back to the Storyboard (only when you have a project open). - saves your work as a movie file in ASF (PC only), AVI, MOV, or MPEG (PC only) format (See the Save As windows below). - allows you to email your movie files. (A MAPI-compliant email program is needed for this option.
Album Screen Options on the Album Screen Select Album - (This button is located immediately to the right of the album name) lets you choose the album you wish to view or work from. Selecting “New” will bring up a new, empty album. You can name/rename an album by clicking in the box with the album name and typing over the existing text. Get - opens a window that allows you to browse through your computer to add image, movie, or audio file thumbnails to the current album.
Edit Movie - lets you modify movie or still image files. You can add text as well. Working with The Storyboard The Storyboard shows you each step or part of the movie that you’re making. Remember, you can add a thumbnail to your Storyboard by drag-n-drop, or by highlighting a thumbnail and clicking on the Add To Storyboard icon. You can rearrange thumbnails on the Storyboard by dragn-drop as well.
Thumbnail Image - displays a still image file, or the first frame of a movie file, for a specific area on the Storyboard. You can edit a movie or still image file by clicking on its thumbnail, and then on the Edit Movie icon. Soundtracks - show audio files that will play during the movie. You can add up to two different audio files for simultaneous playback. You can add audio files to the Storyboard the same way that you add still image and movie files.
Editing a Video Options on the Edit Screen for Video Files Movie File Edit Screen Play - starts the video. Pause - stops the video. Clicking the button again resumes play. Previous Frame (-) - moves the video back one frame. Next Frame (+) - moves the video forward one frame. Playback Slider - shows a marker that moves across the slider as the video plays. Starting Mark - allows you to set where you want the video to begin (the green mark).
Editing Audio Options on the Audio Edit Screen Play - starts the audio.
Printing an Image From a Video File 1. From the Edit Screen, select the video frame you want to print. 2. Right-click the video and select “Print.” Saving a Movie 1. Click on Save on the View Screen. 2. In the Save As window, select the drive and folder that you want to save the movie to. Give the file a name, and select what type of movie you want to save it as. 3. Click Okay to save, or Cancel to abort.
Getting Started With PhotoImpression 3.0 1. Click Start. 2. Select Programs>ArcSoft PhotoImpression>PhotoImpression 3.0. The PhotoImpression Main Screen will appear on your desktop. Command Buttons Navigation Window Magnification Controls ToolBar Command Buttons Main Screen Options on the Main Screen Command Buttons -opens images from an album (Album), a disk drive (From Folder), or from photo-sharing website (Online Service).
View Controls Navigation Window - shows a miniature view of the current image. Even if you zoom in on a specific part of the image, you will still be able to see the whole picture in the Navigation Window. You can drag the box in the Navigation Window to focus on specific areas of the image. Magnification Controls - display the currently viewed size of the image as a percentage. They allow you to zoom in (+), out (-), or reset the image to its original, full size (1:1).
Opening an Image From a Disk Drive You can open an image that is stored on your hard drive, floppy disk, CD-ROM, etc. 1. Click the Get Photo button on the Main Screen, and select From Folder. 2. Click Browse. A Browse for Folder dialog will appear. 3. Navigate to the folder that you wish to view. Highlight the folder and click OK. 4. Thumbnails of the images within the selected folder will appear. Highlight the desired thumbnail, and click OK (or double-click it). Acquiring Images From a TWAIN Device 1.
Working with Albums Photo albums allow easy identification and access to images for viewing, editing, printing, etc. Simply click on the Get Photo button on the Main Screen, and select Album to view the album options. It is important to remember that albums do not store images. When an album is created, thumbnails are generated and a reference to where the files are located is recorded in the album file.
-inverts the selection on an image. For example, if you’ve created a rectangular selection and then used the Inverse tool, the area selected would be outside of the box instead of inside. Copy Selection As New Layer - creates a new layer out of the selected area. Soft Edge Slider - gives cropped edges a warm fade based on the position of the slider. Apply To All Layers - crops all layers to the selected area when checked. Crop - crops the image to only show areas that have been selected.
- smoothes rough edges. - sharpens fuzzy areas. - lowers brightness. - raises brightness. - lets you set a color on your image as the active color. - covers the area you click on (based on color similarity) with the active color. - fills a layer or image with a selected pattern. - fills the current image or layer with a gradient from the alternative color to the active color.
Layers The Layers Palette shows thumbnails of each layer. The currently selected layer will have a highlight around the thumbnail. Toggling the green light above the thumbnail on and off displays and hides the layer, respectively. The slider above the thumbnail adjusts the transparency of the layer. Note: An image can have multiple layers. You can retain separation of the multiple layers of an image only if it is saved as a PSF file.
Saving Images Once you’ve clicked on the Save button on the Main Screen, the following options will become available: To File -saves the changes that you’ve made to the existing file. -allows you to save the file in a new location, with a new name, and even a new file type. Email If your email program is MAPI-compliant, you can use PhotoImpression to open a new mail message and automatically attach the current image to it.
Thumbnail Printing: prints album thumbnails. You can print an entire album, or specific thumbnails. You can also choose different spacing options, add file names below the images, and review every page to be printed. Getting Help PhotoImpression provides extensive online help. If you need more information or instructions on how to use a specific feature or tool, click the Help (?) button in the upper right-hand corner of the screen.
Building Networks for People Subject to the terms and conditions set forth herein, D-Link Systems, Inc. (“D-Link”) provides this Limited warranty for its product only to the person or entity that originally purchased the product from: · D-Link or its authorized reseller or distributor and · Products purchased and delivered within the fifty states of the United States, the District of Columbia, U.S. Possessions or Protectorates, U.S. Military Installations, addresses with an APO or FPO.
Non-Applicability of Warranty: The Limited Warranty provided hereunder for hardware and software of D-Link’s products, will not be applied to and does not cover any product purchased through the inventory clearance or liquidation sale or other sales in which D-Link, the sellers, or the liquidators expressly disclaim their warranty obligation pertaining to the product and in that case, the product is being sold “As-Is” without any warranty whatsoever including, without limitation, the Limited Warranty as des
Limitation of Liability: TO THE MAXIMUM EXTENT PERMITTED BY LAW, D-LINK IS NOT LIABLE UNDER ANY CONTRACT, NEGLIGENCE, STRICT LIABILITY OR OTHER LEGAL OR EQUITABLE THEORY FOR ANY LOSS OF USE OF THE PRODUCT, INCONVENIENCE OR DAMAGES OF ANY CHARACTER, WHETHER DIRECT, SPECIAL, INCIDENTAL OR CONSEQUENTIAL (INCLUDING, BUT NOT LIMITED TO, DAMAGES FOR LOSS OF GOODWILL, LOSS OF REVENUE OR PROFIT, WORK STOPPAGE, COMPUTER FAILURE OR MALFUNCTION, FAILURE OF OTHER EQUIPMENT OR COMPUTER PROGRAMS TO WHICH D-LINK’S PRODUCT
Registration Register online your D-Link product at http://support.dlink.
Techni cal Support echnical You can find software updates and user documentation on the D-Link website. D-Link provides free technical support for customers within the United States and within Canada for the duration of the warranty period on this product. U.S. and Canadian customers can contact D-Link technical support through our website, or by phone. Tech Support for customers within the United States: D-Link Technical Support over the Telephone: (877) 453-5465 24 hours a day, seven days a week.