ADSL/2+ Getting the Most out of your Aussie Broadband ADSL Service D-Link DSL – G604T This guide is also suitable for: • DSL-502T Included: • • • Getting Connected Configuring your ADSL modem Common Setup Connection Difficulties • • • Filters and why they are needed Internet Speeds Explained DSL Troubleshooting Tips and more… 1
Table of Contents The Welcome letter ............................................................................................. 3 Filters – why are they needed? ............................................................................ 3 Getting Connected ............................................................................................... 4 Configuring your ADSL modem ............................................................................ 5 ADSL & Your Telephone Service ................
The Welcome letter If you have not already, you will receive a Welcome Letter from Aussie Broadband. This includes details such as your username, passwords and email addresses. We recommend that you keep this letter in a safe place near your computer, as it holds important information that you may need in the future.
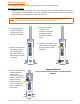
Getting Connected Your existing ADSL modem needs to be configured for your new ADSL service. To connect your modem: 1. Make sure that all the devices that you are working with are powered down. This includes your computer and the modem. If you have a modem connected that is not the one originally specified during your application, please disconnect it. NOTE: Line Filters must be installed onto all telephone wall sockets before you proceed with this Process.
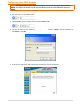
Configuring your ADSL modem NOTE: The images below are shown using Internet Explorer. Your browser may appear slightly different. NOTE: To configure your modem you will require the Welcome Letter Aussie Broadband has mailed you. 1. Open your preferred browser (EG: Internet Explorer, Safari, or Mozilla Firefox). 2. Put your cursor in the address bar. 3. Type 10.0.0.1 into the address bar then press Enter or Go. 4. You will be taken to the modem home page.
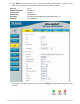
. Click WAN on the left hand menu. Enter the following information as found on your Welcome Letter. All other settings not mentioned are to be left as default. VPI / VCI ATM Encapsulation Virtual Circuit WAN Setting Username Password 8 / 35 Routed LLC Enabled PPPoE/PPPoA Yourphonenumber@adsl.aussiebroadband.com.au CaSe SeNsItIvE 7. Scroll down towards the bottom until you find. Click Apply once the above settings have been entered.
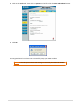
8. Click on the Tools tab. Then click on System on the left. Click the Save and Reboot button. 9. Click OK 10. Congratulations! You have now successfully setup your ADSL modem. NOTE: It can take up to 5 minutes after settings are saved for your modem to connect.
ADSL & Your Telephone Service Even though your telephone voice service and your ADSL may be provided by different companies, they are still closely tied together. This is because the ADSL Service and Voice Service share the same telephone line. Before you make any changes to your voice service always ask if the change will interfere with your ADSL service.
Internet Speed: Some Basics When you sign up with Aussie Broadband your internet speed is determined by the Plan that you selected. This speed determines how fast you can transfer data to and from the internet. For example, you may have selected the 1500/256 plan with 10GB Peak data and 10GB Off-Peak data. The 1500 represents the download speed and the 256 represents the upload speed.
Internet Speed: What Affects It? The speed of your ADSL connection can be affected by numerous factors, as shown below. Some of these you may be able to improve yourself, while others you have no control over. • Distance from the exchange: One of the main factors that determine the speed of your ADSL connection is the cable distance from the telephone exchange to your property. The closer you are to the exchange, the faster your broadband connection speed can be.
Positioning your Modem You will want to place your wireless modem somewhere that it will receive the strongest signal with the least amount of interference. For best results: Place in a Central Location: Place the modem as close to the centre of your home as possible to increase the wireless signal strength. Place in a High position: The modem should be kept off the floor and away from walls, and metal objects such as filing cabinets.
NOTE: To Setup Wireless Settings in your modem, first connect your computer to the modem with an Ethernet Cable. Once you have finished Configuring the Settings you can remove the cable and connect wirelessly. Connect to your ADSL modem Follow steps 1 to 4 on page 6 to log onto your ADSL modem Configuring the Wireless Network 1. Click Wireless and use the below settings. The SSID will become your wireless network name. We recommend WPA security, with PSK String selected.
Connecting to your Wireless Network On a Windows XP Machine If Windows is not your wireless connectivity tool you will need to contact your computer manufacturer to find out how to connect wirelessly to a network 1. On the Lower Right hand side of the screen, near the time, there should be a Wireless Network icon. Fig 3.1 – Wireless Network Icon If unable to find this icon, Left click on the Start Menu and select the Control Panel. Choose Network Connections.
4. If the network has security enabled on it, Windows XP will prompt you to enter a key. Type the encryption key into the Network Key and Confirm network Key boxes. Click Connect. Fig 3.4 – Type in Network Key & Confirm 5. The progress will be shown as the computer connects to the network. If the Wireless Network Connection window continues to show acquiring Network Address, the pre-shared key or encryption key may have been mistyped. Click Cancel and return to Step 3.
Turning Wireless On Click on the Wireless icon and Select Turn Airport On. Fig 3.8 – Turning Airport on The wireless icon will then change to Once the wireless is turned on, if you click on the wireless icon again you will see the computer searching for available wireless networks. Fig 3.9 – Searching for Available Networks Connecting to Wireless Networks Once the computer is finished scanning for available networks the wireless menu will look similar to figure 3.10.
DSL Troubleshooting Tips If you ever have problems with your ADSL connections try the following tips to help you get back on line faster: • Power Cycle Everything: It may seem trivial, but you should always turn your computer, ADSL modem and any other networking equipment off for a minimum of 1 minute at least once a week. Once done, turn your Networking Equipment and ADSL modem back on. Wait for 1 minute and then power up your computer and try connecting again. This solves a lot of connection problems.
Notes __________________________________________________________________ __________________________________________________________________ __________________________________________________________________ __________________________________________________________________ __________________________________________________________________ __________________________________________________________________ __________________________________________________________________ _____________________________________
Notes __________________________________________________________________ __________________________________________________________________ __________________________________________________________________ __________________________________________________________________ __________________________________________________________________ __________________________________________________________________ __________________________________________________________________ _____________________________________
Before Contacting the Helpdesk, Please Carry Out the following An Isolation Test: To do this, unplug all devices such as phones, answering machines, fax machines, home alarm system etc from your telephone line. Test your Internet with only your ADSL2+ modem/router plugged into the first telephone line into the property. If the problem has disappeared, sequentially plug devices back in and test until you locate the interfering device or phone point. Check to make sure suitable filters are installed.