DVC-1000 i2eye TM (Patent Pending) Broadband VideoPhone Manual v2.
Contents Introduction ...................................................................................................... 3 Package Contents ........................................................................................... 4 Features & Benefits ........................................................................................ 5 Connections .................................................................................................... 5 LEDs ...........................................
Introduction Imagine having high-quality, extremely low-cost video conferencing from a standalone, easy to use communication appliance. The D-Link i2eyeTM DVC-1000 Broadband VideoPhone accomplishes this. D-Link i2eyeTM introduces the world of video conferencing over the Internet, to bring you and your family, friends and colleagues together, in real time, anytime! The previously complicated process of conducting a video conference is simplified with the i2eyeTM DVC1000.
Package Contents ! ! ! ! ! ! ! D-Link i2eyeTM DVC-1000 Broadband VideoPhone Power Adapter Instruction Manual Quick Installation Guide Remote Control Standard Composite RCA Audio / Video Cable Cat 5 RJ-45 Ethernet Cable Note: Using a power supply with a different voltage than the one included with the DVC-1000 will cause damage and void the warranty for this product.
Features & Benefits ! ! ! ! ! ! ! ! ! ! ! ! ! ! ! ! ! ! ! Stand-alone operation - No computer needed Uses broadband cable/DSL or network connections for high-quality video H.
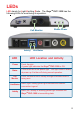
LEDs LED stands for Light-Emitting Diode. The i2eyeTM DVC-1000 has the following LEDs for monitoring its operation. i2eye Call Monitor Activity LED Power Status Call Monitor Link Status Activity Status Power Link Status LED Location and Activity Front, far right. A green light indicates the i2eyeTM DVC-1000 is ON. Front to the left of the power light. This light turns on briefly at power up. It is then off during normal operation. Front, left side of lens.
Getting Started BEFORE YOU BEGIN! Read Using the DVC-1000 with Routers, Gateways or Broadband Modems on page 33 in this manual if you are using the DVC-1000 VideoPhone with a Router, Gateway or Broadband Modem. The DVC-1000 needs to be set-up before use. Use the Quick Installation Guide (included with the DVC-1000) to perform the hardware installation. Each cable (video, audio, Ethernet and AC power) supplied for the TM i2eye has a different color on the end that connects to the DVC-1000.
Remote Control Layout Use the arrow keys along with the ENTER, CANCEL and number keys to enter information in the Setup Wizard screen. The * (asterisk--sometimes called a “star” key) is used to enter a “.” (period also called a “dot”.) When entering alphanumeric information, the left arrow key performs a backspace, deleting the character to the left of the on-screen cursor. Speakerphone Mode When a numeric input is required, (e.g.
Using the On-Screen Keyboard The DVC-1000 uses a keyboard that appears on-screen to enter words or alphanumeric characters into the Setup Wizard screens. When the cursor is located in a setup screen that requires characters to be entered, press the ENTER key to bring up the on-screen keyboard. The keyboard will only appear if the cursor is located in an area of the screen that allows text or numbers to be entered.
Using the Setup Wizard The following descriptions of the Setup Wizard screens will help you understand the purpose and procedures for providing the required information. Welcome Screen The first screen that displays on the initial startup is the Wecome Screen. This screen explains what information is needed to complete the setup and also explains how to use the remote control to navigate through the Setup Wizard. Press ENTER on the remote control to continue to the next screen.
Using the Setup Wizard (continued) Network Address Screen The Network Address screen asks for information that is needed to connect a VideoPhone call over the Internet. Most home users with a cable or DSL modem can leave the checkbox checked to obtain an IP Address automatically. If you know you cannot be assigned an IP Address automatically through a DHCP server, then uncheck the checkbox and enter your IP Address, Subnet mask and Gateway.
Using the Setup Wizard (continued) DNS (Domain Naming System) Screen If you entered an IP address in the Network Address screen (described on the previous page) you will see the screen for setting DNS server addresses. The DNS screen asks for information regarding the Domain Name System (DNS) server. You should be able to get both of these settings from your router configuration settings, ISP or your network administrator.
Using the Setup Wizard (continued) System Restart A warning message now appears asking to restart the DVC-1000 VideoPhone to complete the setup. Press the Yes button to accomplish a restart. Congratulations! You are now ready to make and receive i2eye VideoPhone calls. Using a Telephone with the DVC-1000 Although optional, it is recommended that you connect a standard telephone to the DVC-1000 VideoPhone. The telephone that you use for the DVC-1000 VideoPhone will not be connected to your phone jack.
Using the DVC-1000 Layout of the i2eye Main Screen Status Icons Main Window Main Settings Buttons Privacy Status Icons Status Message Area Self-View Banner Window Window After you have correctly setup the i2eye VideoPhone using the Setup Wizard you will see the above Main Screen each time you turn on the VideoPhone. There is a larger Main Window that displays the self-view until a call is connected and then displays the party you are calling.
Using the DVC-1000 (continued) Privacy Status Icons Privacy Status Icons appear on the Main Screen. Please see the previous page for an illustration. Audio If you select Audio Privacy in Privacy Settings window, the other party will not hear you and the audio icon will appear with a slash through it. Video If you select Video Privacy in Privacy Settings window, the other party will not see you and the video icon will appear with a slash through it.
Using the DVC-1000 (continued) Placing a Manual Dial VideoPhone Call with the Telephone Handset Pick up the telephone handset. The DVC-1000 VideoPhone senses the phone is off the hook and a prompt appears on the screen asking you to either enter a phone number or press # key to select the speed dial list. Enter the phone number in the DVC-1000 VideoPhone just as you would if you were using a regular phone.
Using the DVC-1000 (continued) Speakerphone Mode The DVC-1000 has a Speakerphone Mode if the call needs to be shared with more than one person, or when it is desirable to talk without using the telephone handset. In Speakerphone Mode, the speaker on the television and the microphone in the DVC-1000 VideoPhone are used. When a call is answered using the remote control, or a call is placed using the remote control, the DVC-1000 VideoPhone is automatically in Speakerphone Mode.
Using the DVC 1000 (continued) Entering Phone Numbers Phone numbers may be entered in the following formats (the dash is entered automatically): 1-949-555-1212: The 1 is required if you are calling outside your local area. 555-1212: Will work only within the local area code. The local area code is specified in the Settings > Personal Info screen. Entering IP Addresses Valid entry for the IP address field would include: 205.104.32.20 (Dials a VideoPhone, or other H.
Using the Configuration Menu Main Screen After starting the DVC-1000 VideoPhone, the Main Screen is displayed. The self-view image should be displaying in the larger window. The following buttons reside on the main screen: Dial - Set up a speed dial list and choose from several methods of placing a call to other VideoPhones. You may choose to manually make a call with either another i2eye VideoPhone number, enter an IP Address, or select an entry on the speed dial list.
Using the Configuration Menu (continued) Main Screen > Dial Mom and Dad D-Link Grandma Mary The Dial screen contains the speed dial list as well as buttons to manage the Speed Dial List and make manual VideoPhone calls Speed Dial List - This list contains up to 10 Speed Dial entries. Click the Add button to add to this list. A name is dialed by highlighting the item and pressing the ENTER button on the remote. Manual Dial - Allows the manual dialing of another user by telephone number or IP Address.
Using the Configuration Menu (continued) Main Screen > Dial (continued) Add - To add a Speed Dial entry, enter a name and a number (or address) using the remote’s number pad or the onscreen keyboard. 949-555-1212 Click OK to complete the addition of a Speed Dial entry. Remove - Removes a selected entry from the Speed Dial List. Edit - Allows the modification of either the name or number (or address) of a selected Speed Dial entry.
Using the Configuration Menu (continued) Main Screen > View The View screen allows the user to modify what the main screen may look like. Default View This is the standard view showing both the larger main view window and the smaller selfview window. Full Screen View - The main video window is seen in this view. When no call is in progress, the self-view will display. Once a call is connected, the remote caller’s video will display as well as a self-view picture-in-picture.
Using the Configuration Menu (continued) Main Screen > Settings The Settings screen contains four buttons that allow the application to be customized in different ways. Each of these settings are detailed starting on the next page. General - Controls settings that adjust the way you view, listen and use the DVC-1000 VideoPhone. Personal Information - Contains information about the user and edits user information.
Using the Configuration Menu (continued) Main Screen > Settings >General Always answer incoming calls- Select this checkbox to allow the DVC-1000 to automatically accept any incoming call. If this checkbox is not selected and a call is received, a dialog will appear that will ask if the receiver wants to accept the incoming call. When this checkbox is selected, the incoming call will be answered without any ring.
Using the Configuration Menu (continued) Main Screen >Settings > Personal Information 555-1212 Name- Area Code & Phone # - Enter your name here. When a call is placed from your VideoPhone, the name you enter will be displayed as a Caller ID on the remote end of the call. Unless the VideoPhone you call has auto-answer turned on, the party you wish to call will decide whether or not to accept your call based on this name. The number is one you create for friends, family, and others to call you.
Using the Configuration Menu (continued) Main Screen > Settings > Network Address Controls how the DVC-1000 obtains an IP Address. DNS Allows you to enter a primary and secondary DNS address. Public IP This screen controls how a Public IP Address is obtained. If the Public IP button is “greyed out” it means that your network is unable to obtain an IP Address. Please see #17 in the Troubleshooting section in this manual for more information.
Using the Configuration Menu (continued) Main Screen > Settings > Network > Address Obtain an IP Address The DVC-1000 VideoPhone will attempt to obtain the IP Address from the DHCP server. automatically - When this is checked (the default), the other settings on this screen are automatically grayed. IP Address Subnet mask Gateway - These are all Internet settings that need to be provided by your router configuration settings, ISP or network administrator.
Using the Configuration Menu (continued) Main Screen > Settings > Network > DNS Primary DNS - Enter the Primary Internet DNS (Domain Name System). These are Internet server addresses that you should be able to obtain from your router configuration settings, ISP or network administrator. Secondary DNS Enter the Secondary DNS address if you have one. Though both primary and secondary DNS addresses are preferred, only the primary address is required.
Using the Configuration Menu (continued) Main Screen > Settings > Network > Public IP Address This screen allows you to configure, view, or edit the VideoPhone’s public IP Address. If you are sharing a broadband connection with another device (such as a PC), you typically will need a router to accomplish the sharing of the connection. Your router will usually have a Network Address Translation (NAT) mode installed.
Using the Configuration Menu (continued) Main Screen > Settings > Network > Network Speed The Network Speed screen offers you the option of selecting the speed that is the best match for your current network or connection. Change the settings by selecting the send or receive Change button and select the value desired by moving the selection up or down in the list box. Overestimating these settings may affect the call quality and is therefore not recommended.
Using the Configuration Menu (continued) Main Screen > Settings > Update The Update screen has several functions: Set the checkbox to automatically check for updates of the DVC1000 VideoPhone. Check for an update right now. Display the current version information. Set Defaults will restore all settings to factory defaults. This will erase all speed dial entries that have been added. If you select Check Now for an Update then the DVC-1000 will check for an update.
Using the Configuration Menu (continued) Main Screen > Privacy Audio Privacy - Audio Privacy prevents the audio on your side from being sent to the remote caller. No one on the other end of the VideoPhone call will be able to hear you if this setting is checked, although they can see you. Video Privacy - Video Privacy keeps your video from being sent to the remote caller. The person on the other end of the videoconference call will not be able to see you if this setting is checked.
Using the DVC-1000 with Routers, Gateways and Broadband Modems The D-Link DI-614+ and the DI-604 Routers have a firmware upgrade that allows for easy configuration of the i2eye. With the DI-614+, DI-604 and the firmware upgrade, you will not need to manually configure the ports. If you have other Routers or you are having difficulty with the i2eye, please read the information on page 34 - page 38 to learn how to open ports on routers.
Using the DVC-1000 with Routers, Gateways or Broadband Modems (continued) Opening Ports on Your Routers and Gateways The firewall security features built into most routers and gateways prevent users from accessing the video and audio of their DVC-1000. A router connects to the Internet through a series of numbered ports. The ports used by the DVC-1000 are blocked from access over the Internet by the firewall features of the router.
Using the DVC-1000 with Routers, Gateways or Broadband Modems (continued) Opening Ports on Your Routers and Gateways (continued) How to open ports on a router A B C D E 153258 153258 F G A total of 7 ports must be opened for the DVC-1000 to work with most routers or firewalls. To open these ports, please do the following: A. Click Enabled B. Give the Virtual Server a Name (such as i2eye) C.
Using the DVC-1000 with Routers, Gateways or Broadband Modems (continued) Opening Ports on Your Routers and Gateways (continued) You have now completed the entering of one port to be opened. You will need to open six more ports. Repeat steps A through G five more times for each one of the following five ports: 15329, 15330, 15331, 15332 and 15333. The last port will be opened slightly differently: ! Repeat steps A through C on the previous page.
Using the DVC-1000 with Routers, Gateways, or Broadband Modems (continued) From the following sections, choose the heading that best applies to your equipment or networking configuration. Network With Multiple Public IP Addresses A Public IP Address is visible on the Internet. (Most commonly found in business environments.) Recommended Procedure: If there is an available public IP address, simply enter the IP address, subnet mask, and gateway into the applicable fields under the network settings page.
Using the DVC-1000 with Routers, Gateways, or Broadband Modems (continued) Broadband Modem, Multiple PCs and a Hub Commonly found in small offices, home offices, or homes with more than one PC where multiple public IP addresses are available. In order to install the DVC-1000 Video Phone as another device behind a hub assign an available public IP address to the Video Phone. Refer to the Broadband Modem Only section, below, for detailed installation instructions.
Troubleshooting 1. Cannot make a call using a phone number. Check that you did not misdial the number. If the person you are calling is outside of your area code, you must dial a “1” before the area code and then the number. The VideoPhone is not connected to the Internet. The VideoPhone is not registered with the directory service. It may take the VideoPhone up to 10 minutes to register. Verify all network settings, including DNS. Far side of the call is not registered with the directory service.
Troubleshooting (continued) 4. Telephone or televison produces an off-hook signal. Telephone is off the hook. Hang up the phone. 5.Telephone or television produces a fast busy signal. Person you are trying to call is not registered with the directory service. Call the person using direct IP or wait until the person is registered with the directory service. Person you are trying to call is in a call or has rejected your call. Try your call at a later time. 6.
Troubleshooting (continued) 9. No video in a call. Video cables are not plugged in correctly. Ensure that your video cables are correctly plugged into the TV. Make sure that the TV is set for video input. Consult your TV manual for reference. Incorrect network speeds. See Incorrect Network Speeds Section in this Troubleshooting Guide. VideoPhone is not functioning properly behind a firewall. Place the IP address of the VideoPhone in the DMZ of the firewall.
Troubleshooting (continued) 11. Video freezes during a call. Far side muted their video. If the far side mutes their video you will not be able to see him or her. Network is congested. Give the VideoPhone a couple of minutes to try to recover, or disconnect the call and try again at a later time. 12. No audio in call. Audio cables are not plugged in correctly. Ensure that your audio cables are correctly plugged into the TV. Make sure that the TV is set for video input. Check the volume level on the TV.
Troubleshooting (continued) VideoPhone is not functioning properly behind NAT. Go to Settings/Network/Public IP. Select “Auto detect public IP Address.” If the VideoPhone is unable to detect the public IP Address, it should be entered manually using “Use specific IP Address.” The public IP Address is given to you by either your ISP or your network administrator. Incorrect network speeds. See the Incorrect Network Speeds section in this Troubleshooting Guide Volume is adjusted incorrectly.
Troubleshooting (continued) 16. Error Displays on main screen. VideoPhone cannot obtain public IP Address (Router’s address). See “VideoPhone cannot obtain IP Address automatically” section below. 17. VideoPhone cannot obtain IP Address automatically Not properly connected to a DHCP server. Check connection to LAN, by verifying a link light on the back of the VideoPhone. Make sure that the router is set-up for DHCP. Consult either your router’s user manual for reference or your network administrator.
Troubleshooting (continued) 20. VideoPhone is not connected to the Internet. Ethernet cable is not properly plugged into the VideoPhone. Ensure that the RJ-45 cable is properly plugged into the back of the VideoPhone. A steady green light on the Ethernet port indicates a valid link has been made. Invalid DNS entries. The VideoPhone requires at least one valid DNS entry. Consult your ISP or network administrator for the DNS IP Addresses. Invalid IP, subnet mask and/or gateway.
Troubleshooting (continued) 22. VideoPhone does not boot up. Video is not being displayed on television. Ensure that the video and audio cables are plugged in correctly to both the VideoPhone and television. The television should be set for video input. Consult your television user manual for support. The VideoPhone doesn’t have power or is not turned on. Ensure that the AC adapter is plugged into an outlet and the other end is plugged into the VideoPhone.
Frequently Asked Questions 1 What is D-Link´s i2eye? i2eye (TM) is a breakthrough communications video appliance that provides IP videoconferencing and connects to any standard television. Simple to install and use, the small unit sits on top of the television and contains a video camera that can stream up to 30 frames per second over the Internet to friends, family and business associates.
Frequently Asked Question (continued) 6 How large will the image be? As large as the TV screen. i2eye supports three screen formats. The first is a picture-in-picture mode that has the incoming video covering about half the television screen and the outbound video in a smaller window. The second is full screen mode. This mode displays the incoming video across the entire television screen. The third is connection status mode.
Frequently Asked Question (continued) 11 What devices can I connect to with the DVC-1000? With the DVC-1000 you can connect to any hardware or software that is H.323 compatible. If you are not sure if your hardware or software is H.323 compatible, please contact the manufacturer/developer. If you are using a PC with a Windows operating system, you can use NetMeeting with any webcam to connect to the DVC-1000. NetMeeting is a common H.323 compatible software application.
Glossary of Terms Bandwidth: A measure of the rate at which data can be sent through the network. This value is usually given in bits per second (bps) or kilobits per second (kbps). CIF (Common Intermediate Format): An intermediate video format. When D-Link DVC-1000 video is transmitted over a network, the sizes will be CIF, QCIF, or SQCIF. The VideoPhone will default to CIF. CIF resolution is 352 x 288.
Glossary of Terms (continued) Home Gateway: A term commonly interchanged with router. IP Address (Internet Protocol Address): An IP Address is a number that identifies a computer connected to the Internet. Every computer that is connected to the Internet must have a unique IP Address. An IP Address consists of four sections separated by periods. Each section contains an 8-bit value represented as a number ranging from 0 to 255. Public IP Address: An IP Address that is not behind a NAT.
Glossary of Terms (continued) QoS (Quality of Service): Allows guaranteed bandwidth and packet delivery between network devices over a network. Router: A device that attaches two or more network devices and forwards data accordingly. Most consumer type routers act as DHCP servers, NATs and simple firewalls. DMZ (Demilitarized Zone): Devices set up to be in the router’s DMZ will see all network traffic.
Technical Specifications Internal Processor ARM-9 ASIC Communication Processor Standards Compliant ITU H.323 (IP communications) Video: H.263 Audio: G.711, G.
Technical Specifications (continued) User Interface Dialing Diagnostics Quality of service measurement Manual or auto answer Incoming Caller ID Privacy shutter via video mute and/or audio mute Do Not Disturb mode Answer using infrared remote control or the telephone Dialing Capabilities Speed dial list with ten entries Manual dialing with telephone handset using Directory Service Manual dialing with direct IP entry Remote Software Update Software update, automatic or manual Network Requirements IP-based net
Contacting Technical Support Technical Support You can find the most recent software and user documentation on the i2eye website. D-Link provides free technical support for customers within the United States and Canada for the duration of the warranty period on this product. U.S. and Canadian customers can contact D-Link technical support through our web site or by phone.
Warranty and Registration Subject to the terms and conditions set forth herein, D-Link Systems, Inc. (“D-Link”) provides this Limited warranty for its product only to the person or entity that originally purchased the product from: ! ! D-Link or its authorized reseller or distributor and Products purchased and delivered within the fifty states of the United States, the District of Columbia, U.S. Possessions or Protectorates, U.S. Military Installations, addresses with an APO or FPO.
! The customer must submit with the product as part of the claim a written description of the Hardware defect or Software nonconformance in sufficient detail to allow D-Link to confirm the same. ! The original product owner must obtain a Return Material Authorization (“RMA”) number from the Authorized D-Link Service Office and, if requested, provide written proof of purchase of the product (such as a copy of the dated purchase invoice for the product) before the warranty service is provided.
Governing Law: This Limited Warranty shall be governed by the laws of the State of California. Some states do not allow exclusion or limitation of incidental or consequential damages, or limitations on how long an implied warranty lasts, so the foregoing limitations and exclusions may not apply. This limited warranty provides specific legal rights and the product owner may also have other rights which vary from state to state. Trademarks: D-Link is a registered trademark of D-Link Systems, Inc.