DVC-1100 i2eye TM (Patent Pending) Wireless Broadband VideoPhone Manual v1.
Contents Introduction ...................................................................................................... 3 Package Contents ........................................................................................... 4 System Requirements ...................................................................................... 4 Features & Benefits ......................................................................................... 5 Connections .........................................
Introduction Imagine having high-quality, low-cost videoconferencing from a standalone, easy to use communication appliance that supports your existing wireless network. The D-Link i2eye TM DVC-1100 Wireless Broadband VideoPhone accomplishes this.
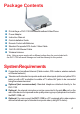
Package Contents D-Link i2eyeTM DVC-1100 Wireless Broadband VideoPhone Power Adapter Instruction Manual Quick Installation Guide Remote Control with Batteries Standard Composite RCA Audio / Video Cable Cat 5 RJ-45 Ethernet Cable Wireless Antenna Note: Using a power supply with a different voltage than the one included with the DVC-1100 will cause damage and void the warranty for this product.
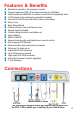
Features & Benefits Standalone operation - No computer needed Supports enhanced 802.11b wireless networks up to 22 Mbps Uses broadband cable/DSL or network connections for high-quality video H.
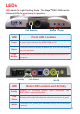
LEDs LED stands for Light-Emitting Diode. The i2eyeTM DVC-1100 has the following LEDs for monitoring its operation. Call Monitor Status Power LED Front LED Location Power A green light indicates the DVC-1100 is ON Status This LED turns on briefly at power up.
Getting Started BEFORE YOU BEGIN! Read the section on using the DVC-1100 with routers, gateways or broadband modems starting on page 47 in this manual if you are using the DVC-1100 VideoPhone with a router, gateway or broadband modem. The DVC-1100 needs to be setup before use. You can use the Quick Installation Guide (included with the DVC-1100) to perform the hardware installation.
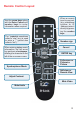
Remote Control Layout When a numeric input is required, (e.g., a telephone number or IP Address) enter it directly by pressing the number keys. Use the arrow keys along with the Enter, Cancel and number keys to enter information when required. The * (asterisk--sometimes called a “star” key) is used to enter a “.” (period also called a “dot”.) Number sign When entering alphanumeric information, the left arrow key performs a backspace, deleting the character to the left of the on-screen cursor.
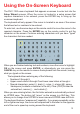
Using the On-Screen Keyboard The DVC-1100 uses a keyboard that appears on-screen to enter text into the Setup Wizard screens. When the cursor is located in a setup screen that requires characters to be entered, press the ENTER key to bring up the on-screen keyboard. The keyboard will only appear if the cursor is located in an area of the screen that allows text or numbers to be entered. To enter text, use the arrow keys on the remote control to move the cursor to the required character.
Using the Setup Wizard The following descriptions of the Setup Wizard screens will help you understand the purpose and procedures for providing the required information. Welcome Screen The first screen that displays on the initial startup is the Welcome Screen. This screen explains what information is needed to complete the setup and also explains how to use the remote control to navigate through the Setup Wizard. Press ENTER on the remote control to continue to the next screen.
Using the Setup Wizard (continued) Wireless Site Survey Screen To use your DVC-1100 wirelessly, it is necessary to find an available wireless network. The Wireless Site Survey screen makes this simple. Upon starting, the DVC-1100 performed a “site survey” looking for wireless network devices the DVC-1100 can connect to. These discovered wireless devices are displayed by their SSID name on the Wireless Site Survey screen. On a home network, you may have just one entry.
Using the Setup Wizard (continued) Wireless Settings Screen The Wireless Settings screen shows the SSID of the selected wireless device the DVC-1100 will attach to and allows setting the DVC-1100 for WEP encryption. The DVC-1100 has WEP encryption disabled by default. i2eye AP Encryption will make your wireless network more secure, but may slow down the network due to the increased traffic caused by the encryption. SSID The SSID name selected on the Wireless Site Survey screen appears here.
Using the Setup Wizard (continued) Wireless Settings Screen (continued) WEP Type Press the down arrow on the remote to select the WEP Type. Select one of the WEP Types by pressing Enter. The WEP Type must match the type used by the wireless network if encryption is enabled. Disabled: No WEP encryption (Default) 64-bit 128-bit 256-bit Key ID Press the down arrow on the remote to select the Key ID. You can enter up to four encryption keys that is used to encrypt data passed wirelessly over the network.
Using the Setup Wizard (continued) Wireless Settings Screen (continued) A 256-bit encryption key must be exactly 58 characters in length. The box for entering a key will scroll to allow entering numbers that do not fit in the box. (Example:12345678901234567890123456789012345678901234567890FFAAABBE is a valid string of 58 characters for 256-bit encryption.) Only one key needs to be entered. Press the down arrow after entering the first key to enter a second key.
Using the Setup Wizard (continued) Network Address Screen The Network Address screen asks for information that is needed to connect a DVC-1100 call over the Internet. Most home users with a cable or DSL modem can leave the checkbox checked to obtain an IP address automatically. If you know you cannot be assigned an IP Address automatically through a DHCP server then uncheck the checkbox and enter your IP Address, Subnet mask and Gateway.
Using the Setup Wizard (continued) DNS (Domain Naming System) Screen If you entered an IP address in the Network Address screen (described on the previous page) you will see the screen for setting DNS server addresses. The DNS screen asks for information regarding the Domain Name System (DNS) server. You should be able to get both of these settings from your router configuration settings, ISP or your network administrator.
Using the Setup Wizard (continued) System Restart A message appears asking to restart the DVC-1100 to complete the setup. Press the Yes button to accomplish a restart. Congratulations! You are now ready to make and receive i2eye VideoPhone calls. Using a Telephone with the DVC-1100 Although optional, it is recommended that you connect a standard telephone to the DVC-1100 VideoPhone. The telephone that you use for the DVC-1100 VideoPhone will not be connected to your phone wall jack.
Using the DVC-1100 Status Icons Main Window Status Message Area Main Settings Buttons Ready for call Privacy Status Icons Self-View Window Banner Window Layout of the i2eye Main Screen After the DVC-1100 VideoPhone is setup by using the Setup Wizard, you will see the above Main Screen each time you turn on the VideoPhone. There is a larger Main Window that displays the self-view until a call is connected.
Using the DVC-1100 (continued) If a Status Icon is displayed, this indicates the operation the icon represents is not complete. The i2eye Update status icon appears at startup. While the icon appears, the DVC-1100 is quickly determining if auto-update is enabled. If it is enabled, the DVC-1100 will determine if an update exists. When this is complete, the icon disappears.
Using the DVC-1100 (continued) Privacy Status Icons Privacy Status Icons appear on the Main Screen. Please see page 18 for an illustration. Audio If you select Audio Privacy in the Privacy Settings window, the other party will not hear you and the audio icon will appear with a slash through it. Video If you select Video Privacy in the Privacy Settings window, the other party will not see you and the video icon will appear with a slash through it.
Using the DVC-1100 (continued) Placing a Speed-dial VideoPhone Call with the Telephone Handset To add a VideoPhone number or IP address as a Speed Dial entry, please see page 29. Pick up the telephone handset. The DVC-1100 VideoPhone senses the telephone is off the hook and a prompt appears on the screen asking you to either enter a phone number or press # key to select the Speed Dial List. The Speed Dial List appears, displaying the speed dial number assigned to the party you want to call.
Using the DVC-1100 (continued) Placing a Speed-dial VideoPhone Call with the Remote To add a VideoPhone number or IP address as a Speed Dial entry, please see page 29. From the Main Menu, select DIAL. In the Dial screen the Speed Dial List box is highlighted and the first speed dial entry is selected. Navigate with the arrow keys to select the speed dial number assigned to the party you want to call and press ENTER.
Using the DVC-1100 (continued) Switching From a Private Call to a Speakerphone Call If a VideoPhone call is in progress using a telephone handset, Speakerphone Mode can be enabled: Press the Speakerphone button on the DVC-1100 remote control. When the dialog appears on the video display telling you to hang up the phone, go ahead and hang up the phone. Speakerphone Mode is now active.
Using the DVC-1100 (continued) Entering Phone Numbers The DVC-1100 can connect with other DVC-1100 VideoPhones throughout the world. During the setup of the DVC-1100, you entered a Country code into the Personal Information screen, along with an Area code and a Phone number. To make calling a VideoPhone similar to using a regular telephone, you enter VideoPhone numbers in a format similar to your local telephone system.
Using the DVC-1100 (continued) Calling a VideoPhone with a Different Area Code To complete a call to another VideoPhone with the same Country code, but a different Area code (i.e., “a long-distance” call), enter the Area code and Phone number of the party you are calling.
Using the DVC-1100 (continued) Entering IP Addresses Calling a VideoPhone or H.323 Device with an IP Address If you are unable to Dial another DVC-1100 by using its Phone number, you can complete a call by entering the IP Address of the VideoPhone you want to call. This will require obtaining the IP Address for the device you want to call. To complete a call to another VideoPhone or any other compatible H.
Using the Configuration Menu Main Screen Ready for call After starting the DVC-1100 VideoPhone, the Main Screen is displayed. The self-view image should be displaying in the larger window. The following buttons reside on the main screen: Dial Set up a speed dial list and choose from several methods of placing a call to other VideoPhones. You can make a call by entering an i2eye VideoPhone number, by entering an IP address, or select an entry on the speed dial list.
Using the Configuration Menu (continued) Main Screen > Dial D-Link Grandma Mary Mom and Dad School Ted’s Farm Supply Work The Dial screen contains the Speed Dial List as well as buttons to manage the Speed Dial List and make manual VideoPhone calls Speed Dial List This list contains up to 50 Speed Dial entries. Click the Add button to add to this list. A name is dialed by highlighting the item and pressing the ENTER button on the remote.
Using the Configuration Menu (continued) Main Screen > Dial (continued) Add To add a Speed Dial entry, enter a name and a number (or an IP address) using the remote’s number pad or the on-screen keyboard. John Smith 1 949 555-1212 Click OK to complete the addition of a Speed Dial entry. Remove Removes a selected entry from the Speed Dial List. Edit Allows the modification of either the name or number (or IP address) of a selected Speed Dial entry.
Using the Configuration Menu (continued) Main Screen > View The View screen allows the user to modify what the Main Screen may look like. Default View This is the standard view showing both the larger main view window and the smaller self-view window. Full Screen View The main video window is seen in this view. When no call is in progress, the self-view will display. Once a call is connected, the remote caller’s video will display as well as a self-view picture-in-picture.
Using the Configuration Menu (continued) Main Screen > Settings The Settings screen contains six buttons that allow the DVC-1100 to be customized in different ways. Each of these settings are detailed starting on the next page. Controls settings that adjust the way you view, listen and General use the DVC-1100 VideoPhone. Personal Information Contains information about the user and allows editing of user information.
Using the Configuration Menu (continued) Main Screen > Settings >General Always answer incoming calls Selecting this checkbox allows the DVC-1100 to automatically accept any incoming call. You will hear two short beeps if a call is received with auto-answer enabled. If this checkbox is not selected and a call is received, a dialog box appears asking if you want to accept the incoming call.
Using the Configuration Menu (continued) Main Screen >Settings > Personal Information John Smith 1 555-1212 949 555-1212 Name Enter your name here. When a call is placed from your VideoPhone, the name you enter will be displayed as a Caller ID on the remote end of the call. Unless the VideoPhone you call has auto-answer turned on, the party you wish to call will decide whether or not to accept your call based on this name.
Using the Configuration Menu (continued) Main Screen > Settings > Network Address Controls how the DVC-1100 obtains an IP address. DNS Allows you to enter a primary and secondary DNS address. Public IP This screen controls how a public IP address is obtained. If the Public IP button is “grayed out”, it means that your DVC-1100 is in the process of searching for a public IP address. If this lasts for more than 30 seconds, the DVC-1100 will most likely not find a public IP address.
Using the Configuration Menu (continued) Main Screen > Settings > Network > Address X Obtain an IP Address The DVC-1100 VideoPhone will attempt to obtain the IP Address from the DHCP server. When this is automatically checked (the default), the other settings on this screen are automatically grayed. IP Address, Subnet mask & Gateway These are all Internet settings that need to be provided by your router configuration settings, ISP or network administrator.
Using the Configuration Menu (continued) Main Screen > Settings > Network > DNS Primary DNS Enter the Primary Internet DNS (Domain Name System). These are Internet server addresses that you should be able to obtain from your router configuration settings, ISP or network administrator. Secondary DNS Enter the Secondary DNS address if you have one. Though both primary and secondary DNS addresses are preferred, only the primary address is required.
Using the Configuration Menu (continued) Main Screen > Settings > Network > Public IP Address This screen allows you to view or edit the VideoPhone’s public IP address. If you are sharing a broadband connection with another device (such as a PC), you typically will need a router to accomplish the sharing of the connection. Your router will usually have a Network Address Translation (NAT) mode installed. The NAT affects the IP address of the DVC-1100 and any other devices sharing your Internet Connection.
Using the Configuration Menu (continued) Main Screen > Settings > Network > Network Speed The Network Speed screen offers you the option of selecting the speed that is the best match for your current network or connection. Change the settings by selecting the send or receive Change button and select the value desired by moving the selection up or down in the list box. Overestimating these settings may affect the call quality and is not recommended.
Using the Configuration Menu (continued) Main Screen > Settings > Network > PING PING is a network or Internet utility, used to test a network or Internet connection. If you are having problems establishing a connection to another VideoPhone after the setup of the DVC-1100, you can use the PING function to test if your Internet connection is working correctly. To use the PING function, from the remote control enter a known IP Address on your network or on the Internet into the Input Host Address box.
Using the Configuration Menu (continued) Main Screen > Settings > Network > Wireless Site Survey 47 42 36 36 33 18 i2eye AP Router Default Daisy95 Study001 Sam’s AP Upon startup, the DVC-1100 performs a “site survey” looking for available wireless networks. Any discovered wireless devices are displayed by their SSID name. On a home network, you may have just one entry. In a business, there may be numerous wireless devices listed.
Using the Configuration Menu (continued) Main Screen > Settings > Network > Wireless Site Survey > Wireless Settings i2eye AP The Wireless Settings screen controls the following wireless connection and encryption settings on the DVC-1100: SSID The name of the selected wireless device from the Wireless Site Survey screen. This name can be entered or edited using the on-screen keyboard (e.g.
Using the Configuration Menu (continued) Main Screen > Settings > Network > Wireless Site Survey > Wireless Settings (continued) Key ID Selects which of the four keys, listed to the right on the screen, is the active encryption key. You can enter up to four encryption keys that are used to encrypt data passed wirelessly over the network. Only one of the keys are used for encryption.
Using the Configuration Menu (continued) Main Screen > Settings > Update The Update screen has several functions: Click the box to automatically check for updates of the DVC-1100 VideoPhone. It is recommended this checkbox is checked to allow updates to be found. Check for an update right now. Displays the current version information. Set Defaults will restore all settings to factory defaults. This will also erase all speed dial entries that have been added.
Using the Configuration Menu (continued) Main Screen > Settings > Video You can fine tune the video display from the Video Settings screen. Control over the following settings is available: • Color Saturation • Image Brightness • Image Contrast • Video AGC Gain To adjust any of the four video controls: 1. Use the up/down remote control arrow keys to select which control needs adjustment. 2. Press the right arrow to increase the setting and the left arrow to decrease the setting.
Using the Configuration Menu (continued) Main Screen > Settings > Mic Vol You can adjust the volume of the built-in microphone from the Volume Adjustment screen. This adjustment will control how the party on the other end of the VideoPhone connection hears you. To adjust the volume, press the right arrow on the remote control to increase the setting and the left arrow to decrease the setting. The slider bar will indicate the volume level. Click the Apply button to save the change.
Using the Configuration Menu (continued) Main Screen > Privacy Audio Privacy Audio Privacy prevents the audio on your side from being sent to the remote caller. No one on the other end of the VideoPhone call will be able to hear you if this setting is checked, although they can see you. Video Privacy Video Privacy keeps your video from being sent to the remote caller. The person on the other end of the videoconference call will not be able to see you if this setting is checked.
Using the DVC-1100 with D-Link Routers Most D-Link routers now support a feature that allows for easy one-click configuration of the DVC-1100. You will not need to manually configure the ports. Upgrading your router to the latest firmware might be necessary to support this feature. If you have other routers or you are having difficulty with the DVC-1100, please read the information on pages 48 through page 52 to learn how to open ports on routers.
Using the DVC-1100 with Routers, Gateways or Broadband Modems Opening Ports on Your Routers and Gateways The firewall security features built into most routers and gateways may prevent users from accessing the video and audio of their DVC-1100. A router connects to the Internet through a series of numbered ports. The ports used by the DVC-1100 are often blocked from access over the Internet by the firewall features of the router.
Using the DVC-1100 with Routers, Gateways or Broadband Modems (continued) Opening Ports on Your Routers and Gateways (continued) How to open ports on a router A B C D E 15328 15328 F G A total of 7 ports must be opened for the DVC-1100 to work with most routers or firewalls. To open these ports, please do the following: A. Click Enabled B. Give the Virtual Server a Name (such as i2eye) C.
Using the DVC-1100 with Routers, Gateways or Broadband Modems (continued) Opening Ports on Your Routers and Gateways (continued) You have now completed the entering of one port to be opened. You will need to open six more ports. Repeat steps A through G five more times for each one of the following five ports: 15329, 15330, 15331, 15332 and 15333. The last port will be opened slightly differently: Repeat steps A through C on the previous page.
Using the DVC-1100 with Routers, Gateways, or Broadband Modems (continued) From the following sections, choose the heading that best applies to your equipment or networking configuration. Network With Multiple Public IP Addresses A Public IP Address is visible on the Internet. (Most commonly found in business environments.) Recommended Procedure: If there is an available public IP address, simply enter the IP address, subnet mask, and gateway into the applicable fields in the Network Settings screen.
Using the DVC-1100 with Routers, Gateways, or Broadband Modems (continued) Broadband Modem, Multiple PCs and a Hub Commonly found in small offices, home offices, or homes with more than one PC where multiple public IP addresses are available. In order to install the DVC-1100 VideoPhone as another device behind a hub assign an available public IP address to the VideoPhone. Refer to the Broadband Modem Only section, below, for detailed installation instructions.
Troubleshooting 1. Cannot make a call using a phone number. Check that you did not misdial the number. Remember to dial a country code and area code for all calls when using a telephone handset to make video calls. The VideoPhone is not connected to the Internet. The VideoPhone is not registered with the Directory Service. It may take the VideoPhone up to 10 minutes to register. Verify all network settings, including DNS. Far side of the call is not registered with the Directory Service.
Troubleshooting (continued) 5. Picking up the phone displays a window with speed dial list or brings up a message about no entries in the speed dial list. VideoPhone is not registered with the Directory Service. Sometimes it takes the VideoPhone up to ten minutes to register. Verify all network settings, including DNS. 6. Telephone doesn’t ring with an incoming call. VideoPhone is set for Auto-Answer. If the VideoPhone is set up for Auto-Answer then the phone will not ring with an incoming call.
Troubleshooting (continued) 9. No video in a call. Video cables are not plugged in correctly. Ensure that your video cables are correctly plugged into the TV. Make sure that the TV is set for video input. Consult your TV manual for reference. Incorrect network speeds. See #23 Incorrect Network Speeds Section in this Troubleshooting Guide. VideoPhone is not functioning properly behind a firewall. Place the IP address of the VideoPhone in the DMZ of the firewall.
Troubleshooting (continued) 11. No audio in call. Audio cables are not plugged in correctly. Ensure that your audio cables are correctly plugged into the TV. Make sure that the TV is set for video input. Check the volume level on the TV. Consult your TV manual for reference. Telephone is not setup properly. Plug the telephone into the back of the VideoPhone. If the telephone is powered (cordless) make sure that it is plugged into a power supply. Consult your telephone user manual for reference.
Troubleshooting (continued) 13. Audio has an echo. Far side television is too loud. The far side television volume needs to be turned down. 14. Excessive delay during a conversation. Incorrect network speed settings (too fast). Decrease the send/ receive speeds from the Settings>Network>Speed screen and attempt the call again. 15. Error displays on Main Screen. Unable to find the Update Server. No connection to the Internet. Local setting may be incorrect. Firewall not allowing FTP out.
Troubleshooting (continued) 18. Error message displays on main screen. VideoPhone could connect to the selected wireless network. Check the status of other wireless devices on the network. Confirm the wireless router and any access points are configured and operating normally. Wireless settings do not match wireless network settings. Check the wireless settings for the network wireless router or access point. Confirm the SSID, authentication type, key length match.
Troubleshooting (continued) 21. VideoPhone reports packet loss. Incorrect Network Speeds. See Incorrect Network Speeds section in this Troubleshooting Guide. Network line is congested. If the packet loss is from one to six percent it will probably be due to network congestion. The VideoPhone will be able to recover. 22. VideoPhone is not connected to the Internet. Ethernet cable is not properly plugged into the VideoPhone. Ensure that the RJ-45 cable is properly plugged into the back of the VideoPhone.
Troubleshooting (continued) 24. VideoPhone does not boot up. Video is not being displayed on television. Ensure that the video and audio cables are plugged in correctly to both the VideoPhone and television. The television should be set for video input. Consult your television user manual for support. The VideoPhone doesn’t have power or is not turned on. Ensure that the AC adapter is plugged into an outlet and the other end is plugged into the VideoPhone.
Troubleshooting (continued) 4. Make sure that the antenna is positioned for best reception by using the software signal strength tools included with your product. 5. Keep your product away (at least 3-6 feet) from electrical devices that generate RF noise, like microwaves, Monitors, electric motors, etc. 6. If you are using 2.4GHz cordless phones or X-10 (wireless products such as ceiling fans, lights, and home security systems), your wireless connection will degrade dramatically or drop completely. 7.
Frequently Asked Questions 1 What is D-Link´s i2eye? i2eye (TM) is a breakthrough communications video appliance that provides IP videoconferencing and connects to any standard television. Simple to install and use, the small unit sits on top of the television and contains a video camera that can stream up to 30 frames per second over the Internet to friends, family and business associates.
Frequently Asked Question (continued) 6 How large will the image be? As large as the TV screen. The DVC-1100 supports three screen formats. The first is a picture-in-picture mode that has the incoming video covering about half the television screen and the outbound video in a smaller window. The second is full screen mode. This mode displays the incoming video across the entire television screen. The third is connection status mode.
Frequently Asked Question (continued) 11 What devices can I connect to with the DVC-1100? With the DVC-1100 you can connect to any hardware or software that is H.323 compatible. If you are not sure if your hardware or software is H.323 compatible, please contact the manufacturer/developer. If you are using a PC with a Windows operating system, you can use Microsoft NetMeeting with any webcam to connect to the DVC-1100. NetMeeting is a common H.323-compatible videoconferencing software application.
Glossary of Terms 802.11b: A wireless networking standard that supports data encryption and up to 11Mbps bandwidth. Authentication: The process of verifying a user on a network is who they say they are and preventing unauthorized users from network access. Bandwidth: A measure of the rate at which data can be sent and received through the network. This value is usually given in bits per second (bps) or Megabits per second (Mbps). CIF (Common Intermediate Format): An intermediate video format.
Glossary of Terms (continued) Far side: The remote connection of the videoconference. Your connection is the Local Connection. Firewall: A security mechanism placed between networks, which restricts certain types of data to devices behind the firewall. H.323: Standard defining videoconferencing over the Internet. Home Gateway: A term commonly interchanged with router. Also called a residential gateway.
Glossary of Terms (continued) LAN (Local Area Network): A network that is designed to span small distances. These are most commonly used in small buildings, businesses and homes with multiple PCs. See WAN. NAT (Network Address Translation): A technology that allows multiple network devices to share the same IP Address. NAT devices forward all incoming and outgoing information to the correct network devices. Most NAT devices have firewall capabilities.
Glossary of Terms (continued) SLIC (Subscriber-Line Interface Circuit): Provides a phone’s analog dial tone, busy tone, dual-tone multiple-frequency (DTMF) generation and decoding, caller ID and ring-signaling functions. The SLIC allows the DVC-1100 to work with a standard telephone without connecting to the phone system. SSID: Service Set Identifier (SSID) is the name designated for a specific wireless local area network (WLAN). The SSID can be easily changed to connect to an existing wireless network.
Technical Specifications Internal Processor ARM-9 ASIC Communications Processor Standards Compliant ITU H.323 (IP communications) Video: H.263 Audio: G.711, G.
Technical Specifications (continued) LED Indicators Power Status Video monitor WLAN activity Network link and transmit Dialing Capabilities Speed dial list allows up to 50 entries Manual dialing with telephone handset using Directory Service Manual dialing with direct IP entry Remote Software Update Software update, automatic or manual Network Standard:IEEE 802.3 IP-based network including Ethernet, Cable, DSL, or T-1 DHCP compliant or fixed IP with subnet mask, DNS and gateway Wireless Standard: IEEE 802.
List of Country Codes Code 93 355 213 684 376 244 809 268 54 374 297 247 61 43 994 242 973 880 246 375 32 501 229 809 975 591 387 267 55 284 673 359 257 855 237 1 238 345 236 235 56 86 57 269 242 682 506 385 53 357 420 45 246 Country Afghanistan Albania Algeria American Samoa Andorra Angola Anguilla Antigua Argentina Armenia Aruba Ascension Island Australia Austria Azerbaijan Bahamas Bahrain Bangladesh Barbados Belarus Belgium Belize Benin Bermuda Bhutan Bolivia Bosnia and Hercegovina Botswana Brazil Briti
List of Country Codes (Continued) Code 231 218 423 370 352 853 389 261 265 60 960 223 356 692 222 230 52 373 33 976 473 212 258 95 264 674 977 31 599 869 687 64 505 227 234 683 850 967 47 968 92 680 507 675 595 51 63 48 351 974 40 7 250 Country Liberia Libya Liechtenstein Lithuania Luxembourg Macao Macedonia Madagascar Malawi Malaysia Maldives Mali Malta Marshall Islands Mauritania Mauritius Mexico Moldova Monaco Mongolia Montserrat Morocco Mozambique Myanmar (Burma) Namibia Nauru Nepal Netherlands Netherl
Contacting Technical Support Technical Support You can find the most recent software and user documentation on the i2eye website. D-Link provides free technical support for customers within the United States and Canada for the duration of the warranty period on this product. U.S. and Canadian customers can contact D-Link Technical Support through our web site or by phone.
Subject to the terms and conditions set forth herein, D-Link Systems, Inc. (“D-Link”) provides this Limited warranty for its product only to the person or entity that originally purchased the product from: • • D-Link or its authorized reseller or distributor and Products purchased and delivered within the fifty states of the United States, the District of Columbia, U.S. Possessions or Protectorates, U.S. Military Installations, addresses with an APO or FPO.
• The original product owner must obtain a Return Material Authorization (“RMA”) number from the Authorized D-Link Service Office and, if requested, provide written proof of purchase of the product (such as a copy of the dated purchase invoice for the product) before the warranty service is provided.
Copyright Statement: No part of this publication or documentation accompanying this Product may be reproduced in any form or by any means or used to make any derivative such as translation, transformation, or adaptation without permission from D-Link Corporation/D-Link Systems, Inc., as stipulated by the United States Copyright Act of 1976. Contents are subject to change without prior notice. Copyright© 2002 by D-Link Corporation/D-Link Systems, Inc. All rights reserved.