D-Link Air DWL-122 2.
Contents Package Contents ................................................................................3 Introduction............................................................................................4 Wireless Basics ....................................................................................6 Inserting and Removing the DWL-122; Using the Extension Cord ..........9 Getting Started ....................................................................................
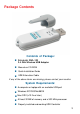
Package Contents Contents of Package: ! D-Link Air DWL-122 2.4 GHz Wireless USB Adapter ! Manual on CD-ROM ! Quick Installation Guide ! USB Extenstion Cable If any of the above items are missing, please contact your reseller. System Requirements: ! A computer or laptop with an available USB port ! Windows XP/2000/Me/98SE ! Mac OSX (v10.
Introduction The D-Link Air DWL-122 Wireless USB Adapter is a convenient Plug & Play USB 1.1 solution that brings wireless networking to your laptop or desktop PC. With transfer rates up to 11Mbps you can connect to a wireless network at home, at the office or at any wireless hotspot. Now you can stay connected wherever you are and wherever you go. The DWL-122 is Wi-Fi compliant, meaning that it can connect and interoperate with other 802.11b Wi-Fi-compliant wireless routers, access points and adapters.
Features and Benefits ! Compact size for placement anywhere ! Convenience of Plug & Play installation ! Fully 802.11b compatible ! Powered by the USB port; no external power source is needed ! USB 1.
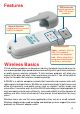
Features USB connector Used to connect the DWL-122 to your computer Internal Antenna Used to wirelessly connect to 802.11b networks Link/Activity LED Power - Indicates that the DWL-122 is properly installed in the computer. Link - Blinks when data is being transmitted through the wireless connection. Wireless Basics D-Link wireless products are based on industry standards to provide easy-touse and compatible high-speed wireless connectivity within your home, business or public access wireless networks.
Wireless Basics (continued) People use wireless LAN technology for many different purposes: Mobility - Productivity increases when people have access to data in any location within the operating range of the WLAN. Management decisions based on real-time information can significantly improve worker efficiency. Low Implementation Costs – WLANs are easy to set up, manage, change and relocate. Networks that frequently change can benefit from WLANs ease of implementation.
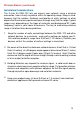
Wireless Basics (continued) Installation Considerations The D-Link Air DWL-122 lets you access your network, using a wireless connection, from virtually anywhere within its operating range. Keep in mind, however, that the number, thickness and location of walls, ceilings, or other objects that the wireless signals must pass through, may limit the range. Typical ranges vary depending on the types of materials and background RF (radio frequency) noise in your home or business.
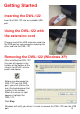
Getting Started Inserting the DWL-122 Insert the DWL-122 into an available USB port. Using the DWL-122 with the extension cord Plug one end of the USB extension cord into the USB port on your computer and plug the other end into the DWL-122. Removing the DWL-122 (Windows XP) After installing the DWL-122, this icon will appear in the taskbar at the bottom of the screen (for WinXP service pack I and above).
Getting Started (continued) With its default settings, the DWL-122 will connect with other D-Link Air products, right out of the box. There are basically two modes of networking: Infrastructure – using an Access Point or Router, such as the DI-614+. Ad-Hoc – directly connecting to another computer, for peer-to-peer communication, using wireless network adapters on each computer, such as two or more DWL-122 wireless USB adapters.
Getting Started (continued) Setting up a Wireless Infrastructure Network 1 2 3 4 DWL-122 DWL-122 5 For a typical wireless setup at home (as shown above), please do the following: You will need broadband Internet access (a Cable or DSL-subscriber line into your home or office) Consult with your Cable or DSL provider for proper installation of the modem Connect the Cable or DSL modem to your broadband router. (See the Quick Installation Guide included with your router.
Getting Started (continued) Setting up a Wireless Ad Hoc Network Install the D-Link Air DWL-122 Wireless USB adapter into the desktop computer. (See the Quick Installation Guide included with the product for installation instructions.) Install another DWL-122 into the laptop computer. (See the Quick Installation Guide included with the product for installation instructions.
Using the Configuration Utility with Windows OS D-Link Air DWL-122 uses the Configuration Utility as the management software. The utility provides the user an easy interface to change any settings related to the wireless adapter. When the computer is started, the Configuration Utility starts automatically and the system tray icon is loaded in the toolbar (see illustration below.) Clicking on the utility icon will start the Configuration Utility.
Using the Configuration Utility with Windows OS (continued) Status: Link Info Displays the MAC Address of the Access Point or Router to which the DWL122 is associated SSID: The Service Set Identifier is the name assigned to the wireless network. The factory SSID setting is default. Frequency: 802.11b indicates that the DWL-122 is communicating in the 2.4GHz band. Wireless Mode: Either Infrastructure or Ad-Hoc will be displayed here.
Using the Configuration Utility with Windows OS (continued) Configuration SSID: Service Set Identifier is a name that identifies a wireless network. Access Points and wireless devices attempting to connect to a specific WLAN (Wireless Local Area Network) must use the same SSID. The default setting is default. Wireless Mode: Click on the pull-down menu; select from the following options: Infrastructure - connecting to the WLAN using an Access Point.(This is the IP Settings default setting).
Using the Configuration Utility with Windows OS (continued) Ad-Hoc Channel: Advanced All devices in the Ad Hoc network must be set to the same channel Profile IP Settings: You can Enable or Disable the IP Settings portion of your profile here. If you select Disable you will need to configure the IP Address information each time you connect to a network. If you select Enable you will maintain the same IP Address information each time you connect to a network.
Using the Configuration Utility with Windows OS (continued) Available Network: The top section of the window displays the Available Networks. Scroll up and down the list and highlight the network to which you wish to connect. Click on the Connect button. Profile: In the lower half of the screen, you can manage the profiles that you have created for the wireless network at home, at the office and in public places. Scroll up and down and highlight the profile that you wish to configure.
Using the Configuration Utility with Windows OS (continued) Advanced In this window you can select the type of network connection. Click OK to save the changes. Configuration, Add or Properties If you clicked on Add, you can configure, in this window, all the properties of a profile that you wish to add to the network. If you clicked on Configuration or Properties you can configure, in this window, all the properties of a profile that already exists in the network. Click OK to save the changes.
Using the Configuration Utility with Windows OS (continued) About The About tab displays the MAC Address, the utility and the firmware versions.
Using the Configuration Settings with Macintosh OS After you have completed the installation of the DWL-122 into your Macintosh computer (please refer to the Quick Installation Guide included with the product), follow the steps below to access the configuration settings. From the Apple pull-down menu select System Preferences. Double-click on the Wireless Adaptor icon.
Using the Configuration Utility with Macintosh OS (continued) This window will appear displaying the following: Current Wireless Network settings: Network Name; Network Type; Link Status; Channel; and Signal Strength Available Wireless Networks including: Name; Type; Signal; Channel; Privacy Start Scan: click Start Scan to rescan for an available wireless network at your current location Connect: highlight a network profile and click Connect to connect to that network profile Wireless Adaptor Settings: Radi
Using the Configuration Utility with Macintosh OS (continued) My Networks Connect: highlight a network profile and click Connect to connect to that network profile Properties: highlight a network profile and click Properties to configure that network profile. (See screens on the next page.) Remove: highlight a network profile and click Remove to remove that network from the profile list Create: click Create to create a new network profile, manually. (See screens on the next page.
Using the Configuration Utility with Macintosh OS (continued) My Networks > Create and/or Properties Select the level of WEP encryption. In the example, 40 Bits ASCII was chosen. Enter the WEP string, in this case 5 ASCII characters have been entered. Select the key that you wish to use. You can input up to four keys.
Using the Configuration Utility with Macintosh OS (continued) Power Save: Always On consumes the most power Advanced Max Power Save - consumes the least power Power Save consumes a moderate amount of power Authentication: Choose one of the following modes: Open Authentication - the DWL-122 is visible to all devices on the network Shared Authentication - allows communication only with devices with identical WEP settings Auto - will automatically adjust to the Authentication mode of the wireless Access Poin
Networking Basics Using the Network Setup Wizard in Windows XP In this section you will learn how to establish a network at home or work, using Microsoft Windows XP. Note: Please refer to websites such as http://www.homenethelp.com and http://www.microsoft.com/windows2000 for information about networking computers using Windows 2000, ME or 98SE. Go to Start>Control Panel>Network Connections Select Set up a home or small office network When this screen appears, Click Next.
Networking Basics (continued) Please follow all the instructions in this window: Click Next In the following window, select the best description of your computer. If your computer connects to the internet through a gateway/router, select the second option as shown.
Networking Basics (continued) Enter a Computer description and a Computer name (optional.) Click Next Enter a Workgroup name. All computers on your network should have the same Workgroup name.
Networking Basics (continued) Please wait while the Network Setup Wizard applies the changes. When the changes are complete, click Next. Please wait while the Network Setup Wizard configures the computer. This may take a few minutes.
Networking Basics (continued) In the window below, select the option that fits your needs. In this example, Create a Network Setup Disk has been selected. You will run this disk on each of the computers on your network. Click Next. Insert a disk into the Floppy Disk Drive, in this case drive A.
Networking Basics (continued) Please read the information under Here’s how in the screen below. After you complete the Network Setup Wizard you will use the Network Setup Disk to run the Network Setup Wizard once on each of the computers on your network. To continue click Next.
Networking Basics (continued) Please read the information on this screen, then click Finish to complete the Network Setup Wizard. The new settings will take effect when you restart the computer. Click Yes to restart the computer. You have completed configuring this computer. Next, you will need to run the Network Setup Disk on all the other computers on your network. After running the Network Setup Disk on all your computers, your new wireless network will be ready to use.
Networking Basics (continued) Naming your Computer To name your computer, using Windows XP, please follow these directions: ! Click Start (in the lower left corner of the screen) ! Right-click on My Computer ! Select Properties and click ! Select the Computer Name Tab in the System Properties window. ! You may enter a Computer Description if you wish; this field is optional. ! To rename the computer and join a domain, Click Change.
Networking Basics (continued) Naming your Computer ! In this window, enter the Computer name ! Select Workgroup and enter the name of the ! All computers on your network must have the same Workgroup name. ! Click OK Checking the IP Address in Windows XP The wireless adapter-equipped computers in your network must be in the same IP Address range (see Getting Started in this manual for a definition of IP Address Range.
Networking Basics (continued) Checking the IP Address in Windows XP This window will appear. ! Click the Support tab ! Click Close Assigning a Static IP Address in Windows XP/2000 Note: Residential Gateways/Broadband Routers will automatically assign IP Addresses to the computers on the network, using DHCP (Dynamic Host Configuration Protocol) technology. If you are using a DHCP-capable Gateway/Router you will not need to assign Static IP Addresses.
Networking Basics (continued) Assigning a Static IP Address in Windows XP/2000 ! Double-click on Network Connections ! Right-click on Local Area Connections ! Double-click on Properties 35
Networking Basics (continued) Assigning a Static IP Address in Windows XP/2000 ! Click on Internet D-Link Air DWL-122 Wireless USB Adapter Protocol (TCP/IP) ! Click Properties ! In the window below, select Use the following IP address. Input your IP address and subnet mask. (The IP Addresses on your network must be within the same range. For example, if one computer has an IP Address of 192.168.0.2, the other computers should have IP Addresses that are sequential, like 192.168.0.3 and 192.168.0.4.
Networking Basics (continued) Checking the Wireless Connection by Pinging in Windows XP and 2000* ! Go to Start > Run > type cmd. A window similar to this one will appear. Type ping xxx.xxx.xxx.xxx, where xxx is the IP Address of the Wireless Router or Access Point. A good wireless connection will show four replies from the Wireless Router or Acess Point, as shown. Checking the Wireless Connection by Pinging in Windows Me and 98* ! Go to Start > Run > type command. A window similar to this will appear.
Troubleshooting This chapter provides solutions to problems that can occur during the installation and operation of the DWL-122. Read the following descriptions if you are having problems. (The examples below are illustrated in Windows XP. If you have another operating system, these solutions will still apply although the appearance on your computer screen may differ.) 1. Check that the drivers for the DWL-122 are installed properly.
Troubleshooting (continued) ! Double-click on Network Adapters ! Right-click on D-Link Air DWL-122 Wireless USB Adapter D-Link Air DWL-122 Wireless USB Adapter ! Select Properties to check that the drivers are installed properly D-Link Air DWL-122 Wireless USB Adapter D-Link Air DWL-122 Wireless USB Adapter ! Look under Device Status to check that the device is working properly ! Click OK 39
Troubleshooting (continued) 2. What variables may cause my wireless products to lose reception? D-Link products let you access your network from virtually anywhere you want. However, the positioning of the products within your environment will affect the wireless range. Please refer to Installation Considerations in the Wireless Basics section of this manual for further information about the most advantageous placement of your D-Link wireless products. 3.
Technical Specifications Standard ! IEEE 802.11b Diagnostic LED ! Power ! Link Status Temperature ! Operating: 0ºC to 55ºC (32ºF to 131ºF) ! Storing: -20ºC to 75ºC (-4ºF to 167ºF) Humidity: ! Operating: 5-95%, non-condensing ! Storing: 10-90%, non-condensing Antenna Type: ! Integrated microstrip diversity antenna Modulation Technique: ! DSSS Physical Dimensions: ! L = 3.25 inches (82.5mm) ! W = 1.07 inches (27.2mm) ! H = 0.47 inches (12mm) Data Rates: ! 1,2,5.
Technical Specifications (continued) Operating Voltage: ! 5VDC ± 5%, powered through USB port Encryption: ! RC4 Encryption algorithm ! 64 or 128-bit WEP Encryption MTBF: ! >30,000 hours Modulation Schemes: ! DQPSK, DBPSK and CCK Transmitter Output Power: ! Typical 16dBm, 40mW Receiver Sensitivity: ! Typical -81dBm for 11Mbps @ 8% PER (Packet Error Rate) ! Typical -86dBm for 2Mbps @ 8% PER (Packet Error Rate) 42
Technical Support You can find software updates and user documentation on the D-Link website. D-Link provides free technical support for customers within the United States and within Canada for the duration of the warranty period on this product. U.S. and Canadian customers can contact D-Link Technical Support through our website, or by phone. Tech Support for customers within the United States: D-Link Technical Support over the Telephone: (877) 453-5465 24 hours a day, seven days a week.
Warranty and Registration (USA only) Subject to the terms and conditions set forth herein, D-Link Systems, Inc. (“D-Link”) provides this Limited warranty for its product only to the person or entity that originally purchased the product from: • ! • ! D-Link or its authorized reseller or distributor and Products purchased and delivered within the fifty states of the United States, the District of Columbia, U.S. Possessions or Protectorates, U.S. Military Installations, addresses with an APO or FPO.
• ! • ! • ! • ! • ! The customer must submit with the product as part of the claim a written description of the Hardware defect or Software nonconformance in sufficient detail to allow D-Link to confirm the same.
LIABILITY OF D-LINK UNDER THIS WARRANTY IS LIMITED TO THE PURCHASE PRICE OF THE PRODUCT COVERED BY THE WARRANTY. THE FOREGOING EXPRESS WRITTEN WARRANTIES AND REMEDIES ARE EXCLUSIVE AND ARE IN LIEU OF ANY OTHER WARRANTIES OR REMEDIES, EXPRESS, IMPLIED OR STATUTORY. Governing Law: This Limited Warranty shall be governed by the laws of the State of California.