D-Link Air Xpert DWL-AG520 Tri-mode Dualband Wireless PCI Adapter Manual Building Networks for People TM
Contents Package Contents ................................................................................3 Introduction............................................................................................4 Wireless Basics ....................................................................................6 Getting Started ....................................................................................10 Using the Configuration Utility .............................................................
Package Contents Contents of Package: D-Link Air Xpert TM DWL-AG520 Tri-mode Dualband Wireless PCI Adapter Manual, Warranty and Drivers on CD Printed Quick Installation Guide If any of the above items are missing, please contact your reseller. System Requirements for Configuration: A desktop computer with an available 32-bit PCI 2.2 slot, with an operating voltage of 3.3V Windows XP, Windows 2000, Windows Me, or Windows 98SE At least 128 MB of memory and a 500 MHz processor An 802.
Introduction TM The D-Link Air Xpert DWL-AG520 Tri-Mode Dualband Wireless PCI Adapter, when installed into your desktop PC, provides you a versatile way to wirelessly connect to any one of three available wireless networks - 802.11b and the newer, faster 802.11g and 802.11a that operate in two discrete, non-interfering frequency bands, 2.4GHz and 5GHz. The versatile 802.11a/b/g compatible DWL-AG520 gives you an immediate way to expand to your existing 802.
Features Dualband versatility - With the DWL-AG520, you have the option of using one of two frequencies. If the 2.4GHz frequency band is experiencing interruptions and interference from cordless phones, and microwave ovens, you have the option of using the 5GHz band with 802.11a enabled devices. Compatible with 802.11a, 802.11b and 802.11g Devices - Fully compatible with the IEEE 802.11a, 802.11b and Draft 802.11g standards, the DWL-AG520 can connect with existing 802.
Wireless Basics D-Link wireless products are based on industry standards to provide easy-touse and compatible high-speed wireless connectivity within your home, business or public access wireless networks. D-Link wireless products will allow you access to the data you want, when and where you want it. You will be able to enjoy the freedom that wireless networking brings. A WLAN is a cellular computer network that transmits and receives data with radio signals instead of wires.
Wireless Basics (continued) People use WLAN technology for many different purposes: Mobility - Productivity increases when people have access to data in any location within the operating range of the WLAN. Management decisions based on real-time information can significantly improve worker efficiency. Low Implementation Costs – WLANs are easy to set up, manage, change and relocate. Networks that frequently change can benefit from WLANs ease of implementation.
Wireless Basics (continued) Standards-Based Technology 1 The DWL-AG520 Wireless Cardbus Adapter utilizes the 802.11a, 802.11b and 1 draft 802.11g standard. The IEEE draft 802.11g standard is an extension of the 802.11b standard. It increases the data rate up to 54 Mbps within the 2.4GHz band. The 802.11a standard also increases the data rate up to 54 Mbps, but within the 5GHz band. Both 802.11a and 802.11g utilize OFDM technology.
Wireless Basics (continued) Installation Considerations TM The D-Link Air Xpert DWL-AG520 lets you access your network, using a wireless connection, from virtually anywhere within its operating range. Keep in mind, however, that the number, thickness and location of walls, ceilings, or other objects that the wireless signals must pass through, may limit the range. Typical ranges vary depending on the types of materials and background RF (radio frequency) noise in your home or business.
Getting Started There are basically two modes of networking: Infrastructure – using an Access Point or Wireless Router, such as the DWL-7000AP or DI-774. Ad-Hoc – directly connecting to another computer, for peer-topeer communication, using wireless network adapters on each computer, such as two or more DWL-AG520 wireless network PCI adapters. On the following pages we will show you an example of an Infrastructure Network and an Ad-Hoc Network.
Getting Started Setting up a Wireless Infrastructure Network 1 2 3 5 4 DWL-AG520 DWL-AG650 For a typical wireless setup at home (as shown above), please do the following: You will need broadband Internet access (a Cable or DSL-subscriber line into your home or office) Consult with your Cable or DSL provider for proper installation of the modem Connect the Cable or DSL modem to your broadband router (see the Quick Installation Guide included with your router).
Getting Started Setting up a Wireless Ad-Hoc Network Install the D-Link DWL-AG520 Wireless PCI adapter into a desktop computer. (See the Quick Installation Guide included with the product for installation instructions). Install a DWL-AG650 into a laptop computer, or you can install another DWL-AG520 wireless PCI adapter into a desktop computer. (See the Quick Installation Guide included with the product).
Using the Configuration Utility If you wish to change the default settings or optimize the performance of the DWL-AG520, D-Link has included a configuration utility for this purpose. However, in Windows XP, you can use either the Zero Configuration Utility or you can use the D-Link Configuration utility.
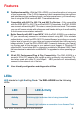
Configuration Utility Link Info Status: Displays the MAC Address of the Access Point that is associated with the DWLAG520. default SSID: The Service Set Identifier is the name assigned to the wireless network. The factory SSID setting is set to default. Frequency: The DWL-AG520 is a tri-mode, dualband wireless PCI adapter. In this instance 802.11b indicates that the DWL-AG520 is communicating in the 2.4GHz band. Wireless Mode: Either Infrastructure or Ad-Hoc will be displayed here.
Configuration Utility D-Link AirPlus DWL-650+ 2.4GHz Wireless Cardbus Configuration Adapter default SSID - (Service Set Identifier) is a name that identifies a wireless network. Access Points and wireless clients attempting to connect to a specific WLAN (Wireless Local Area Network) must use the same SSID. The default setting is default. Wireless Mode - Click on the pulldown menu; select from the following options: Infrastructure - connecting the WLAN using an Access Point.(The default setting).
Configuration Utility Advanced Frequency - Select the Frequency here. Auto is the default setting. Starting Ad-Hoc Network – Each wireless adapter communicating in Ad-Hoc mode must have the same setting here. Turbo Mode - To enable Turbo mode, all devices must have the same setting Ad-Hoc Channel - All devices in the Ad-Hoc network must have the same channel Encryption Type– Select the Encryption type Profile IP Settings -You can Enable or Disable the IP Settings portion of your profile here.
Configuration Utility Site Survey Available Network The top section of the window displays the Available Networks. Scroll up and down the list and highlight the network to which you wish to connect. Click on the Connect button. Profile In the lower half of the screen, you can manage the profiles that you have created. Scroll up and down and highlight the profile that you wish to configure.
Configuration Utility Add New Profile In this window you can configure all the properties of a profile in order to connect with a network of your choice. After you have entered your changes in this window, click OK to save the changes.
Configuration Utility About The ABOUT screen gives you information about the MAC Address and the Utility and Driver Versions of the DWL-AG520.
Networking Basics Using the Network Setup Wizard in Windows XP In this section you will learn how to establish a network at home or work, using Microsoft Windows XP. Note: Please refer to websites such as http://www.homenethelp.com and http://www.microsoft.com/windows2000 for information about networking computers using Windows 2000, ME or 98SE. Go to Start>Control Panel>Network Connections Select Set up a home or small office network When this screen appears, click Next.
Networking Basics Please follow all the instructions in this window: Click Next In the following window, select the best description of your computer. If your computer connects to the internet through a gateway/router, select the second option as shown.
Networking Basics Enter a Computer description and a Computer name (optional.) Click Next Enter a Workgroup name. All computers on your network should have the same Workgroup name.
Networking Basics Please wait while the Network Setup Wizard applies the changes. When the changes are complete, click Next. Please wait while the Network Setup Wizard configures the computer. This may take a few minutes.
Networking Basics In the window below, select the option that fits your needs. In this example, Create a Network Setup Disk has been selected. You will run this disk on each of the computers on your network. Click Next. Insert a disk into the Floppy Disk Drive, in this case drive A.
Networking Basics Please read the information under Here’s how in the screen below. After you complete the Network Setup Wizard you will use the Network Setup Disk to run the Network Setup Wizard once on each of the computers on your network. To continue click Next.
Networking Basics Please read the information on this screen, then click Finish to complete the Network Setup Wizard. The new settings will take effect when you restart the computer. Click Yes to restart the computer. You have completed configuring this computer. Next, you will need to run the Network Setup Disk on all the other computers on your network. After running the Network Setup Disk on all your computers, your new wireless network will be ready to use.
Networking Basics Naming your Computer To name your computer, please follow these directions:In Windows XP: Click Start (in the lower left corner of the screen) Right-click on My Computer Select Properties and click Select the Computer Name Tab in the System Properties window. You may enter a Com- puter Description if you wish; this field is optional. To rename the computer and join a domain, Click Change.
Networking Basics Naming your Computer In this window, enter the Computer name Select Workgroup and enter the name of the Workgroup All computers on your network must have the same Workgroup name. Click OK Checking the IP Address in Windows XP The wireless adapter-equipped computers in your network must be in the same IP Address range (see Getting Started in this manual for a definition of IP Address Range).
Networking Basics Checking the IP Address in Windows XP This window will appear. Click the Support tab Click Close Assigning a Static IP Address in Windows XP/2000 Note: Residential Gateways/Broadband Routers will automatically assign IP Addresses to the computers on the network, using DHCP (Dynamic Host Configuration Protocol) technology. If you are using a DHCP-capable Gateway/Router you will not need to assign Static IP Addresses.
Networking Basics Assigning a Static IP Address in Windows XP/2000 Double-click on Network Connections Right-click on Local Area Connections Double-click on Properties 30
Networking Basics Assigning a Static IP Address in Windows XP/2000 AG-520 Click on Internet Protocol (TCP/IP) Click Properties In the window below, select Use the following IP address. Input your IP address and subnet mask. (The IP Addresses on your network must be within the same range. For example, if one computer has an IP Address of 192.168.0.2, the other computers should have IP Addresses that are sequential, like 192.168.0.3 and 192.168.0.4.
Networking Basics Checking the Wireless Connection by Pinging in Windows XP and 2000 Go to Start > Run > type cmd. A window similar to this one will appear. Type ping xxx.xxx.xxx.xxx, where xxx is the IP Address of the Wireless Router or Access Point. A good wireless connection will show four replies from the Wireless Router or Access Point, as shown. Checking the Wireless Connection by Pinging in Windows Me and 98SE Go to Start > Run > type command. A window similar to this will appear.
Troubleshooting This chapter provides solutions to problems that can occur during the installation and operation of the DWL-AG520. Read the following descriptions if you are having problems. (The examples below are illustrated in Windows XP. If you have a different operating system, the screenshots on your computer will look similar to the following examples). 1. Check that the drivers for the DWL-AG520 are installed properly.
Troubleshooting Double-click on Network Adapters Right-click on D-Link DWL-AG520 Wireless PCI Adapter D-Link Air Xpert DWL-AG520 D-Link AirPro DWL-AB650 Wireless Cardbus Adapter Select Properties to check that the drivers are installed properly D-Link Air Xpert DWL-AG520 Look under Device Status to check that the device is working properly TM D-Link AirXpert DWL-AG520 Tri-mode Dualband Wireless PCI Adapter Cardbus Click OK 34
Troubleshooting 2. I cannot connect to the Access Point or the wireless Router. Make sure that the SSID on the DWL-AG520 PCI adapter is exactly the same as the SSID on the Access Point or wireless Router. Move the DWL-AG520 and Access Point or wireless Router into the same room and then test the wireless connection. Disable all security settings.
Troubleshooting A. Under Tools> select Folder Options…> select View > under Hidden files and folders > select Show hidden files and folders B. Uncheck Hide extension for known file types > click on Apply C. Search for previously loaded driver files. Remove these files from the INF and SYSTEM32 (DRIVERS) folders in the Windows directory. Note: Windows XP and Windows 2000 will rename .inf files that have not received WHQL certification into oem.inf files (e.g., oem1.inf). 6.
Troubleshooting Check that the Network Connection for the wireless client is configured properly. Select AP (Infrastructure) when connecting to an access point and select Ad-Hoc mode when connecting without an access point. Double-click on the WLAN icon in the taskbar > click on Configuration to change the settings for the wireless adapter. If Security is enabled, make sure that the correct encryption keys are entered on both the DWL-AG520 and the access point.
Technical Specifications Standards IEEE 802.11a IEEE 802.11b IEEE 802.11g-Draft Bus Type PCI 2.2 PCI 32-bit Interface Temperature Operating: 32ºF to 149ºF (0ºC to 55ºC) Humidity: 95% maximum, non-condensing Internal Antenna Type: Omni Directional Dipole Antenna with 2~4 dbi gain Security: 64, 128-bit WEP 802.
Technical Specifications Data Rates: With Automatic Fallback 54Mbps; 48Mbps; 36Mbps; 24Mbps; 18Mbps; 12Mbps; 11Mbps; 9Mbps; 6Mbps; 5.5Mbps; 2Mbps; 1Mbps Media Access Control: CSMA/CA with ACK Frequency Range: 2.4GHz to 2.462GHz 5.150GHz to 5.
Techni cal Support echnical You can find software updates and user documentation on the D-Link website. D-Link provides free technical support for customers within the United States and within Canada for the duration of the warranty period on this product. U.S. and Canadian customers can contact D-Link Technical Support through our website, or by phone. Tech Support for customers within the United States: D-Link Technical Support over the Telephone: (877) 453-5465 24 hours a day, seven days a week.
Warranty (USA only) Subject to the terms and conditions set forth herein, D-Link Systems, Inc. (“D-Link”) provides this Limited Warranty: • Only to the person or entity that originally purchased the product from D-Link or its authorized reseller or distributor, and • Only for products purchased and delivered within the fifty states of the United States, the District of Columbia, U.S. Possessions or Protectorates, U.S. Military Installations, or addresses with an APO or FPO.
Submitting A Claim: The customer shall return the product to the original purchase point based on its return policy.
FROM THE USE OF THE PRODUCT, RELATING TO WARRANTY SERVICE, OR ARISING OUT OF ANY BREACH OF THIS LIMITED WARRANTY, EVEN IF D-LINK HAS BEEN ADVISED OF THE POSSIBILITY OF SUCH DAMAGES. THE SOLE REMEDY FOR A BREACH OF THE FOREGOING LIMITED WARRANTY IS REPAIR, REPLACEMENT OR REFUND OF THE DEFECTIVE OR NON-CONFORMING PRODUCT. THE MAXIMUM LIABILITY OF D-LINK UNDER THIS WARRANTY IS LIMITED TO THE PURCHASE PRICE OF THE PRODUCT COVERED BY THE WARRANTY.
Registration Product registration is entirely voluntary and failure to complete or return this form will not diminish your warranty rights.