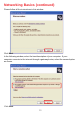
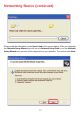
Networking Basics (continued) Please follow all the instructions in this window: Click Next. In the following window, select the best description of your computer. If your computer connects to the internet through a gateway/router, select the second option as shown. Click Next.
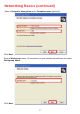
Networking Basics (continued) Enter a Computer description and a Computer name (optional.) Click Next. Enter a Workgroup name. All computers on your network should have the same Workgroup name. Click Next.
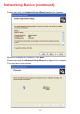
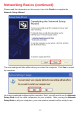
Networking Basics (continued) Please wait while the Network Setup Wizard applies the changes. When the changes are complete, click Next. Please wait while the Network Setup Wizard configures the computer. This may take a few minutes.
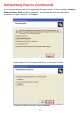
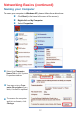
Networking Basics (continued) In the window below, select the option that fits your needs. In this example, Create a Network Setup Disk has been selected. You will run this disk on each of the computers on your network. Click Next. Insert a disk into the Floppy Disk Drive, in this case drive A. Format the disk if you wish, and click Next.
Networking Basics (continued) Please read the information under Here’s how in the screen below. After you complete the Network Setup Wizard you will use the Network Setup Disk to run the Network Setup Wizard once on each of the computers on your network. To continue click Next.
Networking Basics (continued) Please read the information on this screen, then click Finish to complete the Network Setup Wizard. The new settings will take effect when you restart the computer. Click Yes to restart the computer. You have completed configuring this computer. Next, you will need to run the Network Setup Disk on all the other computers on your network. After running the Network Setup Disk on all your computers, your new wireless network will be ready to use.
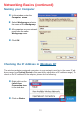
Networking Basics (continued) Naming your Computer To name your computer in Windows XP, please follow these directions: Click Start (in the lower left corner of the screen). Right-click on My Computer. Select Properties. Select the Computer Name Tab in the System Properties window. You may enter a Com- puter Description if you wish; this field is optional. To rename the computer and join a domain, click Change.
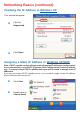
Networking Basics (continued) Naming your Computer In this window, enter the Computer name. Select Workgroup and enter the name of the Workgroup. All computers on your network must have the same Workgroup name. Click OK. Checking the IP Address in Windows XP The wireless adapter-equipped computers in your network must be in the same IP address range (see Getting Started in this manual for a definition of IP address range).
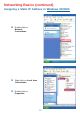
Networking Basics (continued) Checking the IP Address in Windows XP This window will appear. Click the Support tab. Click Close. Assigning a Static IP Address in Windows XP/2000 Note: DHCP-capable routers will automatically assign IP addresses to the computers on the network, using DHCP (Dynamic Host Configuration Protocol) technology. If you are using a DHCP-capable router you will not need to assign static IP addresses.
Networking Basics (continued) Assigning a Static IP Address in Windows XP/2000 Double-click on Network Connections. Right-click on Local Area Connections. Double-click on Properties.
Networking Basics (continued) Assigning a Static IP Address in Windows XP/2000 Click on Internet Protocol (TCP/IP) Click Properties In the window below, select Use the following IP address. Input your IP address and subnet mask. (The IP addresses on your network must be within the same range. For example, if one computer has an IP address of 192.168.0.2, the other computers should have IP addresses that are sequential, like 192.168.0.3 and 192.168.0.4.
Networking Basics (continued) Checking the Wireless Connection by Pinging in Windows XP and 2000 Go to Start > Run > type cmd. A window similar to this one will appear. Type ping xxx.xxx.xxx.xxx, where xxx is the IP Address of the Wireless Router or Access Point. A good wireless connection will show four replies from the Wireless Router or Access Point, as shown. Checking the Wireless Connection by Pinging in Windows Me and 98 Go to Start > Run > type command. A window similar to this will appear.
Troubleshooting This Chapter provides solutions to problems that can occur during the installation and operation of the DWL-7200AP Wireless Access Point. We cover various aspects of the network setup, including the network adapters. Please read the following if you are having problems. Note: It is recommended that you use an Ethernet connection to configure the DWL-7200AP. 1. The computer used to configure the DWL-7200AP cannot access the Configuration menu.
Troubleshooting (continued) 2. The wireless client cannot access the Internet in the Infrastructure mode. Make sure the wireless client is associated and joined with the correct access point. To check this connection: Right-click on the Local Area Connection icon in the taskbar> select View Available Wireless Networks. The Connect to Wireless Network screen will appear. Please make sure you have selected the correct available network, as shown in the illustrations below.
Troubleshooting (continued) 3. Check that the drivers for the network adapters are installed properly. You may be using different network adapters than those illustrated here, but this procedure will remain the same, regardless of the type of network adapters you are using.
Troubleshooting (continued) Double-click on Network adapters Right-click on D-Link DWL-AG660 Wireless Cardbus Adapter Select Properties to check that the drivers are installed properly Look under Device status D-Link DWL-AG660 to check that the device is working properly D-Link DWL-AG660 Click OK 41
Troubleshooting (continued) 4. What variables may cause my wireless products to lose reception? D-Link products let you access your network from virtually anywhere you want. However, the positioning of the products within your environment will affect the wireless range. Please refer to Installation Considerations in the Wireless Basics section of this manual for further information about the most advantageous placement of your D-Link wireless products. 5.
Troubleshooting (continued) 7. Resetting the DWL-7200AP to Factory Default Settings After you have tried other methods for troubleshooting your network, you may choose to Reset the DWL-7200AP to the factory default settings.
Technical Specifications Standards IEEE 802.11g IEEE 802.11b IEEE 802.11a IEEE 802.3 IEEE 802.3u Device Management Web-based - Internet Explorer v6 or later; Netscape Navigator v6 or later; or other Java-enabled browsers DHCP Client Network Architecture Supports Infrastructure Mode LEDs Power WAN LAN (10/100) WLAN - 802.11a, 802.
Technical Specifications (continued) Safety and Emissions: FCC CE CSA Physical Dimensions: L = 7.6 inches (193mm) W = 5.5 inches (140mm) H = 1.2 inches (31mm) Wireless Data Rates with Automatic Fallback: 54Mbps 48Mbps 108Mbps 18Mbps 12Mbps 24Mbps 6Mbps 5.
Technical Specifications (continued) Media Access Control: CSMA/CA with ACK Wireless Transmit Power: 15dBm(32mW)±2dB Power Adapter: Ext. Power Supply DC 5V, 2.0A 100-120V ~ 50-60Hz Weight: 0.
Federal Communication Commission (FCC) Interference Statement: This device complies with Part 15 of the FCC Rules. Operation is subject to the following two conditions: (1) This device may not cause harmful interference, and (2) this devicemust accept any interference received, including interference that may cause undesired operation. This equipment has been tested and found to comply with the limits for a Class B digital device, pursuant to Part 15 of the FCC Rules.