
- D-link DCS-900 Internet Camera ManualVersion 1.10

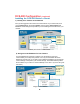

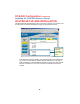
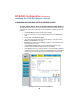

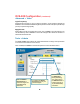
Table Of Contents
- Table of Contents
- Package Contents
- System Requirements
- Introduction
- Features and Benefits
- Connections
- LEDs
- Hardware Installation
- Security
- Using the Setup Wizard
- DCS-900 Configuration
- IPView Lite Application Installation
- IPView Lite - Getting Started
- Uninstall IPView Application
- Appendix A: Frequently Asked Questions
- Troubleshooting
- Appendix B: How to PING your IP address
- Time Zone Table
- Xplug Control Installation
- Adjusting the Camera Focus
- Technical Specifications
- Contacting Technical Support
- Warranty and Registration
21
Single Camera Installation
If you are installing a single camera on your network the installation is an easy 4–step
procedure:
1) Identify Your Camera on the Network
2) Assign a Local IP Address for Your Camera
3) Determine Your Router’s WAN IP Address (Enable Remote Viewing)
4) Open Virtual Server Ports for Your Router (Enable Remote Viewing)
Multiple Camera Installation
If you are installing multiple cameras on your network, the installation is an easy 5-
step procedure:
1) Identify Your Camera on the Network
2) Assign a Local IP Address for Your Camera
3) Open a Second Port on the Camera
4) Determine Your Router’s WAN IP Address (Enable Remote Viewing)
5) Open Virtual Server Ports for Your Router (Enable Remote Viewing)
DCS-900 Configuration (continued)
Installing the DCS-900 Behind a Router