Version 1.
Preface D-Link reserves the right to revise this publication and to make changes in the content hereof without obligation to notify any person or organization of such revisions or changes. Manual Revisions Revision Date 1.0 December 16, 2013 Description • Initial release Trademarks D-Link and the D-Link logo are trademarks or registered trademarks of D-Link Corporation or its subsidiaries in the United States or other countries.
Table of Contents Table of Contents Preface ................................................................................. i Manual Revisions ........................................................................... i Trademarks ...................................................................................... i Product Overview .............................................................. 1 Package Contents .........................................................................
Table of Contents Setup ..................................................................................53 Local Network ...........................................................53 Wireless..............................................................................54 Wireless Basics...........................................................54 Wi-Fi Protected (WPS) Setup................................57 Advanced Wireless...................................................58 Maintenance ...............
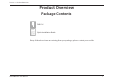
Section 1 - Product Overview Product Overview Package Contents DIR-516 Quick Installation Guide If any of the above items are missing from your package, please contact your reseller.
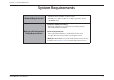
Section 1 - Product Overview System Requirements Network Requirements • An Ethernet-based Cable or DSL modem • IEEE 802.11ac, 802.11a, 802.11n or 802.11g wireless clients • 10/100 Ethernet Computer with the following: • Windows®, Macintosh, or Linux-based operating system • An installed Ethernet adapter Web-based Configuration Utility Requirements Browser Requirements: • Microsoft Internet Explorer® v7, Mozilla® Firefox® v9.0, Google® Chrome 16.
Section 1 - Product Overview Introduction TOTAL COVERAGE Provides greater wireless signal rates even at farther distances for incredible wireless coverage. ULTIMATE PERFORMANCE The D-Link DIR-516 lets you create a secure wireless network to share photos, files, music, video, printers, and network storage throughout your home. Connect the DIR-516 router to a cable or DSL modem and share your high-speed Internet access with everyone on the network.
Section 1 - Product Overview Features • Faster Wireless Networking - The DIR-516 provides an up to 150Mbps wireless connection in 2.4GHz band, 433Mbps wireless connection in 5GHz with other 802.11ac and draft 802.11n wireless clients. This capability allows users to participate in real-time activities online, such as video streaming, online gaming, and real-time audio.
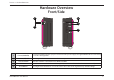
Section 1 - Product Overview Hardware Overview Front/Side 1 5 4 2 3 1 Power (PWR LED) A solid green light indicates a proper connection to the power supply. The light will blink when connectiong to a device through WPS. 2 Internet (ISP) LEd A solid light indicates connection on the Internet port. 3 Selector Switch 4 WPS Button Press this to activate Wi-Fi Protected Setup(WPS) to connect other wireless devices automatically.
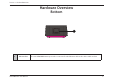
Section 1 - Product Overview Hardware Overview Bottom 1 1 Ethernet Port D-Link DIR-516 User Manual The auto MDI/MDIX Internet port is the connection for the Ethernet cable to the cable or DSL modem.
Section 1 - Product Overview Operation Modes Depending on how you want to use your DIR-516 will determine which mode you use. The following pages describe each mode to help you figure out which one to use.
Section 1 - Product Overview Router Mode In Router Mode, the DIR-516 connects to your cable modem, DSL modem, or other Internet source and shares your Internet connection with your devices wirelessly, providing Internet access for an entire home or office.
Section 1 - Product Overview Access Point Mode In Access Point Mode, the DIR-516 connects your wireless devices together, but does not provide routing functionality. It also allows a connected wired device to connect to your other devices wirelessly. This can be useful if you already have an existing Internet router that does not have built-in wireless capabilities.
Section 1 - Product Overview Wireless Installation Considerations The D-Link wireless router lets you access your network using a wireless connection from virtually anywhere within the operating range of your wireless network. Keep in mind, however, that the number, thickness and location of walls, ceilings, or other objects that the wireless signals must pass through, may limit the range.
Section 2 - Setting Up With a Web Browser - Router Mode Router Mode This section will show you how to configure your new D-Link wireless router using the web-based configuration utility. To access the configuration utility, open a web-browser such as Internet Explorer and enter the IP address of the router (192.168.0.1). Enter admin in the User Name field. By default, the password should be left blank. If you get a Page Cannot be Displayed error, please refer to the Troubleshooting section for assistance.
Section 2 - Setting Up With a Web Browser - Router Mode Network Settings This section will allow you to change the local network settings of the router and to configure the DHCP settings. LAN Interface: Use this section to configure the router’s local network settings. DHCP Server Use this section to configure the DIR-516’s built-in DHCP Settings: server settings. DHCP Static IP Use this section to add a new DHCP Static IP configuration.
Section 2 - Setting Up With a Web Browser - Router Mode IP Address: Enter the IP address of the router. The default IP address is 192.168.0.1. If you change the IP address, once you click Apply, you will need to enter the new IP address in your browser to get back into the configuration utility. Subnet Mask: Enter the subnet mask. The default subnet mask is 255.255.255.0. Click the Apply Changes button to save any changes made.
Section 2 - Setting Up With a Web Browser - Router Mode DHCP stands for Dynamic Host Control Protocol. The DIR-516 has a built-in DHCP server. The DHCP Server will automatically assign an IP address to the computers on the LAN/private network. Be sure to set your computers to be DHCP clients by setting their TCP/IP settings to “Obtain an IP Address Automatically.” When you turn your computers on, they will automatically load the proper TCP/IP settings provided by the DIR-516.
Section 2 - Setting Up With a Web Browser - Router Mode If you want a computer or device to always have the same IP address assigned, you can create a DHCP reservation. The router will assign the IP address only to that computer or device. Note: This IP address must be within the DHCP IP address range. IP Address: Enter the IP address you want to assign to the computer or device. This IP address must be within the DHCP IP address range. MAC Address: Enter the MAC address of the computer or device.
Section 2 - Setting Up With a Web Browser - Router Mode Internet Setup This section allows you to manually configure your router’s Internet WAN settings. WAN Access Select the WAN interface type. Type: If you choose DHCP, please configure the following fields: Host Name: Enter the host name of the router. MTU Size: Enter the MTU size. Attain DNS Click this if the DNS is to be obtained automatically. Automatically: Set DNS Click this to specify a DNS server. You can enter up to two Manually: DNS servers.
Section 2 - Setting Up With a Web Browser - Router Mode If you choose Static IP, please configure the following fields; WAN Access Select Static IP from the drop-down menu. Type: IP Address: Enter the static IP address which was provided to you by your Internet Service Provider (ISP). Subnet Mask: Enter the subnet provided by your ISP. Default Enter the default gateway provided by your ISP. Gateway: MTU Size: Enter the Maximum Transmission Unit size. The default value is 1500.
Section 2 - Setting Up With a Web Browser - Router Mode If you choose PPPoE, please configure the following fields: WAN Access Select PPPoE from the drop-down menu. Type: User Name: Enter the user name provided to you by your ISP. Password: Enter the password provided to you by your ISP. Service Name: Enter the service name if your ISP provided you with one, otherwise leave this field empty. MTU Size: Enter the Maximum Transmission Unit size. The default value is 1492.
Section 2 - Setting Up With a Web Browser - Router Mode Wireless • Wireless Settings This page allows you to configure the wireless LAN settings. You can also configure the wireless encryption and wireless network parameters. Enabled Access Use this to disable NAT on the router and turn it into an Point Mode: Access Point. Enable Wireless: Enable SSID broadcast if you want the router to transmit its SSID publicly so other wireless devices can discover it.
Section 2 - Setting Up With a Web Browser - Router Mode Wireless security helps to prevent unauthorized users from accessing your wireless network, or seeing data being passed between the router and wireless clients. The DIR-516 supports two popular wireless security protocols, you should select a protocol based on the wireless clients which will be accessing your network.
Section 2 - Setting Up With a Web Browser - Router Mode Wi-Fi Protected Access (WPA/WPA2) This is a newer and more secure protocol for wireless security. It uses a cipher combined with a pre-shared key (password) to encrypt data being sent over the wireless network. It is recommended that you use this security method if it is supported by your wireless clients. Security Select WPA-PSK/WPA2-PSK AES from the drop-down Options: menu.
Section 2 - Setting Up With a Web Browser - Router Mode Wi-Fi Protected (WPS) Setup Wi-Fi Protected Setup (WPS) System is a simplified method for securely connecting new devices to your network. The process as easy as pressing a button (the Push-Button Connection method) or correctly entering the 8-digit code (the PIN method). If you wish to use the Push-Button Connection (PBC) method, simply press the WPS button on the side of the router. The power LED will begin to flash.
Section 2 - Setting Up With a Web Browser - Router Mode Firmware This page allows you to upgrade the firmware of the router. If you plan to install new firmware, make sure the firmware you want to use is on the local hard drive of the computer. Please check the D-Link support site for firmware updates at http://support.dlink.com. You can download firmware upgrades to your hard drive from the D-Link support site.
Section 2 - Setting Up With a Web Browser - Router Mode System This page allows you to save the router’s current configuration file onto your computer’s hard drive or load a saved file from your hard drive. Click the Save Settings to File button to download the current configuration settings as a file onto your hard drive. To load a previously saved settings file, click the Browse button to locate the file on your hard drive, then click the Upload button.
Section 2 - Setting Up With a Web Browser - Router Mode Admin This page allows you to add a user account to the router’s web server. You can also delete or modify existing accounts. Confirm Retype the new password. Password: To delete an existing account, click the Select tab next to the user account in the table and then click the Delete button.
Section 2 - Setting Up With a Web Browser - Router Mode Status Device Info This page displays the current status and basic settings of the router. System: Displays the router’s time and firmware version. LAN Displays the MAC address and the private (local) IP Configuration: settings for the router. WLAN Displays the wireless MAC address and your wireless Configuration: settings such as SSID and Channel. WAN Displays the MAC address and the public IP settings for Configuration: the router.
Section 2 - Setting Up With a Web Browser - Router Mode Wireless This page displays lists of all wired and wireless clients. The IP address and MAC address of each client is displayed in the tables. Active Wired Client This table displays all active wired clients. Table: Active Wireless This table displays all active wireless clients.
Section 2 - Setting Up With a Web Browser - Router Mode Statistics This page displays the statistics for packets that have been transmitted and received on the network on the router’s WAN and LAN ports, and wireless bands. Click the Refresh button to refresh the router’s traffic statistics.
Section 2 - Setting Up With a Web Browser - Router Mode Support This section provides an explanation of each configuration or setting for the DIR-516. Click on the links to be taken to the help text for that particular section of router’s setup.
Section 2 - Setting Up With a Web Browser - Access Point Mode Access Point Mode Manual Configuration This section will show you how to configure your new D-Link wireless router using the web-based configuration utility. To access the configuration utility, open a web-browser such as Internet Explorer and enter the IP address of the router (192.168.0.50). Enter admin in the User Name field. Leave the password blank as the default password.
Section 2 - Setting Up With a Web Browser - Access Point Mode Setup Local Network This section will allow you to change the local network settings of the access point. IP Address: Enter the IP address of the access point. Subnet Mask: Enter the subnet mask of the access point.
Section 2 - Setting Up With a Web Browser - Access Point Mode Wireless Wireless Settings This page allows you to configure the wireless LAN settings. You can also configure the wireless encryption and wireless network parameters. Enabled Access Use this to disable NAT on the router and turn it into an Point Mode: Access Point. Enable SSID Enable SSID broadcast if you want the router to transmit its Broadcast: SSID publicly so other wireless devices can discover it.
Section 2 - Setting Up With a Web Browser - Access Point Mode Wireless security helps to prevent unauthorized users from accessing your wireless network, or seeing data being passed between the router and wireless clients. The DIR-516 supports two popular wireless security protocols, you should select a protocol based on the wireless clients which will be accessing your network.
Section 2 - Setting Up With a Web Browser - Access Point Mode Wi-Fi Protected Access (WPA/WPA2) This is a newer and more secure protocol for wireless security. It uses a cipher combined with a pre-shared key (password) to encrypt data being sent over the wireless network. It is recommended that you use this security method if it is supported by your wireless clients. Security Select WPA-PSK/WPA2-PSK AES from the drop-down Options: menu.
Section 2 - Setting Up With a Web Browser - Access Point Mode Wi-Fi Protected (WPS) Setup Wi-Fi Protected Setup (WPS) System is a simplified method for securely connecting new devices to your network. The process as easy as pressing a button (the Push-Button Connection method) or correctly entering the 8-digit code (the PIN method). If you wish to use the Push-Button Connection (PBC) method, simply press the WPS button on the side of the router. The power LED will begin to flash.
Section 2 - Setting Up With a Web Browser - Access Point Mode Maintenance Reboot This page allows you to reboot your router or reset it to the factory default settings. Click the Reboot button to reboot the system. To reset the system to the factory default setting, click the Reset button. This will erase the current settings.
Section 2 - Setting Up With a Web Browser - Access Point Mode Firmware This page allows you to upgrade the firmware of the router. If you plan to install new firmware, make sure the firmware you want to use is on the local hard drive of the computer. Please check the D-Link support site for firmware updates at http://support.dlink.com. You can download firmware upgrades to your hard drive from the D-Link support site.
Section 2 - Setting Up With a Web Browser - Access Point Mode System This page allows you to save the router’s current configuration file onto your computer’s hard drive or load a saved file from your hard drive. Click the Save button to download the current configuration settings as a file onto your hard drive. To load a previously saved settings file, click the Browse button to locate the file on your hard drive, then click the Upload button.
Section 2 - Setting Up With a Web Browser - Access Point Mode Admin This page allows you to add a user account to the router’s web server. You can also delete or modify existing accounts. User Name: Enter a username. Privilege: The user has root privilege. Old Password: Enter the current password of the account. New Password: Enter the new password for the account. Confirm Password: Retype the new password. Click the Add button to save any changes made.
Section 2 - Setting Up With a Web Browser - Access Point Mode Status Device Info This page displays the current status and basic settings of the router. System: Displays the router’s time and firmware version. LAN Displays the MAC address and the private (local) IP Configuration: settings for the router. WLAN Displays the wireless MAC address and your wireless Configuration: settings such as SSID and Channel. WAN Displays the MAC address and the public IP settings for Configuration: the router.
Section 2 - Setting Up With a Web Browser - Access Point Mode Wireless This page displays lists of all wired and wireless clients. The IP address and MAC address of each client is displayed in the tables. Active Wired Client This table displays all active wired clients. Table: Active Wireless This table displays all active wireless clients. Client Table: Click the Save Settings button to save any changes made.
Section 2 - Setting Up With a Web Browser - Access Point Mode Statistics This page displays the statistics for packets that have been transmitted and received on the network on the router’s WAN and LAN ports, and wireless bands. Click the Refresh button to refresh the router’s traffic statistics.
Section 2 - Setting Up With a Web Browser - Access Point Mode Support This section provides an explanation of each configuration or setting for the DIR-516. Click on the links to be taken to the help text for that particular section of router’s setup.
Section 3 - Connecting a Wireless Client Connecting a Wireless Client WPS Button The easiest and most secure way to connect your wireless devices to the router is WPS (Wi-Fi Protected Setup). Many wireless devices will have a WPS button (or a software utility with WPS) that you can press to connect to the DIR-516 router. Please refer to your user manual for the wireless device you want to connect to make sure you understand how to enable WPS on it.
Section 3 - Connecting a Wireless Client Windows® 8 WPA/WPA2 It is recommended to enable wireless security (WPA/WPA2) on your wireless router or access point before configuring your wireless adapter. If you are joining an existing network, you will need to know the security key (Wi-Fi password) being used. To join an existing network, locate the wireless network icon in the taskbar, next to the time display.
Section 3 - Connecting a Wireless Client You will then be prompted to enter the network security key (Wi-Fi password) for the wireless network. Enter the password into the box and click Next. If you wish to use Wi-Fi Protected Setup (WPS) to connect to the router, you can also press the WPS button on your router at the point to enable the WPS function.
Section 3 - Connecting a Wireless Client Windows® 7 WPA/WPA2 It is recommended to enable wireless security (WPA/WPA2) on your wireless router or access point before configuring your wireless adapter. If you are joining an existing network, you will need to know the security key or passphrase being used. 1. Click on the wireless icon in your system tray (lower-right corner). Wireless Icon 2. The utility will display any available wireless networks in your area.
Section 3 - Connecting a Wireless Client 3. Highlight the wireless network (SSID) you would like to connect to and click the Connect button. If you get a good signal but cannot access the Internet, check your TCP/IP settings for your wireless adapter. Refer to the Networking Basics section in this manual for more information. 4. The following window appears while your computer tries to connect to the router.
Section 3 - Connecting a Wireless Client 5. Enter the same security key or passphrase that is on your router and click Connect. You can also connect by pushing the WPS button on the router. It may take 20-30 seconds to connect to the wireless network. If the connection fails, please verify that the security settings are correct. The key or passphrase must be exactly the same as on the wireless router.
Section 3 - Connecting a Wireless Client WPS The WPS feature of the DIR-516 can be configured using Windows® 7. Carry out the following steps to use Windows® 7 to configure the WPS feature: 1. Click the Start button and select Computer from the Start menu. 2. Click Network on the left side.
Section 3 - Connecting a Wireless Client 3. Double-click the DIR-516. ',5 4. Input the WPS PIN number (displayed in the WPS window on the Router’s LCD screen or in the Setup > Wireless Setup menu in the Router’s Web UI) and click Next.
Section 3 - Connecting a Wireless Client 5. Type a name to identify the network. 6. To configure advanced settings, click the icon. Click Next to continue.
Section 3 - Connecting a Wireless Client 7. The following window appears while the Router is being configured. Wait for the configuration to complete. 8. The following window informs you that WPS on the router has been setup successfully. Make a note of the security key as you may need to provide this security key if adding an older wireless device to the network in the future. 9. Click Close to complete WPS setup.
Section 3 - Connecting a Wireless Client Windows Vista® Windows Vista® users may use the built-in wireless utility. If you are using another company’s utility or Windows® 2000, please refer to the user manual of your wireless adapter for help with connecting to a wireless network. Most utilities will have a “site survey” option similar to the Windows Vista® utility as seen below. If you receive the Wireless Networks Detected bubble, click on the center of the bubble to access the utility.
Section 3 - Connecting a Wireless Client WPA/WPA2 It is recommended to enable wireless security (WPA/WPA2) on your wireless router or access point before configuring your wireless adapter. If you are joining an existing network, you will need to know the security key or passphrase being used. 1. Open the Windows Vista® Wireless Utility by right-clicking on the wireless computer icon in your system tray (lower right corner of screen). Select Connect to a network. 2.
Section 3 - Connecting a Wireless Client 3. Enter the same security key or passphrase that is on your router and click Connect. It may take 20-30 seconds to connect to the wireless network. If the connection fails, please verify that the security settings are correct. The key or passphrase must be exactly the same as on the wireless router.
Section 3 - Connecting a Wireless Client WPS/WCN 2.0 The router supports Wi-Fi protection, referred to as WCN 2.0 in Windows Vista®. The following instructions for setting this up depends on whether you are using Windows Vista® to configure the router or third party software. When you first set up the router, Wi-Fi protection is disabled and unconfigured. To enjoy the benefits of Wi-Fi protection, the router must be both enabled and configured.
Section 3 - Connecting a Wireless Client Windows® XP Windows® XP users may use the built-in wireless utility (Zero Configuration Utility). The following instructions are for Service Pack 2 users. If you are using another company’s utility, please refer to the user manual of your wireless adapter for help with connecting to a wireless network. Most utilities will have a “site survey” option similar to the Windows® XP utility as seen below.
Section 3 - Connecting a Wireless Client WPA/WPA2 It is recommended to enable WPA on your wireless router or access point before configuring your wireless adapter. If you are joining an existing network, you will need to know the WPA key being used. 1. Open the Windows® XP Wireless Utility by right-clicking on the wireless computer icon in your system tray (lower-right corner of screen). Select View Available Wireless Networks. 2.
Section 3 - Connecting a Wireless Client 3. The Wireless Network Connection box will appear. Enter the WPA-PSK passphrase and click Connect. It may take 20-30 seconds to connect to the wireless network. If the connection fails, please verify that the WPA-PSK settings are correct. The WPA-PSK passphrase must be exactly the same as on the wireless router.
Section 4 - Troubleshooting Troubleshooting This chapter provides solutions to problems that can occur during the installation and operation of the DIR-516. Read the following descriptions if you are having problems. The examples below are illustrated in Windows® XP. If you have a different operating system, the screenshots on your computer will look similar to the following examples. 1. Why can’t I access the web-based configuration utility? When entering the IP address of the D-Link router (192.168.0.
Section 4 - Troubleshooting • Configure your Internet settings: • Go to Start > Settings > Control Panel. Double-click the Internet Options Icon. From the Security tab, click the button to restore the settings to their defaults. • Click the Connection tab and set the dial-up option to Never Dial a Connection. Click the LAN Settings button. Make sure nothing is checked. Click OK. • Go to the Advanced tab and click the button to restore these settings to their defaults. Click OK three times.
Section 4 - Troubleshooting 3. Why can’t I connect to certain sites or send and receive emails when connecting through my router? If you are having a problem sending or receiving email, or connecting to secure sites such as eBay, banking sites, and Hotmail, we suggest lowering the MTU in increments of ten (Ex. 1492, 1482, 1472, etc). To find the proper MTU Size, you’ll have to do a special ping of the destination you’re trying to go to. A destination could be another computer, or a URL.
Section 4 - Troubleshooting You should start at 1472 and work your way down by 10 each time. Once you get a reply, go up by 2 until you get a fragmented packet. Take that value and add 28 to the value to account for the various TCP/IP headers. For example, lets say that 1452 was the proper value, the actual MTU size would be 1480, which is the optimum for the network we’re working with (1452+28=1480). Once you find your MTU, you can now configure your router with the proper MTU size.
Appendix A - Wireless Basics Wireless Basics D-Link wireless products are based on industry standards to provide easy-to-use and compatible high-speed wireless connectivity within your home, business or public access wireless networks. Strictly adhering to the IEEE standard, the D-Link wireless family of products will allow you to securely access the data you want, when and where you want it. You will be able to enjoy the freedom that wireless networking delivers.
Appendix A - Wireless Basics What is Wireless? Wireless or Wi-Fi technology is another way of connecting your computer to the network without using wires. Wi-Fi uses radio frequency to connect wirelessly, so you have the freedom to connect computers anywhere in your home or office network. Why D-Link Wireless? D-Link is the worldwide leader and award winning designer, developer, and manufacturer of networking products. D-Link delivers the performance you need at a price you can afford.
Appendix A - Wireless Basics Wireless Personal Area Network (WPAN) Bluetooth is the industry standard wireless technology used for WPAN. Bluetooth devices in WPAN operate in a range up to 30 feet away. Compared to WLAN the speed and wireless operation range are both less than WLAN, but in return it doesn’t use nearly as much power which makes it ideal for personal devices, such as mobile phones, PDAs, headphones, laptops, speakers, and other devices that operate on batteries.
Appendix A - Wireless Basics Where is wireless used? Wireless technology is expanding everywhere not just at home or office. People like the freedom of mobility and it’s becoming so popular that more and more public facilities now provide wireless access to attract people. The wireless connection in public places is usually called “hotspots”.
Appendix B - Networking Basics Networking Basics Check your IP address After you install your new D-Link adapter, by default, the TCP/IP settings should be set to obtain an IP address from a DHCP server (i.e. wireless router) automatically. To verify your IP address, please follow the steps below. Click on Start > Run. In the run box type cmd and click OK. (Windows® 8/7/Vista® users type cmd in the Start Search box.) At the prompt, type ipconfig and press Enter.
Appendix B - Networking Basics Statically Assign an IP address If you are not using a DHCP capable gateway/router, or you need to assign a static IP address, please follow the steps below: Step 1 Windows® 7 Click on Start > Control Panel > Network and Internet > Network and Sharing Center. Windows Vista® - Click on Start > Control Panel > Network and Internet > Network and Sharing Center > Manage Network Connections. Windows® XP Click on Start > Control Panel > Network Connections.
Appendix C - Technical Specifications Technical Specifications Standards • IEEE 802.11a • IEEE 802.11b • IEEE 802.11g • IEEE 802.11n • IEEE 802.11ac(Draft) Interfaces • 802.11n/g/b wireless • 10/100 WAN/LAN port • WPS button • Reset button • Switch Button for 2.
Appendix D - Safety Statements Safety Statements CE Mark Warning: This is a Class B product. In a domestic environment, this product may cause radio interference, in which case the user may be required to take adequate measures. Federal Communication Commission Interference Statement This device complies with Part 15 of the FCC Rules.
Appendix D Ͳ Safety Statements _____________________________________________________________________ The model DIRͲ516 is intended for use with other certified equipment with limited power source, where the suitability of the combination is to be determined.