Section 1 - Product Overview Package Contents • D-Link DIR-605L Wireless N 300 Cloud Router • Power Adapter • Quick Installation Guide Note: Using a power supply with a different voltage rating than the one included with the DIR-605L will cause damage and void the warranty for this product. Note: Always attach the power cord plug to the power supply, before inserting the power cord and connected power supply to the wall outlet.
Section 1 - Product Overview Features • Faster Wireless Networking - The DIR-605L provides up to 300Mbps* wireless connection with other 802.11n wireless clients. This capability allows users to participate in real-time activities online, such as video streaming, online gaming, and real-time audio. • Compatible with 802.11b and 802.11g Devices - The DIR-605L is still fully compatible with the IEEE 802.11b and IEEE 802.11g standard, so it can connect with existing 802.11b and IEEE 802.
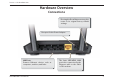
Section 1 - Product Overview Hardware Overview Connections Pressing the Reset Button restores the router to its original factory default settings. Receptor for the Power Adapter. LAN Ports Connect Ethernet devices such as computers, switches, and hubs. D-Link DIR-605L User Manual The Auto MDI/MDIX WAN port is the connection for the Ethernet cable to the Cable or DSL modem.
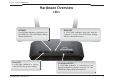
Section 1 - Product Overview Hardware Overview LEDs INTERNET A solid light indicates connection on the WAN port. This LED blinks during data transmission. Power LED A solid light indicates a proper connection to the power supply. D-Link DIR-605L User Manual WLAN LED A solid light indicates that the wireless segment is ready. This LED blinks during wireless data transmission. Local Network LEDs A solid light indicates a connection to an Ethernet-enabled computer on ports 1-4.
Section 2 - Installation Installation This section will walk you through the installation process. Placement of the router is very important. Do not place the router in an enclosed area such as a closet, cabinet, or in the attic or garage. Before you Begin Please configure the router with the computer that was last connected directly to your modem. Also, you can only use the Ethernet port on your modem.
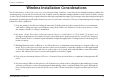
Section 2 - Installation Wireless Installation Considerations The D-Link wireless router lets you access your network using a wireless connection from virtually anywhere within the operating range of your wireless network. Keep in mind, however, that the number, thickness and location of walls, ceilings, or other objects that the wireless signals must pass through, may limit the range.
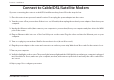
Section 2 - Installation Connect to Cable/DSL/Satellite Modem If you are connecting the router to a cable/DSL/satellite modem, please follow the steps below: 1. Place the router in an open and central location. Do not plug the power adapter into the router. 2. Turn the power off on your modem. If there is no on/off switch, then unplug the modem’s power adapter. Shut down your computer. 3.
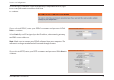
Section 3 - Configuration Configuration This section will show you how to configure your new D-Link wireless router using the web-based configuration utility. Web-based Configuration Utility To access the configuration utility, open a web-browser such as Internet Explorer and enter the IP address of the router (192.168.0.1) or http://dlinkrouter.
Section 3 - Configuration Select the type of Internet connection that Easy Setup Wizard detects, type in necessary information and then click Next to continue. If you selected PPPoE, enter your PPPoE username and password. Click Next to continue. Select Static if your ISP assigned you the IP address, subnet mask, gateway, and DNS server addresses. Note: Make sure to remove your PPPoE software from your computer. The software is no longer needed and will not work through a router.
Section 3 - Configuration If you selected L2TP, enter your L2TP username and password. Click Next to continue. If you selected Static, enter your network settings supplied by your Internet provider. Click Next to continue.
Section 3 - Configuration If you have not registered a mydlink account, please click “configure” In the section “mydlink account’ and complete the registration form. Click “Register” Now you can see the hint that a verification e-mail has been sent out. Open a new browser to login your e-mail account for receiving the verification mail. Once the account verification phase is complete, click "configure" In the section "mydlink account' and login mydlink account.
Section 3 - Configuration Now the router has successfully connected to mydlink service.
Section 3 - Configuration Internet Setup Static (assigned by ISP) Select Static IP Address if all WAN IP information is provided to you by your ISP. You will need to enter in the IP address, subnet mask, gateway address, and DNS address(es) provided to you by your ISP. Each IP address entered in the fields must be in the appropriate IP form, which are four octets separated by a dot (x.x.x.x). The Router will not accept the IP address if it is not in this format.
Section 3 - Configuration Internet Setup Dynamic To manually set up the Internet connection, click the Manual Internet Connection Setup button on the Router’s opening window. Access Point Checking this box disables NAT and turns the Router into an Mode: Access Point only. ',5 / Dynamic IP Choose Dynamic IP Address to obtain IP Address information Address: automatically from your ISP. Select this option if your ISP does not give you any IP numbers to use.
Section 3 - Configuration Internet Setup PPPoE Choose PPPoE (Point to Point Protocol over Ethernet) if your ISP uses a PPPoE connection. Your ISP will provide you with a username and password. This option is typically used for DSL services. Make sure to remove your PPPoE software from your computer. The software is no longer needed and will not work through a router. PPPoE: Select Dynamic (most common) or Static.
Section 3 - Configuration Internet Setup PPTP Choose PPTP (Point-to-Point-Tunneling Protocol ) if your ISP uses a PPTP connection. Your ISP will provide you with a username and password. This option is typically used for DSL services. PPTP: Select Dynamic (most common) or Static. Select Static if your ISP assigned you the IP address, subnet mask, gateway, and DNS server addresses. ',5 / IP Address: Enter the IP address (Static PPTP only).
Section 3 - Configuration Internet Setup L2TP Choose L2TP (Layer 2 Tunneling Protocol) if your ISP uses a L2TP connection. Your ISP will provide you with a username and password. This option is typically used for DSL services. L2TP: Select Dynamic (most common) or Static. Select Static if your ISP assigned you the IP address, subnet mask, gateway, and DNS server addresses. ',5 / IP Address: Enter the IP address (Static L2TP only).
Section 3 - Configuration Wireless Setup Wireless settings for the router may be configured manually or by using a wizard. To use the wizard, click the Wireless Connection Setup Wizard button and then follow the steps that are described below. To configure the wireless settings manually, click the Manual Wireless Connection Setup button. The parameters for this window are described later in this section.
Section 3 - Configuration Enter a Wireless Security Password in the textbox and then click Next to continue. This window displays a summary of your wireless security settings. Please print this out or record this information in a safe place and then click Save to continue. The Router will save your new settings and reboot. When it is finished after 1-2 minutes, the opening Wireless Setup window is displayed.
Section 3 - Configuration Wi-Fi Protected To implement Wi-Fi protection, or WCN 2.0, tick the Enable Setup: checkbox, click either Generate New PIN or Reset PIN to Default, and then configure the Wi-Fi settings below. Please see the Setting Up Wi-Fi Protection (WCN 2.0 in Windows Vista) section later in this manual for detailed configuration information. ',5 / Enable Wireless: Check the box to enable the wireless function.
Section 3 - Configuration 1. To enable wireless security on the Router, use the drop-down menu to select the desired option. To enable WEP, select Enable WEP Wireless Security (basic). 2. Next to Authentication, select either Open or Shared Key. Shared Key provides greater security. 3. Select either 64Bit or 128Bit encryption from the dropdown menu next to WEP Encryption. 4. Next to Default Key Type, select WEP Key 1 and enter a WEP key that you create.
Section 3 - Configuration 1. To enable WPA, WPA2, or WPA/WPA2, select either Enable WPA Only Wireless Security (enhanced), Enable WPA2 Only Wireless Security (enhanced), or Enable WPA/WPA2 Wireless Security (enhanced). 2. Next to Cipher Type, select TKIP, AES, or Both. 3. Next to PSK/EAP, select PSK. 4. Next to Network Key, enter a passphrase. The key is an alpha-numeric password between 8 and 63 characters long. The password can include symbols (!?*&_) and spaces.
Section 3 - Configuration LAN Setup This section will allow you to change the local network settings of the router and to configure the DHCP settings. Router IP Address: Enter the IP address of the router. The default IP address is 192.168.0.1. ',5 / If you change the IP address, once you click Apply, you will need to enter the new IP address in your browser to get back into the configuration utility. Default Subnet Enter the Subnet Mask. The default subnet mask is Mask: 255.255.255.0.
Section 3 - Configuration DHCP Server Settings DHCP stands for Dynamic Host Control Protocol. The DIR-605L has a built-in DHCP server. The DHCP Server will automatically assign an IP address to the computers on the LAN/private network. Be sure to set your computers to be DHCP clients by setting their TCP/IP settings to “Obtain an IP Address Automatically.” When you turn your computers on, they will automatically load the proper TCP/IP settings provided by the DIR-605L.
Section 3 - Configuration Time and Date This section will allow you to configure, update, and maintain the correct time on the internal system clock. Time Zone: Select the Time Zone from the drop-down menu. ',5 / Enable Ticking this checkbox enables Daylight Saving Daylight time. Click Sync. your computer’s time settings Saving: to copy your PC’s time settings.
Section 3 - Configuration Parental Control This feature allows you to create a list of websites that you want to either allow or deny users access. Configure Select Turn Parental Control OFF, Turn Parental Parental Control ON and ALLOW computers access to ONLY Control: these sites, or Turn Parental Control ON and DENY computers access to ONLY these sites. ',5 / Website URL: Enter the keywords or URLs that you want to block (or allow). Any URL with the keyword in it will be blocked.
Section 3 - Configuration Port Forwarding This will allow you to open a single port or a range of ports. Rule: Check the box to enabled the rule. ',5 / Name: Enter a name for the rule. IP Address: Enter the IP address of the computer on your local network that you want to allow the incoming service to. Start Port/ Enter the port or ports that you want to open. If you End Port: want to open one port, enter the same port in both boxes.
Section 3 - Configuration Application Rules Some applications require multiple connections, such as Internet gaming, video conferencing, Internet telephony and others. These applications have difficulties working through NAT (Network Address Translation). Special Applications makes some of these applications work with the DIR-605L. Rule: Check the box to enable the rule. ',5 / Name: Enter a name for the rule. Trigger Port: This is the port used to trigger the application.
Section 3 - Configuration Access Control Use MAC (Media Access Control) Filters to allow or deny LAN (Local Area Network) computers by their MAC addresses from accessing the Network. You can either manually add a MAC address or select the MAC address from the list of clients that are currently connected to the Broadband Router.
Section 3 - Configuration Traffic Control Traffic control can be used to distribute download bandwidth automatically according to the requirements of the users, and the users also can setup manually. Enable Traffic Control: Select this function to control the access bandwidth of computer in LAN. Enable Traffic Select this function to control the access bandwidth Control: of computer in LAN. ',5 / Automatic All the computers in LAN will be distributed the Distribute bandwidth equally.
Section 3 - Configuration Setup Wizard You may run the setup wizard from the opening quick setup window to quickly set up your router. You will be directed to the first window of the wizard automatically.
Section 3 - Configuration Firewall & DMZ This section will allow you to set up a DMZ host and to set up firewall rules. If you have a client PC that cannot run Internet applications properly from behind the DIR-605L, then you can set the client up for unrestricted Internet access. It allows a computer to be exposed to the Internet. This feature is useful for gaming purposes. Enter the IP address of the internal computer that will be the DMZ host.
Section 3 - Configuration Advanced Wireless This window allows you to change the behavior of the 802.11g wireless radio from the standard settings. Please be aware that any changes to the factory default settings may adversely affect the behavior of your network. Transmit Power: Set the transmit power of the antennas. ',5 / Beacon interval: Beacons are packets sent by an Access Point to synchronize a wireless network. Specify a value. 100 is the default setting and is recommended.
Section 3 - Configuration Advanced Network This window allows you to change the LAN settings. Please be aware that any changes to the factory default settings may affect the behavior of your network. Enable UPnP: To use the Universal Plug and Play (UPnP™) feature tick this checkbox. UPNP provides compatibility with networking equipment, software and peripherals. ',5 / Enable WAN Unchecking the box will not allow the DIR-605L to Ping Respond: respond to Pings.
Section 3 - Configuration Routing This option allows you to define fixed routes to defined destinations. ',5 / Enable: Tick this checkbox to enable or disable fixed routes to defined destinations. Interface: Use the drop-down menu to choose the WAN or WAN (Physical Port) Interface the IP packet must use to transit out of the Router. Destination: The IP address of the packets that will take this route. Subnet Mask: The subnet of the IP address of the packets that will take this route.
Section 3 - Configuration Device Administration This window will allow you to change the Administrator password. You can also enable Remote Management. Administrator Enter a new Login Name for the Administrator account. Login Name: ',5 / Administrator Enter a new password for the Administrator Login Name Password: and then retype the new password in the Confirm Password textbox. The administrator can make changes to the settings.
Section 3 - Configuration Save and Restore This window allows you to save your configuration file to a hard drive, load configuration settings from a hard drive, and restore the Router’s factory default settings. Save Settings to Use this option to save the current router configuration Local Hard Drive: settings to a file on the hard disk of the computer you are using. First, click the Save button. You will then see a file dialog, where you can select a location and file name for the settings.
Section 3 - Configuration Firmware Update You can upgrade the firmware of the Router here. Make sure the firmware you want to use is on the local hard drive of the computer. Click on Browse to locate the firmware file to be used for the update. Please check the D-Link support site for firmware updates at http://support.dlink.com. You can download firmware upgrades to your hard drive from the D-Link support site.
Section 3 - Configuration DDNS Setting The router supports DDNS (Dynamic Domain Name Service). The Dynamic DNS service allows a dynamic public IP address to be associated with a static host name in any of the many domains, allowing access to a specified host from various locations on the Internet. This is enabled to allow remote access to a host by clicking a hyperlinked URL in the form “hostname.dyndns.org”.
Section 3 - Configuration System Check This tool is used to verify the physical connectivity on both the LAN and the WAN interfaces. The Ping Test can be used to test the status of the Internet. Virtual Cable VCT is an advanced feature that integrates a LAN cable Tester (VCT) Info: tester on every Ethernet port on the router. Through the graphical user interface (GUI), VCT can be used to remotely diagnose and report cable faults such as opens, shorts, swaps, and impedance mismatch.