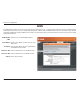
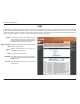
5GEVKQP %QPſIWTCVKQP DDNS The DDNS feature allows you to host a server (Web, FTP, Game Server, etc…) using a domain name that you have purchased (www. whateveryournameis.com) with your dynamically assigned IP address. Most broadband Internet Service Providers assign dynamic (changing) IP addresses. Using a DDNS service provider, your friends can enter in your domain name to connect to your server no matter what your IP address is. Enable Dynamic Check this box to enable DDNS updates. $.
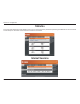
5GEVKQP %QPſIWTCVKQP 3YSTEM #HECK 0ING 4EST The Ping Test is used to send Ping packets to test if a computer is on the Internet. Enter the IP Address that you wish to Ping, and click 2KPI. 0ING 2ESULTS The results of your ping attempts will be displayed here.
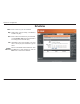
5GEVKQP %QPſIWTCVKQP 3CHEDULES .AME Enter a name for your new schedule. $AYS Select a day, a range of days, or All Week to include every day. 4IME Enter a start and end time for your schedule, or check !LL $AY HRS to set the schedule to run all day (for the selected days). 3AVE Click Save to save your schedule. You must click at the top for your schedules to go into effect. 3CHEDULE The list of schedules will be listed here.
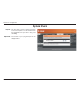
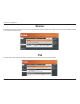
5GEVKQP %QPſIWTCVKQP Device Information This page displays the current information for the DIR-652. It will display the LAN, WAN (Internet), and Wireless information. If your Internet connection is set up for a Dynamic IP address then a Release button and a Renew button will be displayed. Use Release to disconnect from your ISP and use Renew to connect to your ISP. If your Internet connection is set up for PPPoE, a Connect button and a Disconnect button will be displayed.
GEVKQP %QPſIWTCVKQP Logs The router automatically logs (records) events of interest in its internal memory. If there isn’t enough internal memory for all events, logs of older events are deleted, but logs of the most recent events are retained. The Logs option allows you to view the router logs.
5GEVKQP %QPſIWTCVKQP Statistics 6JG UETGGP DGNQY FKURNC[U VJG 6TCHſE 5VCVKUVKEU *GTG [QW ECP XKGY VJG COQWPV QH RCEMGVU VJCV RCUU VJTQWIJ VJG &+4 QP DQVJ VJG +PVGTPGV CPF VJG .
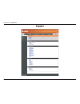
5GEVKQP %QPſIWTCVKQP Wireless The wireless client table displays a list of current connected wireless clients. This table also displays the connection time and MAC address of the connected wireless clients. IPv6 The IPv6 details page displays full details of IPv6 clients that are connected when IPv6 is enabled.
5GEVKQP %QPſIWTCVKQP 3UPPORT D-Link DIR-652 User Manual 77
Section 4 - Security Wireless Security This section will show you the different levels of security you can use to protect your data from intruders. The DIR-652 offers the following types of security: Ŗ 92# 9K (K 2TQVGEVGF #EEGUU Ŗ 92# 9K (K 2TQVGEVGF #EEGUU Ŗ 92# 25- 2TG 5JCTGF -G[ Ŗ 92# 25- 2TG 5JCTGF -G[ 7HAT IS 70! WPA, or Wi-Fi Protected Access, is a Wi-Fi standard that was designed to improve the security features of WEP (Wired Equivalent Privacy).
Section 4 - Security 7IRELESS 3ECURITY 3ETUP 7IZARD To run the security wizard, click on Setup at the top and then click ,AUNCH 7IRELESS 3ECURITY 3ETUP 7IZARD. Click Next to continue.
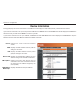
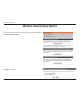
Section 4 - Security 'PVGT VJG 55+& 5GTXKEG 5GV +FGPVKſGT 6JG 55+& KU VJG PCOG QH [QWT wireless network. Create a name using up to 32 characters. The SSID is case-sensitive. Select the level of security for your wireless network: Ŗ $GUV 92# #WVJGPVKECVKQP Ŗ $GVVGT 92# #WVJGPVKECVKQP Ŗ 0QPG 0Q UGEWTKV[ Click Next to continue. If you selected Best or Better, enter a password between 8-63 characters. If you selected Good, enter 13 characters or 26 Hex digits. Click Next to continue.
Section 4 - Security If you selected Better, the following screen will show you your Pre-Shared -G[ VQ GPVGT QP [QWT YKTGNGUU ENKGPVU Click Save VQ ſPKUJ VJG 5GEWTKV[ 9K\CTF If you selected Best, the following screen will show you your Pre-Shared -G[ VQ GPVGT QP [QWT YKTGNGUU ENKGPVU Click Save VQ ſPKUJ VJG 5GEWTKV[ 9K\CTF If you selected WPA-Enterprise, the RADIUS information will be displayed. Click Save VQ ſPKUJ VJG 5GEWTKV[ 9K\CTF D-Link DIR-652 User Manual 81
Section 4 - Security #ONlGURE 70! 0ERSONAL 03+ It is recommended to enable encryption on your wireless router before your wireless network adapters. Please establish wireless connectivity before enabling encryption. Your wireless signal may degrade when enabling encryption due to the added overhead. Log into the web-based configuration by opening a web browser and entering the IP address of the router (192.168.0.1).
Section 4 - Security #ONlGURE 70! %NTERPRISE 2!$)53 It is recommended to enable encryption on your wireless router before your wireless network adapters. Please establish wireless connectivity before enabling encryption. Your wireless signal may degrade when enabling encryption due to the added overhead. .QI KPVQ VJG YGD DCUGF EQPſIWTCVKQP D[ QRGPKPI C YGD DTQYUGT CPF GPVGTKPI VJG +2 CFFTGUU QH VJG TQWVGT Click on 3ETUP and then click Wireless Settings on the left side. 2.
Section 4 - Security D-Link DIR-652 User Manual 84
Section 5 - Connecting to a Wireless Network Using Windows® 7 and WPS for Wireless Configuration 6JG HQNNQYKPI UVGRU CNNQY [QW VQ EQPſIWTG [QWT &+4 YKTGNGUU PGVYQTM UGVVKPIU WUKPI 9KPFQYU® 7 through WPS. 1. Click the Start button and select Computer from the Start menu. 2. Click the Network option.
Section 5 - Connecting to a Wireless Network 3. Double-click the DIR-652 router. 4. Input the WPS PIN number (displayed in the Advanced > Wi-Fi Protected Setup section in the Router’s Web UI) and click Next.
Section 5 - Connecting to a Wireless Network 5. Type a name for your wireless network. 6Q EQPſIWTG CFXCPEGF UGVVKPIU ENKEM VJG icon. Click Next to continue.
Section 5 - Connecting to a Wireless Network 7. The following window will appear while the Router is being EQPſIWTGF 9CKV HQT VJG EQPſIWTCVKQP VQ EQORNGVG #HVGT EQPſIWTCVKQP KU EQORNGVG C YKPFQY YKNN CRRGCT VJCV [QWT wireless network has been set up successfully. Make a note of the security key as you may need to provide this security key when adding an older wireless device to the network in the future. Click Close to complete WPS setup.
Section 5 - Connecting to a Wireless Network Connecting to a Wireless Network Using Windows® 7 +V KU TGEQOOGPFGF VJCV [QW GPCDNG YKTGNGUU UGEWTKV[ 92# 92# QP [QWT YKTGNGUU TQWVGT QT CEEGUU RQKPV DGHQTG EQPſIWTKPI [QWT YKTGNGUU CFCRVGT +H [QW CTG LQKPKPI CP GZKUVKPI PGVYQTM [QW YKNN PGGF VQ MPQY VJG UGEWTKV[ MG[ QT passphrase being used. 1. Click on the wireless icon in the system tray in the lowerright corner of your screen. Wireless Icon 2.
Section 5 - Connecting to a Wireless Network 3. Highlight the wireless network (SSID) you would like to connect to and click the Connect button. 4. The following window appears while your computer tries to connect to the router.
Section 5 - Connecting to a Wireless Network 5. If your wireless network uses encryption such as WEP or 92# 92# GPVGT VJG GPET[RVKQP RCUUYQTF RCUURJTCUG for your wireless network and click Connect. It may take 20-30 seconds to connect to the wireless network. If the connection fails, please verify that the key or passphrase is exactly the same as on the wireless router.
Section 5 - Connecting to a Wireless Network Connecting to a Wireless Network Using Windows Vista® +V KU TGEQOOGPFGF VJCV [QW GPCDNG YKTGNGUU UGEWTKV[ 92# 92# QP [QWT YKTGNGUU TQWVGT QT CEEGUU RQKPV DGHQTG EQPſIWTKPI [QWT YKTGNGUU CFCRVGT +H [QW CTG LQKPKPI CP GZKUVKPI PGVYQTM [QW YKNN PGGF VQ MPQY VJG UGEWTKV[ MG[ QT passphrase being used. 1.
Section 5 - Connecting to a Wireless Network 3. +H [QWT YKTGNGUU PGVYQTM WUGU GPET[RVKQP UWEJ CU 9'2 QT 92# 92# GPVGT VJG GPET[RVKQP RCUUYQTF RCUURJTCUG HQT [QWT YKTGNGUU network and click Connect. It may take 20-30 seconds to connect to the wireless network. If the connection fails, please verify that the key or passphrase is exactly the same as on the wireless router.
Section 5 - Connecting to a Wireless Network Connecting to a Wireless Network Using Windows® XP Windows® :2 WUGTU OC[ WUG VJG DWKNV KP YKTGNGUU WVKNKV[
Section 5 - Connecting to a Wireless Network 3. +H [QWT YKTGNGUU PGVYQTM WUGU GPET[RVKQP UWEJ CU 9'2 QT 92# 92# GPVGT VJG GPET[RVKQP RCUUYQTF RCUURJTCUG HQT [QWT YKTGNGUU network and click Connect. It may take 20-30 seconds to connect to the wireless network. If the connection fails, please verify that the key or passphrase is exactly the same as on the wireless router.
Section 6 - Troubleshooting 4ROUBLESHOOTING 7HY CAN T ) ACCESS THE WEB BASED CONlGURATION UTILITY When entering the IP address of the D-Link router (192.168.0.1 for example), you are not connecting to a website on the Internet or have to be connected to the Internet. The device has the utility built-in to a ROM chip in the device itself. Your computer must be on the same IP subnet to connect to the web-based utility.
Section 6 - Troubleshooting Ŗ %QPſIWTG [QWT +PVGTPGV UGVVKPIU Ŗ )Q VQ Start > Settings > Control Panel. Double-click the )NTERNET /PTIONS Icon. From the Security tab, click the button to restore the settings to their defaults. Ŗ %NKEM VJG Connection tab and set the dial-up option to Never Dial a Connection. Click the LAN Settings button. Make sure nothing is checked. Click OK. Ŗ )Q VQ VJG Advanced tab and click the button to restore these settings to their defaults. Click OK three times.
Section 6 - Troubleshooting 7HY CAN T ) CONNECT TO CERTAIN SITES OR SEND AND RECEIVE EMAILS WHEN CONNECTING THROUGH MY ROUTER If you are having a problem sending or receiving email, or connecting to secure sites such as eBay, banking sites, and Hotmail, we suggest lowering the MTU in increments of ten (Ex. 1492, 1482, 1472, etc). Note: AOL DSL+ users must use MTU of 1400. 6Q ſPF VJG RTQRGT /67 5K\G [QWŏNN JCXG VQ FQ C URGEKCN RKPI QH VJG FGUVKPCVKQP [QWŏTG VT[KPI VQ IQ VQ # FGUVKPCVKQP could be anot
Section 6 - Troubleshooting You should start at 1472 and work your way down by 10 each time. Once you get a reply, go up by 2 until you get a HTCIOGPVGF RCEMGV 6CMG VJCV XCNWG CPF CFF VQ VJG XCNWG VQ CEEQWPV HQT VJG XCTKQWU 6%2 +2 JGCFGTU (QT GZCORNG lets say that 1452 was the proper value, the actual MTU size would be 1480, which is the optimum for the network we’re working with (1452+28=1480). 1PEG [QW ſPF [QWT /67 [QW ECP PQY EQPſIWTG [QWT TQWVGT YKVJ VJG RTQRGT /67 UK\G To change the MTU rate
Appendix A - Wireless Basics Wireless Basics D-Link wireless products are based on industry standards to provide easy-to-use and compatible high-speed wireless connectivity within your home, business or public access wireless networks. Strictly adhering to the IEEE standard, the D-Link wireless family of products will allow you to securely access the data you want, when and where you want it. You will be able to enjoy the freedom that wireless networking delivers.
Appendix A - Wireless Basics 7HAT IS 7IRELESS Wireless or Wi-Fi technology is another way of connecting your computer to the network without using wires. Wi-Fi uses radio frequency to connect wirelessly, so you have the freedom to connect computers anywhere in your home QT QHſEG PGVYQTM 7HY $ ,INK 7IRELESS? D-Link is the worldwide leader and award winning designer, developer, and manufacturer of networking products. D-Link delivers the performance you need at a price you can afford.
Appendix A - Wireless Basics Compared to WLAN the speed and wireless operation range are both less than WLAN, but in return it doesn’t use nearly as much power which makes it ideal for personal devices, such as mobile phones, PDAs, headphones, laptops, speakers, and other devices that operate on batteries. 7HO USES WIRELESS Wireless technology as become so popular in recent years that almost everyone is using it, whether it’s for home, QHſEG DWUKPGUU & .
Appendix A - Wireless Basics 7HERE IS WIRELESS USED 9KTGNGUU VGEJPQNQI[ KU GZRCPFKPI GXGT[YJGTG PQV LWUV CV JQOG QT QHſEG 2GQRNG NKMG VJG HTGGFQO QH OQDKNKV[ CPF KVŏU becoming so popular that more and more public facilities now provide wireless access to attract people. The wireless connection in public places is usually called “hotspots”.
Appendix A - Wireless Basics Wireless Modes There are basically two modes of networking: Ŗ Infrastructure – All wireless clients will connect to an access point or wireless router. Ŗ !D (OC – Directly connecting to another computer, for peer-to-peer communication, using wireless network adapters on each computer, such as two or more DIR-652 wireless network Cardbus adapters. An Infrastructure network contains an Access Point or wireless router.
Appendix B - Networking Basics Networking Basics #HECK YOUR )0 ADDRESS #HVGT [QW KPUVCNN [QWT PGY & .KPM CFCRVGT D[ FGHCWNV VJG 6%2 +2 UGVVKPIU UJQWNF DG UGV VQ QDVCKP CP +2 CFFTGUU HTQO a DHCP server (i.e. wireless router) automatically. To verify your IP address, please follow the steps below. Click on Start > Run. In the run box type cmd and click /+ (Windows Vista® users type cmd in the 3TART 3EARCH box.) At the prompt, type ipconfig and press Enter.
Appendix B - Networking Basics Statically Assign an IP address +H [QW CTG PQV WUKPI C &*%2 ECRCDNG ICVGYC[ TQWVGT QT [QW PGGF VQ CUUKIP C UVCVKE +2 CFFTGUU RNGCUG HQNNQY VJG UVGRU below: 3TEP Windows Vista®: Windows® XP: Windows® 2000: Click on Start > Control Panel > Network and Internet > .ETWORK AND 3HARING #ENTER > Manage Network #ONNECTIONS Click on Start > Control Panel > Network Connections. From the desktop, right-click My Network Places > 0ROPERTIES.
#RRGPFKZ % 6GEJPKECN 5RGEKſECVKQPU 4ECHNICAL 3PECIlCATIONS Standards Ŗ +''' P Ŗ +''' I Ŗ +''' Ŗ +''' W Frequency Range Ŗ )*\ VQ )*\ Security Ŗ 92# 2GTUQPCN Ŗ 92# 2GTUQPCN Ŗ 92# 'PVGTRTKUG Ŗ 92# 'PVGTRTKUG %XTERNAL !NTENNA 4YPE Ŗ 6YQ FGVCEJCDNG TGXGTUG 5/# #PVGPPCU 4RANSMITTER /UTPUT 0OWER 7l[hW][ Ŗ F$O LEDs Ŗ 2QYGT 5VCVWU Ŗ 9.#0 Ŗ +PVGTPGV Ŗ .
#RRGPFKZ & %GTVKſECVKQPU Certifications #% -ARK 7ARNING This is a Class B product. In a domestic environment, this product may cause radio interference, in which case the user may be required to take adequate measures. &## 3TATEMENT This equipment has been tested and found to comply with the limits for a Class B digital device, pursuant to part 15 of the FCC Rules. These limits are designed to provide reasonable protection against harmful interference in a residential installation.