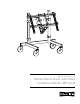
INSTRUCTION BOOK FOR Mobile Plasma Stand Automated Confidence Monitor MPS-ACM
Mobile Plasma Stand Automated Confidence Monitor MPS-ACM CAUTION: The user of this product should exercise caution when moving the Mobile Plasma Stand. Any sudden stop could cause instability of the stand and could cause serious injury and/ or damage. The stand should always be pushed, never pulled, by the user. Always push from the side of the stand, never from the front or back of the stand.
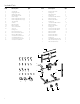
Included Parts Item Description QTY 1 2 3 4 5 6 7 8 9 10 11 12 13 A B C D E F G Security Bar Hanging Bracket Zee-Bar Plate Ass'y Key FOB Remote, RF Power Supply Power Supply Bracket, Small Power Supply Bracket, Large Top Assembly Column Base Assembly Glide, Furniture Caster .5" W/ Brake Caster .
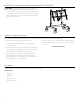
Procedure (Continued) 2. Insert the Caster stems or Glide stems into the Base. See Figure 1. Must go in straight. 6. Tighten the fasteners at the bottom of the Columns. 7. Attach Zee-Bar Plate to Hinge. See Figure 3. Hinge D A 13 G 11 12 F Link C Figure 1 Figure 3 3. Insert tube enclosures shown. 4. Insert two Columns into the Base and install the fasteners shown. Leave loose at this time. 5. Slide the Top Assembly down the Columns. See Figure 2. Position the Top by tightening both Knobs.
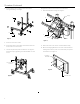
Procedure (Continued) 10. Hang the plasma unit on the Zee-Bars making sure the top and bottom notches on each Hanging Bracket are placed over the upper and lower Zee-Bars. See Figure 5. 12. Install Power Supply. See Figure 7. 11. Slide the Security Bar through the slots in the Hanging Brackets, bolt one end to the Zee-Bar then secure the opposite end with the pad lock. See Figure 5 & 6. Plasma (Not Included) Figure 7 See Fig.6 J E 13. Plug electrical cord into power supply. 14.
A Milestone AV Technologies Brand 3100 North Detroit Street Warsaw, Indiana 46582 P: 574.267.8101 or 800.622.3737 F: 574.267.7804 or 877.325.4832 E: info@da-lite.com www.da-lite.com DL–0381 (Rev. 1) 02.15 © 2015 Milestone AV Technologies LLC. Printed in U.S.A.