
Operating instructions


2
INSTALLATION
Before proceeding with the installation please read the installation and operating instructions thoroughly. Make sure to
recheck measurements of screen and hanger locations before installation. Area must be clear for screen to operate.
With all lid sections removed from shipping container, remove the screws holding the frame to the shipping container (2
per cross brace). The screen can now be carefully lifted out of the container.
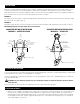
METHOD A
The frame can be mounted to ceiling with 5/16" diameter threaded rods. Level frame from front to back and left to right.
Mount from all cross braces (fig. 1).
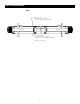
METHOD B
Hang from a pipe (fly the screen). Level frame from front to back and left to right. Mount from all cross braces (fig. 2).
NOTE: Motor pulley must clear pipe. Chains must clear motor tubes.
FIG. 1
FIG. 2
SUGGESTED METHOD OF INSTALLATION
METHOD A – SECURE TO CEILING
SUGGESTED METHOD OF INSTALLATION
METHOD B – “FLYING PIPE”
Ceiling
Pipe To Suit
Front
Chain To Suit
(6 Cross Braces)
(Not Furnished)
Eye Bolts
For Leveling
(Not Furnished)
Safety Switch Trigger
Back
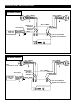
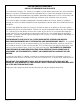
ELECTRICAL INSTALLATION
Screen motors have been internally wired at Da-Lite. Wiring designated “external” is completed by installer conforming to
local and national codes. Refer to wiring diagram on next page.
Check for satisfactory condition by operating the screen. Be prepared to stop screen. Standard Duty Cycle: 1 MIN. 30
SEC. ON / 45 MIN. OFF.
CAUTION! Excessive continuous operation may cause overheating and motors will shut off. Let motors cool 10 to 15 minutes
and continue test.
Check the cables to make sure they are winding on the motor and roller pulleys properly.
SCREEN ADJUSTMENT
1. With screen in complete unrolled position, examine the screen surface carefully. If fabric does not hang flat, loosen
the nuts on the eyebolts of the black clamps. Adjust the wingnuts to pull or relax the fabric as needed. Several
clamp heights may be adjusted depending on the severity of the hang. After adjustment, tighten the nuts against
the underside of the frame. Caution stage hands and others to check area before lowering screen. Do not bump
screen with ladders, scenery, etc.
s
!
Cross
Brace
Ceiling
Secure
To Suit
Front
5/16" Threaded Rod
(6 Cross Braces)
(Not Furnished)
15"
Safety Switch Trigger
Back
Cross
Brace
Secure
To Suit
Cable