
Operating instructions


5
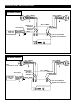
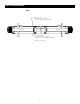
LIMIT SWITCH ADJUSTMENT
The stop positions of the screen are preset at the factory. If adjustments are necessary, the limit switch screws
located at the end of each motor can adjust the stop positions. Use a 5/32" hex key or a flat screwdriver.
Adjustments should be made in small increments by turning the adjustment screws a half turn at a time. Refer to
figure 3.
SETTING THE “DOWN” LIMIT POSITION.
SCREEN DROPS TOO FAR:
Left motor (as viewed from audience side): Turn the white limit switch screw clockwise to decrease the amount
of fabric drop.
Right motor (as viewed from audience side): Turn the yellow limit switch screw clockwise to decrease the amount
of fabric drop.
After adjusting the limit screws on both motors, run the screen down to test the stop position. Repeat until the
desired position is set.
SCREEN DOES NOT DROP ENOUGH:
Left motor (as viewed from audience side): Turn the white limit switch screw counterclockwise to increase the
amount of fabric drop.
Right motor (as viewed from audience side): Turn the yellow limit switch screw counterclockwise to increase the
amount of fabric drop.
After adjusting the limit screws on both motors, run the screen down to test the stop position. Repeat until the
desired position is set. Do not adjust for more drop than what was ordered. At least 1-1/2 wraps of fabric must
remain on the roller.
SETTING THE “UP” LIMIT POSITION.
SCREEN TRAVELS UP TOO FAR:
Left motor (as viewed from audience side): Turn the yellow limit switch screw clockwise to decrease the amount
of travel.
Right motor (as viewed from audience side): Turn the white limit switch screw clockwise to decrease the amount
of travel.
After adjusting the limit screws on both motors, run the screen up to test the stop position. If the screen travels
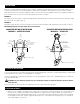
up too far, the safety stop switch will be activated and all power to the motors will be shut off. You will have to
deactivate the switch by hand. To do this, push down on the switch trigger (see Figure 1) to release the switch
and have someone run the screen down. This safety switch is to prevent the screen from traveling too far and
binding the motors should the motor limit switches fail.
SCREEN DOES NOT TRAVEL UP FAR ENOUGH:
Left motor (as viewed from audience side): Turn the yellow limit switch screw counterclockwise to increase the
amount of travel.
Right motor (as viewed from audience side): Turn the white limit switch screw counterclockwise to increase the
amount of travel.
After adjusting the limit screws on both motors, run the screen up to test the stop position. Repeat until the
desired position is set.