INSTRUCTION BOOK FOR Multi-Media Lectern
Set-Up Power Digital Clock/Count Down Timer Connect power supply to 110/120 VAC 3-wire outlet (220/240 VAC models to 220/240 VAC source). Select desired mode; adjust time with SET switch. Unit will remain operational as long as the main power supply is on. NOTE: Power interruptions will cause the clock to flash until reset. Reading Light Depress light switch to activate light. ADJUST VISOR AS NECESSARY.
Service The Da-Lite sound system is modular in design for ease of service. The power supply and amplifier are accessed inside the lectern body. If your lectern fails to operate on a known power source, be sure to check the circuit breaker located on the Power Supply for a tripped condition. Reset to restore function. If breaker continues to trip, discontinue use of product until problem can be diagnosed.
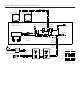
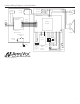
Lectern Wiring Diagram – Non-Sound System Optional Fan Optional Fan Wire Nut Dash Panel (Rear View) Fan Switch (Optional) Light Switch Clock/Timer Switch Fast/Slow Switch Conn.-2 CIR. Wire Nut Digital Clock ON OFF ON To Light T1 120 VAC ONLY Ground Conn. 3 CIR. Conn. 3 CIR. 220 VAC (Optional) POWER SUPPLY 120 VAC 4 3 CIR. Conn.
Lectern Wiring Diagram – Sound System + Motherboard Preamp/Mixer Assembly Mic 1 20 Ribbon Cable 1 Tweeter Com Full High Clock 3-Pin Jack External Speakers Speaker Switch 20 Amplifier Assembly 1 + Dash Panel Circuit Housing Woofer AC Out SW.
LIMITED ONE YEAR WARRANTY ON DA-LITE PRESENTATION PRODUCTS Milestone AV Technologies LLC warrants certain Da-Lite branded products to the original purchaser only, to be free from defects in materials and workmanship for a period of one (1) year from the date of purchase by the original purchaser; provided they are properly operated according to Da-Lite’s instructions and are not damaged due to improper handling or treatment after shipment from the factory.