@n IP AIPTEK PENCAM VOICE Installation Guide Company
Contents FCC Statement ECC Statement End User License Agreement 1 2 Contents Checklist System Requirements Specifications Operating Environment 7 How to Use Your PenCam VoiceRecorder Switching the Camera on /off Taking a Picture 10 Selecting Functions Voice Recording Voice Play Delete the Last Stored Self Timer Continuous Mode Clearing All the Stored Changing the Picture Resolution How to Download Photo, Video and Audio to PC Start AIPTEK PenCam VoiceRecorder Manager Mode Selecting PC Camera Mode DSC
@n IP Company FCC Statement This equipment generates and uses radio frequency energy. If not installed and used in accordance with the manufacturer's instructions, it may interfere radio and television reception. This equipment has been tested and certified to comply with the limits of Section 15(J) of FCC Regulations for Class B computing devices. These regulations are designed to provide reasonable protection against interference in a residential installation.
End User License Agreement Important - Read Carefully! The AIPTEK End-User License Agreement ("EULA"), a legal agreement between you and AIPTEK, Inc., specifies regulations for using the AIPTEK hardware products, which includes the computer hardware, software, associated media, printed materials, and "online" or electronic documentation. As you are installing, successfully installing, copying, or otherwise using this HARDWARE PRODUCT, you must comply with the EULA.
@n IP Company copies. 2. OTHER RIGHTS AND LIMITATIONS Single Entity User - Only the person that the HARDWARE PRODUCT was purchased for may use the HARDWARE PRODUCT and its accompanying software. Individual User - Only you and those in your immediate household may use the HARDWARE PRODUCT and its accompanying software. Product Transfer - You may permanently transfer all of the HARDWARE PRODUCT under this EULA, provided you retain no copies of any of the software included in this HARDWARE PRODUCT.
PRODUCT, you can seek a refund from the place of purchase. If you cannot get a refund from the place of purchase, you may not seek a refund for the HARDWARE PRODUCT from AIPTEK, and you agree to not attempt to seek a refund for the HARDWARE PRODUCT from AIPTEK. Technical Support - AIPTEK may provide you with Technical Support ("Tech Support") related to the HARDWARE PRODUCT.
@n IP Company PRODUCT (including but not limited to any images, photographs, animations, video, audio, music, text, and "Applets" incorporated into the HARDWARE PRODUCT), the accompanying printed materials, all "online" documentation, any copies of the software included with the HARDWARE PRODUCT, all pieces of physical hardware, all media, and/or other AIPTEKprovided materials, are owned by AIPTEK or its suppliers.
(c)(1) and (2) of the Commercial Computer Software Restricted Rights at 48 CFR 52.227-19, as applicable. Manufacturer is AIPTEK, Inc.51 Discovery, Suite 100 Irvine, CA 92618, USA. 7. If you acquired this product in the United States, this EULA is governed by the laws of the State of California. 8. If this product was acquired outside the United States or its Territories, then local law may apply.
@n IP Company Contents Checklist 1.PenCam VoiceRecorder 2.Application / One Driver CD Ins 3.Install Quick Guide ta ic Ql u uid kG e Driver & Application 4.USB Cable NOTE: If you are missing any of these contents please inform your dealer or your nearest support office so that the contents can be replaced.
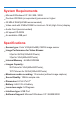
System Requirements Microsoft Windows X P / 98 / ME / 2000 Pentium 200 MHz (or equivalent) processor or higher 32 MB of RAM (64 MB recommended) Video card with 2 MB of RAM for minimum 16 bit (High Color) display Audio Card (recommended) 4X speed CD-ROM An available USB port Specifications Sensor type: Color VGA(640x480) CMOS image sensor Image Performance for Video Stream: 9 fps for QVGA(320x240 Pixels) 3 fps for VGA(640x480 Pixels) Internal Memory : 64 Mbit SDRAM Images Capacity : 26 Picture for VGA(640x4
@n IP Company Operating Environment 41-104 Fahrenheit ; 5-40 Celsius 20% - 85% relative humidity, non-condensing Warning! Never put your camera in water. Disconnect your camera from your computer before cleaning it. Remove dust or stains with a soft cloth dampened with water or neutral detergent. Do not use any volatile chemicals or liquids such as thinner or benzene to clean your camera.. Do not place hot items on the surface of your camera. Do not attempt to disassemble your camera.
How to Use Your PenCam VoiceRecorder Introduction The built-in memory of your camera is 64 Mbit memory. It supports 13-minute voice recording and two kinds of resolution- high resolution ( 640x480 VGA) for 26 pictures and low resolution ( 320x240 QVGA ) for 107 pictures. Besides, your camera offers several functions on the LCD, showing the remaining number of pictures as well. With a USB cable, you can transfer all the pictures and sounds to your PC.
@n IP Company View Finder Lens Speaker Shutter Switch(SW1) USB Port Microphone LCD Display Mode Switch(SW2) Battery Cover
Selecting Functions Your camera has two switches - the shutter switch(SW1) and the mode switch ( Sw2 ). As you keep pressing the mode switch, the LCD indicates " Hr, 26, Ar, Ap, dA, dP, dC, Ct, St, CL, and Lr" icons in order. To select the icon you want, press the shutter switch. Note! If an icon is not selected within 5 seconds, the LCD goes back to the picture remaining number. The following chart shows the function of each icon.
@n IP Company Switching the camera on / off Keep pressing SW2 until the LCD is activated, and the camera turns off after 30 seconds of inactivity. The LCD indicates "Lr" for low resolution (QVGA images) and "Hr" for high resolution(VGA images). The LCD then displays the number of the remaining pictures. To turn off the camera, press SW2 for 2 seconds. Taking a picture Press the shutter switch to take a picture.
Voice playing Press the mode switch until the LCD changes to indicate "Ap". Then press the shutter switch to play recorded sound. Change mode to "AP" "AP" is displayed Press SW1 to play recorded voice Delete the last stored Press the mode switch until the LCD changes to indicate "dP", "dA" or "dC". When pressing the shutter switch, the LCD starts blinking. Press the shutter switch again within 5 seconds and your camera deletes the last stored image, sound or continuous snapshot.
@n IP Company Self Timer Press the mode switch until "St" appears on the LCD. Then press the shutter switch and a 10 second self-timer starts. Every 10 second the camera issues a short beep. When completing the self-timer, a longer beep sounds, which indicates that a picture is taken. Note: The self-timer can't work when the memory of your camera is full.
Clearing all the stored Press the mode switch until CL appears on the LCD. Press SW1 and after a beep the LCD starts to flash . Press SW1 again within 5 seconds and all the camera memory and the picture counter are cleared. SW1 Change mode to "CL" "CL" is displayed Press SW1 to select clear mode LCD starts to flash Press SW1 to clear the memory Changing the picture resolution Picture resolution may only be changed when the camera memory is empty.
@n IP Company How to Download Photo, Video and Audio to PC Thank you for purchasing the AIPTEK PenCam Voice Recorder. This guide will help you install your camera onto your computer system. PenCam Voice Recorder Manager Installation Place the CD into your CD-ROM and click on the PenCam VoiceRecorder Manager Icon to begin the installation.If the CD does not automatically display, simply go to "Start" then "Run" and select the path "D:\Setup.exe".
After the welcome screen appears, click "Next". The CD begins installing the driver to the proper location. The dialog box that appears asks if you would like to restart your computer now or later. Press "OK" to complete installation.
@n IP Company Start AIPTEK PenCam VoiceRecorder Manager The digital pictures can be transferred at all times, even if you shoot only one image. To connect your camera with your PC, you need a USB cable and USB port. Your camera double beeps when successfully connected with your PC. Don't worry! All of the stored images in your camera are still alive. Your PC offers power for your camera. When disconnecting the USB cable, your camera turns off automatically.
To start using the PenCam VoiceRecorder Manager, simply click on the "Start" menu and go up to "Programs" Then go to the folder named "PenCam VoiceRecorder" and select it. This is the program where you can begin to use your camera. Mode Selecting = Press the "Live View" button to change the camera to PC Camera mode. = Press the "DSC Function" button to change the camera to DSC & Camcorder mode.
@n IP Company PC Camera Mode It is easy to attach your camera to your system. In this mode, your camera is used as a standard PC camera. The current view is displayed in the "preview" window. Live preview PC Camera Mode = Press "Video Source" button to adjust advanced settings. = Press "Video Format" button to set image size. = Press "Snap Shot" button to image to the album window. capture an = Press "Record button" to record a video clip to album window.
DSC Mode Transferring Photos & Voice: This allows you to transfer photos in your camera. < Press the "Link" button to connect the camera and transfer photos & sounds. = Press the "Album" button to open the album window. > Press the "Transfer all" or "Transfer selected" button to transfer photos or sounds to the album window. = Transfer pictures and sounds in your camera to your PC.
@n IP Company Enhanced Resolution Mode: . The Largest Resolution : XGA( 800K pixels ) . Optical Resolution: VGA ( 300K pixels) Your camera has particular enhanced image skills, which make images sharper by enhancing the original VGA image to XGA image. How to operate: Click the setting button. Click " picture ". Choose " Enhanced resolution ". You can download your images again.
Image/Audio Sync. This button allows user to select any image and voice files and convert them into an AVI file. This AVI file is transferred to your album window. Image/Audio Sync. Editing Photos: It is easy to edit any photo you want in the album window. Double click the photo icon to execute your default image application (such as Imaging, Paint....etc.) to edit your image file.
@n IP Company Uploading Video: After transferring images to the preview window, click AVI Creator and all images are combined in one AVI file. This AVI file is saved in your album folder. Note: Pictures in AVI files can be placed forward or backward. AVI Creator (Reverse) AVI Creator AVI Creator: < Select Images you want. = Press "Setting" button to adjust frame rate. > Press "AVI Creator" button to create an AVI file.
Playing Video: You can play any video clip file (AVI format) you want in album window by double clicking the AVI file icon to execute your default media application. Image processing: Click the" Image Process" button to choose image settings.
@n IP Company Mail Function: Click the "Mail" button to attach selected image to a new email document. it is easy to send images to your family and friends! Mail Album window: Delete Click the button. All the files you select in the album window are cleared forever. Therefore, you should be very careful with the delete button. Select All Click the button. You select all the files in the album window. Making Your Album Folders Click the button and key in your file name.
Troubleshooting Install step missed - Most of the problems associated with using the camera have to do with the fact that the end-user accidentally skipped a step during installation. Solution: Uninstall the camera, and reinstall it, making sure to follow each step of the Quick Install Guide. USB ports not enabled in the BIOS - Even after following the Quick Install Guide completely, the camera still will not work. Go into the Device Manager and see if a section called "Imaging Devices" is listed.
@n IP Company Statement of Limited Warranty AIPTEK, Inc. "AIPTEK" warranties the enclosed device "HARDWARE PRODUCT" for a period of one year from the date of purchase to be free from physical, operational, and workmanship defects. AIPTEK also warrants that the HARDWARE PRODUCT will perform in accordance with the accompanying written materials during the period that the Limited Warranty is active.
will not provide support for software provided by AIPTEK's suppliers that was included with the HARDWARE PRODUCT, nor will AIPTEK Technical Support provide assistance and/or training in use of the software provided by AIPTEK's suppliers.
@n IP Company of the single entity that purchased the HARDWARE PRODUCT (other than the End-User in whose name it is registered) can receive or ask for the Warranty Service. If the Warranty Service is activated, and AIPTEK has decided to send out replacement parts for the HARDWARE PRODUCT before receiving the defective pieces from the End-User, the End-User must send the defective hardware to AIPTEK within 10 days of receiving the authorization to return the defective part(s) of the HARDWARE PRODUCT.
@n IP Company How To Obtain A Warranty Service If you believe that you have a defective HARDWARE PRODUCT, call AIPTEK Tech Support. They will troubleshoot your HARDWARE PRODUCT to find out if it or any piece of the hardware is defective. If it is, and your HARDWARE PRODUCT is still covered under the Limited Warranty, it will be repaired or replaced free of charge. You must be registered with AIPTEK in order to obtain the Warranty Service.