
Installation Instructions
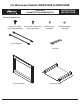
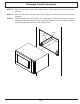


Microwave Trim Kit Instructions
Page 3
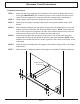
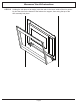
STEP 1 Insert one of the trim supports into the bottom of the cutout as shown and center it,
left to right. IMPORTANT: Use a measuring tape or ruler to center the piece in the
cutout. If the trim support is not centered, the trim assembly will not t properly.
STEP 2 Using a pencil, mark 4 pilot hole locations in the front of the cabinet.
STEP 3 Remove the trim support and drill 4 pilot holes in the places marked using a 3/32”
drill bit.
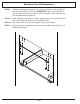
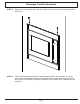
STEP 4 Insert the base assembly into the bottom of the cutout, as shown below. Line up the
holes in the front of the base with the holes drilled in step 3. NOTE: Since there are
only 3 holes in the front of the base, the hole in the cabinet second from the left will
not be covered by the base. Do not attach the base until step 6.
STEP 5 Insert the trim support into the bottom of the cutout. Line up the holes in the trim
support with the holes in the cabinet and the front the base assembly. NOTE: Fiber
washers are included with the kit to create a good t if the cutout is not exactly 16 3/4
inches high.
STEP 6 Attach the base assembly and trim support to the cabinet using (4) #10 x 1/2 Phillips
head screws.
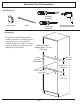
STEP 7 Attach the two (2) rubber bumpers to the anges on the back of the base assembly.
Installation Instructions
Rubber bumper
(2 places)