Installation Instructions Distinctive™ Built-in Dishwasher Part No. 105658 Rev.
Table of Contents Important Safety Instructions.......................... 1 About Safety Instructions................................. 1 Safety Symbols and Labels............................. 1 General Safety Precautions............................. 2 Product Specifications..................................... 3 Product Dimensions......................................... 3 Preparing for Installation.................................. 4 Electrical Specifications...................................
Important Safety Instructions Important Information About Safety Instructions • • The Important Safety Instructions and warnings in these instructions are not meant to cover all possible problems and conditions that can occur. Use common sense and caution when installing, maintaining or operating this or any other appliance. Always contact the Dacor Customer Service Team about problems and conditions that you don’t understand. See Customer Service Information.
Important Safety Instructions General Safety Precautions WARNING - To reduce the risk of fire, electric shock, serious injury or death when using your appliance, follow basic safety precautions, including the following: Warning Warning • Use this dishwasher only for its intended purpose as outlined in the use and care manual. It is not intended for commercial use. Read the use and care manual completely before use. • Do not tamper with the controls.
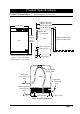
Product Specifications Product Dimensions Product tolerances: ±1/16” (±1.6 mm) Depth with door open 49 3/4” (126.4 cm) Depth with door closed 22 7/8” (63.2 cm) 24” (61.0 cm) Drain hose Do not modify Front 34 3/8” * (87.4 cm) to 36 1/2” (92.7 cm) Depth dimensions allow for hose on back of unit Side 5 3/8” (13.7 cm) to 7 3/8” (18.7 cm) * Minimum height may be reduced by up to 1/2” (1.3 cm). See page 5. 2” (50.0 cm) Shipping weight: 117 lbs. (53 Kg) Do not modify loop in hose Drain hose 54” (137.
Preparing for Installation warning Observe all governing codes and ordinances during planning and installation. Contact your local building department for further information. Electrical Specifications warning Electrical and grounding connections must comply with the applicable portions of the national electrical code and/or other local electrical codes. This dishwasher comes with an electrical cord with a three prong grounding plug for a 120 Vac, 15 Amp. power supply.
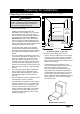
Preparing for Installation Preparing the Location Cutout tolerances: +1/16” (+1.6 mm), -0 warning Follow all cabinet dimensions shown to insure safe operation. All minimum product dimensions must be met or exceeded (see page 3). Dimensions shown provide the required clearances. • The cabinet must enclose the dishwasher on the top, back and both sides. • Carefully check the location where the dishwasher is to be installed.
Preparing for Installation Preparing the Drain • The drain hose is equipped with a cone-shaped connector on the end that is ready to be cut to the desired drain connection size. Only a clamp (not provided) is required. It fits drain connections with an internal diameter of 1/2, 5/8, 3/4 and 7/8 inches (1.3, 1.6, 1.8 and 2.2 cm). • You must install an air gap in the drain system if required by local codes. Plan for the air gap in the sink or countertop area adjacent to the dishwasher.
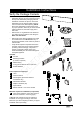
Installation Instructions Verify the Package Contents • Remove all styrofoam and plastic wrap from the dishwasher. Be sure to remove the toe kick from the top of the dishwasher packaging. With the assistance of at least one person, remove the dishwasher from the shipping pallet. Place the unit to the side of the cabinet opening. NOTE: Since each dishwasher is tested at the factory for proper operation, there may be some residual water inside the unit, the water supply line or drain hose.
Installation Instructions Installation Preparation warning • Before working on wiring for any electrical appliance, be sure the power has been turned off at the breaker/fuse box. Place a tag at the disconnect switch indicating that you are working on the circuit. 4. To make larger tension adjustments to the door springs, remove the back of the springs from the dishwasher by turning them outwards. Move them one hole farther back or forward, then make small adjustments as outlined in step 3 as necessary.
Installation Instructions Level the Dishwasher caution • A level unit is very important to proper operation. Be sure to level the unit front to back and side to side. 4. Open the door and pull the bottom rack out of the dishwasher. Check to make sure the dishwasher floor is level left to right using a level. Adjust the front legs as necessary. 5. Adjust the rear leg until the floor of the dishwasher is level front to back. • Use caution when sliding the dishwasher on the floor.
Installation Instructions Connecting the Wiring (cont.) (Permanently Connected Appliance Only) 4. If a nonmetallic cable is being used, install a UL listed strain relief bushing on the back of the dishwasher. 5. Connect the white wire on the cable to the “N” terminal on the dishwasher terminal block as shown below. Installing the Unit in the Cabinet 1. Position the dishwasher in front of the cabinet opening. 2.
Installation Instructions 4. Once the dishwasher is in place check to make sure all slack is pulled out of the power cable, water supply line and drain hose. Check to make sure none of them are pinched or kinked. 3. Connect the drain hose to the air gap or directly to the waste tee or disposer above the sink trap as shown in one of the examples on page 6. NOTE: Do not attach the mounting screws until after Verifying Operation. 5.
Installation Instructions 4. Check for leaks under the dishwasher and under the sink. If any leaks are found, immediately push the STOP button and disconnect power. If there are leaks under the sink, check the water supply and drain connections. Reconnect power and restart the cycle. If the leak is elsewhere, and a hose extension is installed, check for a loose connection. 5. If the dishwasher functions normally, complete the installation as instructed on the following sections. Final Leveling 1.
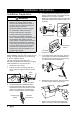
Installation Instructions Attaching the Anti-tip Brackets Installing the Toe Kick 1. Loosen the brackets for the toe kick by moving the gray catches toward the center of the dishwasher. CAUTION Catch Make sure to anchor one anti-tip bracket on each side of the dishwasher. 1. The anti-tip brackets protect against possible tipping caused by heavy bottom rack loads on the door. Use only the stainless steel screws provided with the machine. 2. Open the door and remove the top rack. Pull the rack out.
Installation Instructions Installation Checklist WARNING • To ensure a safe and proper installation, the following checklist should be completed by the installer to ensure that no part of the installation has been overlooked and the unit is working properly. • Proper installation is the responsibility of the homeowner. The importance of proper installation of your Dacor dishwasher cannot be overemphasized.
Notes 15
Notes 16
Item No., 80 933 81 Rev. 03 Dacor ● 600 Anton Blvd. Suite 1000 Costa Mesa, CA 92626 ● Phone: (800) 793-0093 ● Fax: (626) 403-3130 ● www.dacor.