Installation Instructions Discover y Wall Oven For use with models: EO, MO and PO ly On iew ate v Re se D r Fo elea ry d R a in ule m i ed el r h c P S No Part No. 65433 Rev.
All specifications are subject to change without notice. Dacor ® assumes no liability for changes to specifications. © 2007 Dacor, all rights reserved.
Table of Contents Before You Begin............................................................... 1 Important Safety Instructions........................................... 1 Important Information About Safety Instructions............... 1 Safety Symbols and Labels.............................................. 1 General Safety Precautions.............................................. 2 Customer Service Information.......................................... 3 If You Need Help..................................
Important Safety Instructions General Safety Precautions To reduce the risk of fire, electric shock, serious injury or death when using your appliance, follow basic safety precautions, including the following: warning 1. Read the accompanying use and care manual before operating this appliance. 2. Keep packaging materials away from children. Plastic sheets and bags can cause suffocation. 3. 4. If you receive a damaged product, immediately contact your dealer or builder.
Customer Service Information If You Need Help... • Model Identification If you have questions or problems with installation, contact your Dacor dealer or the Dacor Customer Service Team. When you call, have the model and serial number of the appliance ready. The model and serial number are printed on the appliance data plate. EO230xxx A B Dacor Customer Service Team Phone: E-mail: Web site: (800) 793-0093. customerservice@Dacor.com www.Dacor.
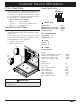
Product Specifications Product Dimensions All tolerances are 1/16”, -0 (1.
Product Specifications “S” “N” “M” “P” 1 1/4” (32mm) “Q” “L” “R” 1 1/16” (27mm) 66” (1676mm) Flexible Conduit “K” Single Wall Oven Dimension “S” “N” “M” 1 1/4” (32mm) “P” “Q” 1 1/16” (27mm) “L” “R” 66” (1676mm) Flexible Conduit “K” Double Wall Oven Dimension 5
Planning the Installation Selecting the Location • • Model Number Carefully check the location where the oven is to be installed. The oven should be placed for convenient access, but away from drafts that may be caused by doors, windows, and heating, ventilation and air conditioning outlets. EO127 Make certain that electrical power can be provided in the selected location. Be certain that proper clearance is provided for the oven door when it is in the open position.
Planning the Installation “D” NOTES: Recommended Electrical Location All tolerances are 1/16”, -0 (1.6 mm, -0) • 24” minimum cutout depth • 3/4” support platform must be flush with front of cutout. See page 8. Recommended Electrical Location 1“ (25mm) Min. to Bottom of Door 4“ (102mm) Min. Between Cutout “A” Duel Single Wall Oven Cutout “A” “B” “B” 3/4” (19mm) Support Platform 1 ¾“ (45mm) Min.
Planning the Installation Cabinet Cut-Out (continued) Support Platform warning The top surface of the support platform must be installed flush with the cutout in the front of the cabinet or wall and any trim. Failure to install the platform properly may cause the exhaust vent to deform and/or become obstructed. An obstructed exhaust area may cause the oven to malfunction. See below. Provide a platform within the cabinet to support the oven.
Planning the Installation Electrical Specifications important • • • Preheat times and cavity temperature recovery times will be increased slightly if operating on less than a 240 Vac circuit. This appliance is provided with electrical connection leads in a flexible metal conduit.
Installation Instructions Electrical Service Installation warning 1. Before proceeding, turn off power to the circuit to which the oven will be connected at the circuit breaker or fuse box. 2. Position the oven directly in front of the cabinet cutout. • Wire the oven only in compliance with local ordinances. 3. Feed the appliance conduit into the electrical junction box and attach it using a UL approved strain relief.
Installation Instructions Connecting to a Three Wire Electrical System - Where Local Codes Permit warning Do not connect the green appliance conduit wire to the neutral (white) junction box wire unless local building codes permit. Connecting to a Three Wire Electrical System with External Ground - Where Local Codes Permit warning • Do not connect the green appliance wire to the junction box or to a cold water pipe unless local building codes permit.
Installation Instructions Connecting to a Three Wire Electrical System with External Ground - Where Local Codes Permit (continued) Cable from power supply Separate No. 10 (minimum) copper grounding wire Junction box coppe RED RED GREEN GREEN WHITE WHITE Clamp must be tight on pipe BLACK BLACK Wire nut (4 places) Conduit from appliance Final Installation warning • A minimum of two people are required to safely install this appliance.
Installation Instructions 3. Raise the door so that it is at a 15° angle from the front of the oven. Hold the door with one hand on each side. Lift the door up and out. 2. Support the oven at all times until it is secured into the cabinet. Be certain to take all necessary safety precautions. 3. Resting the oven on the cabinet support platform, slide the oven into the recessed area until the rear edge of the oven trim post is flush with the cabinet face and the oven is centered within the cutout.
Installation Instructions Install Exhaust Deflector caution Install the exhaust deflector before installing the oven door(s). Attach the exhaust deflector to the front of the oven. It attaches to the oven just below the oven chamber in the door jam. On a double oven, the exhaust deflector is mounted below the bottom oven chamber. 1. Line up the mounting holes on the exhaust deflector with the screw holes on the front of the oven. 2. Secure it using the three (3) screws provided. 1.
Installation Instructions Lower lip of hinge receptacle Notch on bottom of hinge Door Installation Installation Checklist warning • • To ensure a safe and proper installation, the following checklist should be completed by the installer to ensure that no part of the installation has been overlooked. Proper installation is the responsibility of the homeowner. The importance of proper installation of your Dacor oven cannot be overemphasized.
Notes 16
Dacor ● 1440 Bridge Gate Drive, Diamond Bar, CA 91765 ● Tel: (800) 793-0093 ● FAX: (626) 403-3130 ● www.Dacor.