User Manual Modernist Pro Range DOP48M86D**/DOP36M86D** Part No.
Table of Contents Before You Begin 5 Important Energy-Saving Tips Using the Water Reservoir About the Oven Vent 5 5 5 7 Regulatory Notice 8 Important Safety Instructions 9 Overview 15 External Features Control Panel (DOP48M86D**) Control Panel (DOP36M86D**) Display (DOP48M86D** Only) Display (DOP36M86D** Only) What is Included (DOP48M86D**) What is Included (DOP36M86D**) 15 16 16 17 18 19 20 Using the Cooktop 21 About the Burners About Cookware Special Cooktop Features About the Grates About t
Table of Contents Using Delay Start Using the Cleaning Features Using the Sabbath Feature Using the Special Functions Using Chef Mode Using iQ Control Starting the Oven Remotely Using Control Lockout Using Settings Samsung SmartThings 38 38 44 45 47 48 48 49 49 52 Using the Steam Oven 57 Using the Oven Racks About Oven Functions Basic Baking and Broiling Instructions Using the Special Functions 57 57 60 62 Cooktop Maintenance 63 Cleaning the Cooktop Surface Cleaning Stainless-Steel Surfaces Cleaning
To Our Valued Customer: Congratulations on your purchase of the very latest in Dacor® products! Our unique combination of features, style, and performance make us a great addition to your home. To familiarize yourself with the controls, functions, and full potential of your new Dacor range, read this manual thoroughly, starting at the Before You Begin section (pg. 5). Dacor appliances are designed and manufactured with quality and pride, while working within the framework of our company values.
Before You Begin Important Notes to the Owner Installer • For best results, read this manual thoroughly before starting the installation. • Leave this manual with the user. • Write the range’s model/serial numbers in this manual for service/maintenance use. User • Keep this manual for personal/professional use. Clean the oven fully before its first use. Then, ventilate the kitchen well, remove the accessories, and set the oven to Bake at 400 °F for 1 hour. There will be a distinct odor. This is normal.
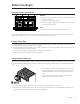
Before You Begin Using the Water Reservoir, cont. 3. Open the reservoir cap, and then fill the reservoir with tap water. You can open the reservoir by removing the rubber cap or by removing the clear plastic top. To avoid spilling water, filling water through the hole after removing rubber cap is recommended. 4. Replace the cap or the clear plastic. 5. 48" range: Pull the reservoir fully into the opening; 36" range: Slide the reservoir into its slot, and touch OPEN/ CLOSE RESERVOIR.
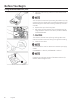
Before You Begin About the Oven Vent The oven vent is under the oven door. Proper air circulation prevents burner combustion problems and ensures good performance. Do not block the vent or surrounding area. Be cautious near the vent. Steam can burn skin and melt certain items.
Regulatory Notice 1. FCC (Federal Communications Commission) Notice Any modifications not expressly approved by the party responsible for compliance could void the user's authority to operate the equipment. This device complies with Part 15 of FCC Rules. Operation is subject to two conditions: 1) This device may not cause harmful interference; and 2) this device must accept any interference received, including that which causes undesired operation.
Important Safety Instructions Read All Instructions Before Using This Appliance • All electrical and gas equipment with moving parts can be dangerous. Read the Important Safety Information, and follow the instructions carefully to minimize risk of property damage, personal injury, and death. • Keep this manual in a handy place for personal and professional reference. Symbols In This Manual Follow these warning icons and symbols explicitly to prevent property damage and personal injury.
Important Safety Instructions General Safety To reduce risk of property damage, fire, personal injury, and death: • Do not touch any part of the range during or immediately after cooking. • Learn where the gas-supply valve is and how to open/close it. • When returning the range to its operating position, make sure it engages the anti-tip bracket. • Do not leave children alone – Children should not be left alone or unattended in area where appliance is in use.
Important Safety Instructions Gas Safety If you smell gas: • Close the range's gas-supply valve and evacuate the building • Do not use a flame or sparking device (e.g.
Important Safety Instructions Installation Safety To reduce risk of property damage, fire, personal injury, and death: • Have the range installed and grounded by a qualified installer per the Installation Instructions. • Do not service/modify/replace any parts unless as instructed in this manual. A qualified technician should perform all other service. • Use only new, flexible connectors when installing the range. • Ensure the anti-tip device is installed per the Installation Instructions.
Important Safety Instructions Cooktop Safety To reduce risk of property damage, fire, personal injury, and death: • Turn off all unused burners. • Do not line any part of the range with aluminum foil. • Do not leave burners unattended on medium or high heat settings. • Before igniting, ensure all burner components are properly assembled. • Use the LITE position to ignite a burner, and verify the burner ignites. If ignition fails, turn the knob to OFF, and wait for the gas to dissipate, then retry.
Important Safety Instructions Oven Safety To reduce risk of property damage, fire, personal injury, and death: • Use the oven for cooking only. • Ensure oven racks are level. • Do not remove or clean the door gasket. • Do not spray water on hot oven-door glass. • Do not line or cover any part of the range or oven chamber. • Stand away if opening the door when the oven is on. • Keep the oven free from grease buildup. • Before repositioning the oven racks, ensure the oven is completely cool.
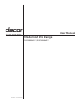
Overview External Features DOP48M86D** 1. Spill tray 2. Surface burners 3. Removable oven door 4. Surface burner knobs (6) 5. Control panel 1 2 4 5 3 DOP36M86D** 1. Spill tray 2. Surface burners 3. Removable oven door 4. Surface burner knobs (6) 5.
Overview Control Panel (DOP48M86D**) Tap the display with clean, bare fingers. Oven mitts and wet or dirty fingers block the electronic transfer between finger and panel. 1. 2. 3. 4. 5. 6. 7. 8. LEFT RIGHT OFF OFF TIMER LOCK SETTINGS LIFT PANEL 5 (3sec) LEFT, RIGHT: Displays left/right oven mode. Shows status; does not turn ovens on/off. OFF: Cancels cooking in left oven. TIMER: Displays the Timer screen. SETTINGS: Displays the Settings screen. OFF: Cancels cooking in right oven.
Overview Display (DOP48M86D** Only) The display shown is for reference only and may differ somewhat from the actual display. LEFT 02 OVEN MODE 08 05 4:35 PM Convection Bake View Summary 01 07 03 Faster, more even baking 325°F Temp Probe Cook Time Delay Start InstantHeat™ 145° None None Off 04 START 06 1. Indicator area • Timer ( ): When set, the Timer indicator appears. If 3 or more timers are set, the number of set timers appears. • Door lock ( ): Appears when the oven door is locked.
Overview Display (DOP36M86D** Only) Tap the display with clean, bare fingers. Oven mitts and wet or dirty fingers block the electronic transfer between finger and panel. 01 02 03 View Summary 08 05 07 04 06 1. Indicator area • Timer ( ): When set, the Timer indicator appears. If 3 or more timers are set, the number of set timers appears. • Door lock ( ): Appears when the oven door is locked. • Wi-Fi ( ): Shows Wi-Fi signal strength in 4 levels.; when Wi-Fi is disconnected, appears.
Overview What is Included (DOP48M86D**) *The range comes with brass and porcelain burner caps to suit customer preference. (The brass caps will discolor with use; however, the discoloration does not affect the caps' intended function.) Grates (3) Burner heads (6), caps (7) Convection filter (3) Temp.
Overview What is Included (DOP36M86D**) *The range comes with brass and porcelain burner caps to suit customer preference. (The brass caps will discolor with use; however, the discoloration does not affect the caps' intended function.) Grates (3) 20 Burner heads (6), caps (7) Convection filter (3) Temp.
Using the Cooktop About the Burners The graphic shows burner type and location. Burners spark when the knob is turned to the "flame symbol." When the burner ignites, sparking stops. Gaskets under the burners prevent spills from affecting internal parts. C A A C D B A,B Dual burner B D C, D Stack dual burner Each burner is designed for specific cooking purpose as below table.
Using the Cooktop About Burner Ignition Each knob has an associated burner, the location of which appears next to the knob. To light a burner: 1. Push in the knob, and turn it counterclockwise to the flame symbol. The igniter sparks and clicks until the burner lights (about 4 seconds). 2. Place the cookware on the grate. 3. Adjust the flame as needed for proper cooking. • The flame should burn evenly around the burner. A normal flame is steady and blue.
Using the Cooktop About Cookware • Cookware with rough bottoms can permanently damage the coated surfaces. • To avoid burns and scalding, turn handles away from the the front of the range and adjacent burners. Always center cookware on the grates for best balance. • Always lift to reposition cookware. Do not drop cookware on a grate. • To avoid burns or fire, keep the flame beneath the cookware. • Verify that glass cookware is designed for cooktop use.
Using the Cooktop Special Cooktop Features Perma-Flame™ The Perma-Flame instant re-ignition feature automatically re-lights a burner quickly if it goes out. With Perma-Flame, your cooking experience is uninterrupted because the flame is re-ignited at the same level as when it went out. SimmerSear™ Dacor’s exclusive precision burner control system. It allows you to cook with a wide range of heat settings, from simmer to sear.
Using the Cooktop • • • • • • Do not remove the griddle until the range and all accessories are cool. The griddle may get hot when the range is on. Wear oven mitts to handle the griddle. Overheating and using metal utensils can damage the griddle coating. Use the griddle for cooking only. Do not cook excessively greasy foods. The grease may spill over. Use both hands to place/remove the heavy griddle. • You may need to adjust heat settings for the griddle over time.
Using the Basic Oven Basic Settings: Clock, Date&Time, Language Clock Theme To change clock theme. 1. Tap SETTINGS > Display. 2. Tap Clock theme, swipe the display to view themes, and select a theme. Date & Time To enable automatic date and time 1. Activate Wi-Fi. 2. Tap SETTINGS > Date & Time > Automatic date and time, and in the right-hand screen, tap ON. The date and time are set automatically. To manually input date and time 1.
Using the Basic Oven Rack and Pan Placement For best results, center pans in the oven as much as possible. If using multiple pans, each should have at least 1" of space around it. Before Using the Racks Each rack has stops that must be placed correctly on the supports to keep the rack from accidentally being pulled completely out. (Adjust racks only when the oven is cool.) Removing the Racks Pull the rack straight out until it stops, then tilt the rack up, and pull it out.
Using the Basic Oven Grasp the handle to pull the gliding rack (left). Pulling by the frame may cause the rack to come off the guides, possibly harming the rack and the user. Wear oven mitts when handling the gliding rack during cooking. Lock the lower part of gliding rack on the oven wall during use to keep the rack securely on the guides. The hook on the gliding rack is controlled via the upper part of the rack. The closed hook tilts up. (See left.
Using the Basic Oven Using the Temp Probe For many foods, especially roasts and poultry, measuring the internal temperature is the best way to determine proper doneness. This feature lets you cook meat to an exact internal temperature. Use it with Bake, Convection Bake, Convection Roast, Pure Conv.Sear, or Dual Four-Part Pure Convection. Once the meat's internal temperature reaches 100 °F, the current temperature appears on the probe display. 1. Push the temp probe tip into the center of the meat.
Using the Basic Oven Using the Temp Probe, cont. • • • • To protect the probe tip, defrost food fully, and do not let the tip poke out of the meat. The probe should only be in the oven if the probe is in use. Do not use tongs to insert/remove the probe. Use the Temp probe only as instructed. Type of Food Beef/Lamb • If you cover the cooked meat with foil and let it sit 10 minutes, the internal temp rises 5-10 degrees.
Using the Basic Oven About Oven Functions, cont. Mode Instruction Bake • • • • This mode is for baking cakes, cookies, casseroles. Always preheat the oven. Baking temps/times vary with ingredients and size/shape of the baking pan. Dark or nonstick coatings may cook faster with more browning. Convection fan may turn on/off during baking. Convection Bake • • • • This mode uses a fan to circulate oven heat evenly and continuously.
Using the Basic Oven About Oven Functions, cont. Broiling Recommendation Guide The size, weight, thickness, starting temperature, and your doneness preference will affect broiling times. This guide is based on meats at refrigerator temperature. Always use a broiler pan and its grid when broiling. Always preheat the oven for 5 minutes.
Using the Basic Oven Setting the Cooking Mode RIGHT LEFT RIGHT Faster, more even baking 325°F OFF TIMER SETTINGS 4:35 PM Convection Bake OVEN MODE Cook Time Delay Start None None OFF LOCK InstantHeat™ Off START RIGHT LEFT 325°F OFF SETTINGS RIGHT Faster, more even baking TIMER Cook Time Delay Start None None LIFT PANEL 4:35 PM Convection Bake OVEN MODE OFF Bake SETTINGS • Tap the mode area to show the summarized mode. OFF InstantHeat™ Off START Conv. Bake Conv.
Using the Basic Oven Basic Baking and Broiling Instructions RIGHT LEFT 4:35 PM RIGHT Convection Bake OVEN MODE Faster, more even baking 325°F OFF TIMER Cook Time SETTINGS None Delay Start OFF Off LIFT PANEL START RIGHT LEFT 4:35 PM RIGHT Convection Bake OVEN MODE Faster, more even baking 325 OFF TIMER Cook Time SETTINGS None Delay Start OFF °F LOCK InstantHeat™ Off None LIFT PANEL START RIGHT LEFT 4:35 PM RIGHT Convection Bake OVEN View MODE Summary Faster, more
Using the Basic Oven Basic Baking and Broiling Instructions, cont. Adjusting the Temperature While Cooking If using single mode, do one of these: 4:35 PM LEFT RIGHT RIGHT LEFT Convection Bake 175°F 325°F OFF TIMER Bake 175°F 350°F OFF OFF LOCK OFF SETTINGS LIFT PANEL RIGHT LEFT OVEN MODE 175 °F OFF TIMER SETTINGS Bake 4:35 PM View Summary 350 °F None OFF LOCK Preheating...
Using the Basic Oven Using the Kitchen Timer, cont. How to Set the Timer, cont. 3. Use the numeric pad to set the time from 1 sec to 23 hr, 59 min, 59 sec. 4. Tap START. When the set time elapses, the oven beeps; the display shows the Timer has finished. • Pause/reset/delete the timer anytime by touching the screen. • (48" range) The timer you set in the left oven can be used in the right oven, and vice versa. Changing the Timer Name You can change the timer name to reflect the cooking task (e.g.
Using the Basic Oven Using Timed Cooking The oven turns on immediately, cooks for the set time period, then turns itself off when cooking is done. Timed Cooking only operates with another cooking operation (Bake, Convection Bake, Convection Roast, Pure Conv. Sear, Convection Broil, Steam Bake, Steam Roast, Dual Four-Part Pure Convection, Proof, Stone Mode, Dehydrate). See Pgs. 30, 31 for the available modes for each oven. 1. (48" range) Tap LEFT or RIGHT, then swipe to a cooking operation.
Using the Basic Oven Using Delay Start In this mode, the oven timer turns the oven on according to the set time. You can have the oven turn itself off when a preset time elapses by setting Timed Cooking as well. • Delay start can be used only with another cooking operation (Bake, Convection Bake, Convection Roast, Pure Conv.Sear, Steam Bake, Steam Roast, Dual Four Part Pure Convection, Proof, Stone Mode, Dehydrate, Self clean, GreenClean™).
Using the Basic Oven Using the Cleaning Features, cont. • During self-cleaning, the outside of the oven become very hot. Do not leave children unattended near the appliance. • Fumes emitted during self-cleaning are harmful to pet birds, which should be moved temporarily to separate, well-ventilated room. • Do not line any part of the oven with aluminum foil. Doing so impedes heat circulation, causes poor results, and can permanently damage the oven interior.
Using the Basic Oven Using the Cleaning Features, cont. 4. Tap Clean Time TIMER OFF OPEN/CLOSE RESERVOIR LIFT PANEL TIMER TIMER OFF OPEN/CLOSE OPEN/CLOSE RESERVOIR RESERVOIR LIFT PANEL TIMER OFF OPEN/CLOSE RESERVOIR LIFT PANEL 5. Tap the screen to set the clean time (2, 3, or 5 hrs (default: 3), and tap OK. 6. If not using Delay Start, go to Step 8. Otherwise, tap Delay Start, and go to Step 7. 7. Set the time you want self-cleaning to start, and tap OK. 8. Tap START to begin self-cleaning.
Using the Basic Oven Using the Cleaning Features, cont. GreenClean™ This function saves time and energy by heating the oven chamber enough to loosen cooking residue so it can be wiped away with a damp cloth. The oven door locks during GreenClean™. Forcing the door open can harm the auto-lock system. Before a GreenClean™ Cycle Don't hand clean the oven door gasket. You may hand-clean the door. • Remove racks, rack supports, broil pan, broil pan insert, and all cookware.
Using the Basic Oven Using the Cleaning Features, cont. Running a GreenClean™ Cycle, cont. • • • • (Basic oven) For best results, pour exactly 10 oz (300 ml) of water on the oven floor. (Steam oven) Operates with the steam function. Add 33.8 oz (1,000 ml) of water to the reservoir. You cannot start GreenClean™ if Control Lockout is active or until the oven cools. The oven doors lock automatically. The display shows the cleaning time remaining.
Using the Basic Oven Descale (steam oven), cont. 3. Tap START. 4:35 PM Descale Please descale Water Reservoir to improve quality. TIMER OFF LOCK SETTINGS OPEN/CLOSE RESERVOIR Clean Time LIFT PANEL START 3hr 00min 4. Follow the onscreen instructions. The cycle lasts 3 hours. Empty and clean the reservoir, then pour in water and descaling agent. (See the table for amounts.) 4:35 PM Descale TIMER Pour 13.5oz (400ml) water and 1.7oz (50ml) descaling solution into Water Reservoir.
Using the Basic Oven Draining (48" oven only) When a steam function is complete, you must drain the remaining water to prevent the water from affecting other cooking modes. To drain the water, follow these steps: 1. 4:35 PM Clean OVEN MODE TIMER SETTINGS OPEN/CLOSE RESERVOIR OFF Self clean GreenClean™ Descale Draining LOCK LIFT PANEL 4:35 PM Draining Water is draining after Steam function use. TIMER OFF 2. Tap START. The oven drains water from the steam grenerator to the reservoir.
Using the Basic Oven 4. Tap SETTINGS > Sabbath, then tap Sabbath to start Sabbath mode. (The oven will not beep or show changes; you may change the oven temp once baking starts.) Settings LEFT ? Help About device OFF 12th Sabbath LOCK DEMO Demo mode i OFF TIMER SETTINGS RIGHT + LIFT PANEL OFF To decrease the oven temp, tap "–" (see left); to increase the oven temp, tap "+." Each time you tap "–" or "+," oven temp changes 5°F.
Using the Basic Oven Using the Special Functions, cont.. Mode Instruction Keep Warm • • • Keeps cooked food warm for serving up to 3 hours after cooking is done. Use this mode by itself, or set it to activate after timed or delay timed cooking. Not for reheating food; 175 °F temperature is non-adjustable.
Using the Basic Oven Using the Special Functions, cont.
Using the Basic Oven Using Chef Mode, cont. Cooking Tips in Chef Mode RIGHT LEFT OFF TIMER 4:35 PM RIGHT Garlic prime rib OVEN MODE - For 8-9 servings - Use Roasting Pan with Roasting Rack - Use Temperature probe SETTINGS OFF LOCK LIFT PANEL OK Garlic prime rib 4:35 PM RIGHT LEFT OFF Insert temperature probe into center of meat. Avoid touching bone, fat or gristle. TIMER 1. Tap TIP on the display. OFF LOCK OK SETTINGS 2. The tip appears with info relevant to the cooking task.
Using the Basic Oven Using Control Lockout This mode lets you disable touch pad functions. The oven doors also lock automatically. Control Lockout must be activated when the oven is in standby mode. Activating Control Lockout RIGHT LEFT OVEN View MODE Summary RIGHT Faster, more even baking 325°F OFF TIMER SETTINGS 4:35 PM Convection Bake Temp Probe Cook Time Delay Start 145° None None No Preheat Off OFF 1. Cancel or turn off all functions. 2. Touch-hold LOCK for 3 seconds.
Using the Basic Oven Using Settings, cont. Display Brightness—You can change the brightness of the display screen. • Tap SETTINGS > Display > Brightness, and use the adjacent bar to adjust screen brightness. Screen Saver—If screen saver is off, the Clock theme and Timeout menu are disabled. • Tap SETTINGS > Display > Screen saver, then tap OFF on the right screen. Clock Theme • Tap SETTINGS > Display > Clock theme, then tap the right screen, and select a theme.
Using the Basic Oven Using Settings, cont. iQ Control To start the oven remotely. • Tap SETTINGS > Connections > iQ Control, then tap ON on the appropriate oven. (See Using iQ Control, Pg. 49.) Easy Connection Easily configure network settings, including the authentication procedure. • Tap SETTINGS > Connections > Easy connection, then tap CONNECT. Hood Connectivity By connecting to the hood, Hood is turned on/off automatically when you use the cooktop. 1. Tap SETTINGS > Connections > Hood connectivity. 2.
Using the Steam Oven Using the Oven Racks DOP48M86D** Left Oven Rack levels for certain cooking tasks (reference only) Type of Food Rack Level Broiling hamburgers 4 Broiling meats or small cuts of poultry, fish 3-4 Bundt cakes, pound cakes, frozen pies, Angel food cakes, casseroles, small roasts 1-2 Large roasts, hams, fresh pizza 1 Each rack has stops that need to be placed correctly on the supports. These stops keep the rack from coming completely out. 1.
Using the Steam Oven About Oven Functions, cont. Cooking Mode Tap LEFT, swipe to select a cooking mode, and set a temperature. (See Setting the Temperature, pg. 33 and Basic Baking and Broiling Instructions, pg. 55.) Mode Temperature range 48" Model 36" Left Right Model Temp probe InstantHeat™ Bake 175 °F (80 °C) - 450 °F (230 °C) ✓ ✓ ✓ ✓ -- Convection Bake/Roast 175 °F (80 °C) - 450 °F (230 °C) ✓ ✓ ✓ ✓ ✓ ✓ ✓ ✓ -- -- ✓ ✓ ✓ -- Broil L0 / HI Pure Conv.
Using the Steam Oven About Oven Functions, cont. Recommended Cook Times for Steam Mode 1. Vegetables Put veggies in the perforated tray at rack Level 2 with the unperforated tray at Level 1 to catch drippings. Food Size Cook time Food Size Cook time Artichokes, red beets Whole 30-35 min Pork chop Sliced 15-25 min Broccoli, Cauliflower Florets 10-15 min Sausage Whole 12-15 min .
Using the Steam Oven Basic Baking and Broiling Instructions LEFT LEFT RIGHT Faster, more even baking 325°F OFF TIMER SETTINGS 4:35 PM Convection Bake OVEN MODE Cook Time Delay Start None None OFF LOCK InstantHeat™ On START LEFT LEFT RIGHT Faster, more even baking 325 OFF TIMER SETTINGS 4:35 PM Convection Bake OVEN MODE Cook Time Delay Start None None OFF °F LOCK InstantHeat™ On START LEFT LEFT 350°F TIMER SETTINGS RIGHT Steam baking OFF Delay Start Cook Time 0h
Using the Steam Oven Basic Baking and Broiling Instructions, cont. Broiling Recommendation Guide The size, weight, thickness, start temperature, and your doneness preference affect broil times. This guide is based on meats at refrigerator temperature. Always use a broiler pan and its grid when broiling. Always preheat the oven for 5 minutes before broiling.
Using the Steam Oven Using the Special Functions Special function provides 2 specialized cooking options. Mode Temperature range 48" Pro range Steam oven Keep Warm **None ✓ Proof 85 °F (29 °C) / 95 °F (35 °C) ✓ Mode ** A non-adjustable, factoryset temperature is applied for best performance. Instruction Keep Warm Proof • Keeps cooked food at serving temp up to 3 hours after cooking is done. • Use this mode individually or set it for timed or delay-timed cooking.
Cooktop Maintenance Turn off power, and let all surfaces cool before cleaning the cooktop. Wear rubber gloves, and be mindful of sharp edges. Cleaning the Cooktop Surface Clean up spills immediately. 1. Turn off all burners. 2. When the grates have cooled, remove them. 3. Clean the cooktop surface with a soft cloth. If spills run into gaps in the burners, remove the burner caps and head, and wipe up the spills. 4. When finished, reassemble the burners, and reposition the grates.
Cooktop Maintenance Disassembling/Assembling the Burners and Grates Turn off burners, and wait for all surfaces to cool down. 1 2 3 1. Remove the burner grates. 2. Remove the burner caps and heads. 3. Clean the grates and burner parts in warm, soapy water. (Do not use abrasive pads or cleaners.) 4. Rinse/dry grates and burner parts fully. (Ensure the burner ports are dry.) 5. Reassemble the burner heads, ensuring a starter electrode passes through the hole in each head (Pgs. 61). 6.
Cooktop Maintenance About Burner Bases • • • The burner bases are not removable. Allow no water in the burner bases and the brass gas orifices. Wipe them clean with a damp cloth, being careful not to damage the bases. Dry the bases completely before using the cooktop. About Electrodes Do not turn on the valve while touching the electrode; do not try to remove the electrode. • • • • Clean the electrode metal portion with a soft cloth. Clean/dry the white ceramic electrodes.
Cooktop Maintenance Assembling the Burner Caps and Heads Dual-Burner Head/Caps 1. Orient the burner head so the electrode opening aligns with the electrode. 2. Install the burner head so the electrode passes through its hole in the head. (Ensure the burner head lies flat on the cooktop.) 3. Match the burner caps to the burners by size, then install the caps on the burner heads. Each cap fits a specific burner head. Verify that each cap is installed and lies flat on the correct head.
Cooktop Maintenance Assembling the Burner Heads and Caps, cont. SimmerSear Burner Assembly 1. With power off and all surfaces cool, place the burner head so the locating tab goes into the keyed hole. 2. Put the burner rings on the burner heads. Match the tabs on the ring bottom to the slots on the head. Twist each ring back and forth slightly until it drops into place. 3. Put the burner caps on the burner rings. The ridge around the bottom edge of the cap fits around the top of the ring.
Oven Maintenance Oven Care and Cleaning Be sure electrical power is off and all surfaces are cool before cleaning any part of the appliance. Cleaning Painted Parts and Decorative Trim • For general cleaning, use a cloth with hot, soapy water. • For more difficult residue, apply liquid detergent directly on the area, and leave for 60 minutes. Wipe with a damp cloth, and dry. Do not use abrasive cleaners; they can scratch oven surfaces. Cleaning Stainless Steel 1.
Oven Maintenance Oven Care and Cleaning, cont. Removing/Re-installing the Convection Filter, cont. Centering the filter over the fan hole, carefully hook the metal clips (back of filter) over the metal bar across the hole. Do not scratch the oven's porcelain with the filter. Oven Racks • If left in the oven during self-cleaning, the racks will discolor and will not slide as easily on their tracks.
Oven Maintenance Oven Care and Cleaning, cont. Removing/Re-installing the Rack Supports Rack supports can be removed for cleaning. (Self-Cleaning, GreenClean™ and Manual cleaning). 1. Grasp the bottom-center of the support, and lift. 2. Swing the support bottom outward about 45°. 3. Pull the rack support from the mounting holes.
Oven Maintenance Oven Care and Cleaning, cont. Removing/Re-installing the Rack Supports, cont. 4. Insert the rack-support prongs into the holes near the top of the oven-chamber wall. 5. Swing the bottom of the rack support toward the oven-chamber wall. 6. Pull the rack support down, making sure the two humps on the support bar rest upon the nuts attached to the oven-chamber wall. Cleaning the Oven Door • • 66 English Clean the oven door surfaces with soap and water, and rinse well.
Oven Maintenance Removing/Re-installing the Oven Door Spread a blanket on a stable, flat surface where you can lay the door once you have removed it. The 30" oven door weighs 42 lbs (19 kg). Grasp the door with both hands. Do not lift by the handle. 1. Open the oven door fully. 2. In the bottom corners of the oven door, flip the hinge locks toward you to unlock them. If the hinge locks are not fully forward (see left), you cannot remove the door. 3. Partially close the door to engage the hinge locks.
Oven Maintenance Changing the Oven Light The oven light is a standard 40-watt halogen appliance bulb. It comes on when the oven door is opened. When the door is closed, touch LIGHT to turn the light on/off. The light does not work during self-cleaning. Wear gloves to halogen bulbs. Before starting, ensure all oven surfaces are cool, then turn off power to the oven at the circuit-breaker panel or fuse box. 1. Support the broil element, and turn the round nut counterclockwise.
Oven Maintenance If you experience an issue with your range, review the tables in this section to resolve it. If you cannot find a solution, call Dacor Customer Assurance (800-793-0093) for assistance. Gas Safety Problem Possible cause You smell gas Action Burner is ON, but burner is not lit. Turn the burner knob to OFF. Gas leak. • Evacuate the building. • From a neighbor's home (your phone may cause a spark that ignites the gas), immediately call the gas supplier, and follow their directions.
Troubleshooting Oven Problem Oven not turning on Possible cause Solution Oven not fully plugged in. Verify the range plug is properly inserted in its outlet. Bad fuse/tripped circuit breaker. Replace fuse/reset circuit breaker. Oven controls improperly set. See Using the Steam Oven, Pgs. 55, 56. Oven too hot. Let oven cool. Incomplete service wiring. Call for service. Power outage. Check house lights. call utilities provider if needed. Light loose/defective.
Troubleshooting Oven, cont. Problem Oven still dirty after self-cleaning. Steam emitting from vent. Possible cause Solution Oven controls incorrectly set. See Self-Cleaning, Pg. 39. Oven too heavily soiled. Wipe up food residue, then start self-cleaning; very dirty ovens may need two self-cleaning cycles or longer cycles. When using convection, steam normally emits from oven vent. This is normal operation. Large quantity of food cooking. Burning or oily odor emitting from New oven. vent.
Warranty and Service Warranty What Is Covered CERTIFICATE OF WARRANTIES: DACOR RANGES WITHIN THE 50 STATES OF THE USA, THE DISTRICT OF COLUMBIA, AND CANADA: FULL 2-YEAR WARRANTY The warranty applies only to Dacor Modernist appliances sold to the original purchaser, starting from the original retail purchase date or closing date for new construction, whichever period is longer. The warranty is valid on Modernist products purchased new from a Dacor Authorized Dealer or other Dacor-authorized seller.
Warranty and Service Warranty, cont. What Is Not Covered • Slight color variations due to differences in painted parts, kitchen lighting, product location, and other factors. • Service calls to educate the owner on product use and care. • Service fees for travel to islands and remote areas (including but not limited to ferries, toll roads, and other travel expenses). • Consequential or incidental damage (including but not limited to food or medicine loss, lost work time, or restaurant meals).
Open-Source Announcement The software included in this product contains open-source software. You may obtain the complete corresponding source code for 3 years after the last shipment of this product by emailing: mailto:oss.request@ samsung.com. You may also obtain the complete corresponding source code via physical medium (e.g., CD-ROM) at a minimal charge. The URL http://opensource.samsung.
Please visit www.dacor.com to activate your warranty online. WARRANTY INFORMATION IMPORTANT: Your warranty will not be activated until you activate it online or return this form to Dacor. If you have purchased more than one Dacor product, please return all forms in one envelope, or activate the warranty online for each product. Owner Last Name (please print) First Middle Init.
fold here NO POSTAGE NECESSARY IF MAILED IN THE UNITED STATES BUSINESS REPLY MAIL FIRST-CLASS MAIL PERMIT NO 1600 CITY OF INDUSTRY CA POSTAGE WILL BE PAID BY ADDRESSEE DACOR ATTN WARRANTY PROCESSING DEPT PO BOX 90070 CITY OF INDUSTRY CA 91715-9907