
Installation Instructions

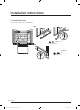
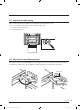
Table Of Contents
- Dacor_FDR_BRF8000M_IM_DA68-03621A-04_EN
- Before you begin...
- Customer-Service Information
- Important Safety Instructions
- Safety and warning information
- Installation Specifications
- Product Specifications
- Installation
- Installation requirements
- Installation instructions
- 1. Uncrating the Refrigerator
- 2. Moving the Refrigerator
- 3. Installation preparation
- 4. Attaching the anti-tip-bracket
- 5. Remove Upper Door Cover, Kickplate
- 6. Attaching the Refrigerator’s Top Cover
- 7. Moving the Refrigerator Into Its Enclosure
- 8. Leveling the Refrigerator
- 9. Securing the Refrigerator
- 10. Attaching Panel brackets
- 11. Hanging a Custom Panel
- 12. Aligning the Panel
- 13. Attaching the Door’s Interior Covers
- 14. Connecting the Water Line
- 15. Attaching kickplate and Toe kickplate
- 16. Attaching the Refrigerator Trim
- 17. Attaching Trim Top Cover
- 18. Removing the Interior packaging
- 19. Adjusting the door spring
- 20. Adjusting the door Opening Angle
- 21. Cleaning
- 22. Installation Checklist
- Dacor_FDR_BRF8000M_IM_DA68-03621A-04_MES
- Antes de comenzar...
- Información de Atención al cliente
- Instrucciones importantes de seguridad
- Información de seguridad y advertencias
- Especificaciones de instalación
- Especificaciones del producto
- Instalación
- Requisitos de instalación
- Instrucciones de instalación
- 1. Desembalar el refrigerador
- 2. Desplazar el refrigerador
- 3. Preparación para la instalación
- 4. Colocar el soporte antivuelco
- 5. Retirar la cubierta superior de la puerta, placa de protección
- 6. Colocación de la tapa superior del refrigerador
- 7. Colocar el refrigerador en su estructura
- 8. Nivelar del refrigerador
- 9. Ajuste del refrigerador
- 10. Ajuste de los soportes del panel
- 11. Colgar un panel personalizado
- 12. Alinear el panel
- 13. Colocar las cubiertas interiores de la puerta
- 14. Conectar la tubería de agua
- 15. Colocar la placa de protección y el zócalo
- 16. Colocar el borde del refrigerador
- 17. Instalar el borde de la cubierta superior
- 18. Retirar el empaque interno
- 19. Ajustar el resorte de la puerta
- 20. Ajuste del ángulo de apertura de la puerta
- 21. Limpieza
- 22. Lista de verificación de instalación
- Dacor_FDR_BRF8000M_IM_DA68-03621A-04_CFR
- Avant de commencer...
- Informations relatives au service client
- Consignes importantes relatives à la sécurité
- Consignes et avertissements de sécurité
- Spécifications relatives à l'installation
- Caractéristiques techniques de l'appareil
- Installation
- Exigences relatives à l'installation
- Instructions d'installation
- 1. Déballage du réfrigérateur
- 2. Déplacement du réfrigérateur
- 3. Préparation à l'installation
- 4. Fixation du support antibasculement
- 5. Retrait du cache supérieur de la porte, plinthe
- 6. Fixer le cache supérieur du réfrigérateur
- 7. Placer le réfrigérateur dans son caisson
- 8. Mise à niveau du réfrigérateur
- 9. Fixation du réfrigérateur
- 10. Fixation des supports du panneau
- 11. Fixation d'un panneau personnalisé
- 12. Alignement du panneau
- 13. Fixation des caches intérieurs de la porte
- 14. Raccordement de la conduite d'eau
- 15. Fixation de la plinthe et de la patte
- 16. Fixation de l'habillage du réfrigérateur
- 17. Fixation du cache supérieur de l'habillage
- 18. Retrait de l'emballage intérieur
- 19. Ajustement du ressort de la porte
- 20. Ajustement de l'angle d'ouverture de la porte
- 21. Nettoyage
- 22. Liste de vérifications pour l'installation
English 45
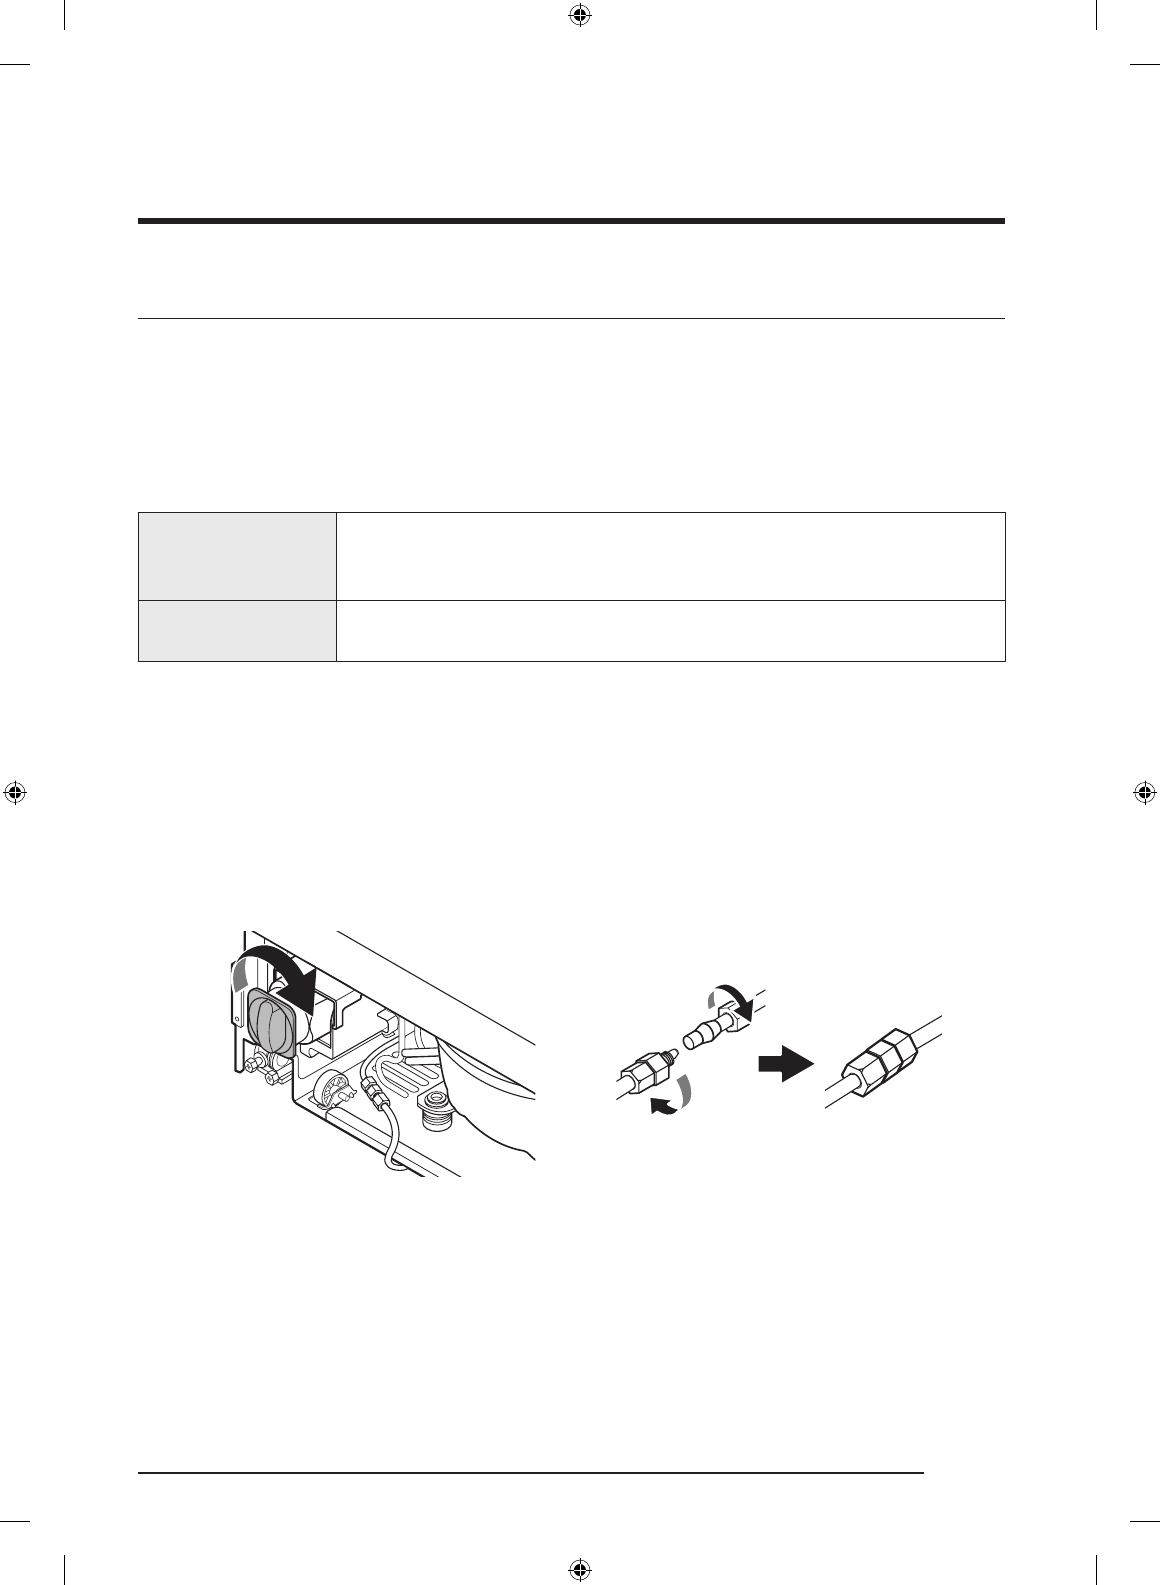
14. Connecting the Water Line
To prevent leaks and water damage, be careful not to kink the water line.
After connecting the water hose on the oor, open the water valve in the rear of the
appliance and check the connection of the water supply line and make sure there is no
leak.
There are several items you must purchase to complete this connection. You may nd
these items sold as a kit at your local hardware store.
Copper Tubing
•
1
/4" copper tubing
•
1
/4" compression nut (1 pc)
• Ferrule (2 pc)
Plastic Tubing
•
1
/4" plastic tubing Molded end (Bulb)
•
1
/4" compression nut (1 pc)
1. Remove the cap from the appliance connection.
2. Bend the water line according to the location of the connection on the appliance.
3. Slide the union nut and seal onto the water line.
4. With the open-end wrench, tighten the union nut, being careful not overtighten.
5. Open the shut-off valve and main water tap.
6. Check the connection on the shut-off valve and on the appliance for leaks.
7. Push the water line into the guard tube as far as possible.
Water Filter
Water Outlet
(Appliance)
Water Outlet
(Home)
Dacor_FDR_BRF8000M_IM_DA68-03621A-04_EN.indd 45 2017-12-14 12:44:36