Installation Distinctive Instructions Series Cooktop Models: DRT304S, DRT366S THIS APPLIANCE HAS BEEN TESTED IN ACCORDANCE WITH THE LATEST EDITION OF ANSI Z21.1 STANDARD FOR HOUSEHOLD GAS APPLIANCES. Part No. 106522 Rev.
Important Safety Instructions .......................................... Important Information About Safety Instructions .............. General Safety Precautions ............................................. Installation Requirements ................................................ Electrical Requirements ................................................... Gas Supply Requirements ............................................... Product Dimensions .........................................................
Important Information About Safety Instructions The Important Safety Instructions and warnings in this manual are not meant to cover all possible problems and conditions that can occur. Use common sense and caution when installing, maintaining or operating this or any other appliance. • Always contact the Dacor Customer Service Team about problems and conditions that you don't understand. See Customer Service Information. _] DANGER , DO not use or light any appliance.
General Safety Precautions To reduce the risk of fire, electric shock, serious injury or death when using your appliance, follow basic safety precautions, including the following: WARNING • Read the accompanying use and care manual completely before operating this appliance. • Keep packaging materials away from children. Plastic sheets and bags can cause suffocation. • If you receive a damaged product, immediately contact your dealer or builder. Do not install or use a damaqed appliance.
Gas Supply Requirements WARNING observe all g0verning c0des and ordinanCes during planning and installation, Contact your local building department for further information. To prevent an electric shock hazard, the power supply must meet the specifications stated below. The electrical and gas supply data on this page is for reference only. If the requirements below do not agree with the product data label, use the data on the product data label.
To reduce the risk of personal injury and to reduce accumulated smoke in the room, Dacor strongly recommends installing a range hood. A hood should project forward a minimum of five (5) inches beyond the face of the cabinets.
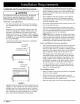
Cabinet/Cutout Dimensions Cabinet tolerances +1/16"-0 (+1.6 mm, 0) unless otherwise noted. 1 1/2" (38 mm) typical countertop thickness 10" (254 mm) to combustible side _- wall Min. both sides --_ _ \ 1/2" (13 mm) overhang, both sides J ! • Cooktop platform 1" (25 mm) Min. thickness 36" (914 mm) typical Cabinet/Countertop Dimensions - Front View 13" (330 mm) max.
Cabinet/Countertop Dimensions (cont.) Cutout tolerances +1/16" -0 (+1.6 ram, O) unless otherwise noted. Gas and electrical connections at right rear section of chassis \ ! I Gas connection and power cord may be routed through bottom or back of chassis Increase countertop and overhang additional 2 1/2" (64 mm) Min. for combustible rear wall above countertop , rear walt, rear of mounting platform / Non-combustible -\i / I 3/8" (13 mm) countertop overhang I / 10" (254 mm) min.
Cooktop Installation Unpack the Cooktop WARNING • • WARNING If the gas and electric service provided does not meet the product specifications, do not proceed with the installation. Call the dealer, the gas supplier or a licensed electrician. The cooktop is heavy. A mini mum of two people are required to safely install it. Unpack the parts box and verify that all required components have been provided. If any item is missing or damaged, please contact your dealer immediately.
Knob Installation , , Control Panel DRT304S Attach the SimmerSear burner knobs [] as shown below. The SimmerSear knobs have a wider space between the large flame icon and the simmer icon than the standard burner knobs. Align the "D-shaped" opening on the back of each knob with the end of the valve shaft. Carefully push each knob on until it stops. Attach the remaining knobs which operate the standard burners I1_1.
Burner Component Installation Remove the burner parts and grates from their shipping packages. SimmerSear Burner Assembly Standard Burner Assembly 1. Install the SimmerSear burner ring(s) on top of the SimmerSear burner base(s). Line up the indentations on the bottom of the burner ring with the pins on the top of the burner base. 1. 2. Set the outer SimmerSear burner cap(s) on top of the burner ring(s). Make sure the burner ring is centered on top.
NOTE: If the cooktop does not operate properly, these troubleshooting steps: Verifying Proper Operation WARNING , Make sure that power to the e ectrical outlet is turned Off at the circuit breaker or fuse box and that the gas is turned off at the gas supply valve before proceedingl The c0oktop must be propedy grounded at el! times when electrical power is applied: i Prior to operating the cooktop, read the accompanying and care manual carefully. , cooktop burner controls are in the OFF position.
_m _0 c)O T c) _o r-- o_o_ :I_ m co G-) co @ o_o_ o --4 r---4 _t _H o o @ o___ c) _o oo oo oo o_o_ r --4 OO w mo_ :70o C- -_o °/_ r _w ctacor 11
"0 0 - T ca i r_ c9 <_ _o z_ 12 c_acar o oc0 _z wo _ 0,-09 S o
4# The Life of the Kitchen? Dacor • 600 Anton Blvd. Suite 1000 Costa Mesa, CA 92626 • Phone: (800) 793-0093 • Fax: (626)403-3130 American Made*Family • www.Dacor.