
Manuals(0)
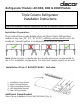
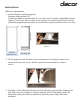

4. Place the right adjustable bracket on the upper left corner of the column and
place the left adjustable bracket on the upper right corner of the column.
5. Place the Upper Joining Bracket over the two adjustable brackets aligning the
center holes of the Joining Bracket with the holes in each of the columns.
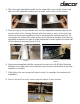
Insert the two screws saved from step 3 and fasten the brackets together. Do
not tighten the screws fully, allow screws to be just loose enough to let the two
adjustable brackets to be able to slide backwards to brace against the back wall
of the cabinetry opening (figures 3 & 4)
6. Using screws supplied with the mounting kit secure the Left & Right Mounting
Brackets to the back wall of the cabinetry opening (use wall anchors if securing
brackets to Drywall).
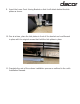
7. Fully tighten the two screws left loose in step 6 to complete the mounting kit
installation.
8. From in front of the units, remove the kick plates of each column.
Figure 3.
Figure 4.