
Installation Guide
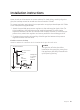
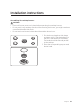
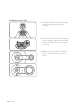
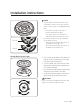
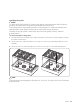

Table Of Contents

Checking for gas leaks
WARNING
To prevent an explosion/fire hazard possibly leading to personal inj
ury or death, DO
NOT use a flame to check for gas leaks.
When using pressures above 1/2 psig to test the home gas-supply system, disconnect
the cooktop and individual shut-off valve from the gas-supply piping. When using
pressures of 1/2 psig or less to test the gas-supply system, isolate the cooktop from the
system by closing the individual shut-off valve.
1. When all connections are made, ensure all cooktop controls are off, and turn on the
main gas-supply valve.
2. Use a liquid leak detector at all joints and connections to check for gas leaks.
3. Tighten connections as needed to stop gas leakage in the cookto
p or supply line.
Making the electrical connections
WARNING
• Disconnect electrical power at the main circuit breaker or fuse box before making any
electrical connections.
• BEFORE operating/testing, follow the grounding requirements on pg. 25. Improper
connection of the grounding plug is an electric-shock risk.
• All gas cooktops come with a power cord connected to the bottom of the cooktop
chassis. (For details, see “Electrical requirements,” page 24.)
• The electrical system, including the power cord, is factory-installed/-wired. Altering
any part of this system may cause a short or overload.
1. Plug in the power cord. (Ensure the outlet meets all applicable electrical codes (see
pg. 24).
2. After installing the cooktop, check the gas-supply line to verify it is connected and
undamaged.
22 English