
Installation Guide
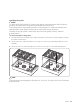
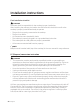

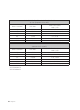
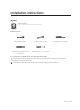
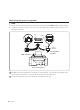
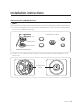
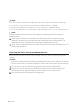
Table Of Contents

Installation instructions
4. With a small, flat-bladed screwdriver, adjust the bypass valve screw in the base of the
valve stem. Turn the bypass valve screw counterclockwise to increase the flame size.
Flat-bladed
screwdriver
Inner flame
bypass screw
Outer flame
bypass screw
Inner flame
bypass screw
Dual valve
5. Replace control knob and recheck the low flame setting.
6. Repeat Step 1 – 5 to check and adjust the low-flame settings on the remaining burners.
Combustion flame quality
2
3
1
1. Soft blue flames—Normal for
natural gas operation.
2. Yellow tips on outer cones—
Normal for LP gas operation.
3. Yellow flames—Abnormal for
any gas operation. Further
adjustment required.
Additional low-flame check
1. Quickly open and close the cabinet door while the burner is on LO. (If the flame goes
out, increase the low-flame setting, and repeat the test until the flame stabilizes.
2. Quickly turn the knob from HI to the lowest setting. (If the flame goes out at the
lowest setting, increase the low-flame setting, and repeat the test until the flame
stabilizes.
English
35