User Manual Modernist Rangetop DTT48M976/DTT36M974 Part No.
Contents Before You Begin 4 Important 4 Regulatory Notice 5 Important Safety Instructions 6 Product Overview 10 External Features Parts Lists 10 10 Using the Rangetop 11 About the Burners Special Rangetop Features Igniting a Burner Using Proper Cookware Using the Grates Using the Griddle Using the Wok Grate Using iQ Connect Using Hood Control 11 11 12 13 14 14 15 16 17 Care and Maintenance 18 Cleaning the Rangetop Surface Cleaning the Stainless-Steel Surfaces Cleaning the Burner-Control Kn
To Our Valued Customer: Congratulations on your purchase of the very latest in Dacor® products! Our unique combination of features, style, and performance make us a great addition to your home. To familiarize yourself with the controls, functions and full potential of your new Dacor range, read this manual thoroughly, starting at the Before you begin section (pg. 4). Dacor appliances are designed and manufactured with quality and pride, while working within the framework of our company values.
Before You Begin Important Overall design/accessories may differ with the model. Service Technician • The electrical diagram is attached inside the burner box. 4 English User • Keep this manual for personal and professional reference • All heat-generating appliances require you to follow certain precautions. • Ensure the rangetop is properly installed/ grounded by a qualified installer. • Ensure the surrounding wall coverings can withstand the heat from the rangetop.
Regulatory Notice 1. FCC Notice CAUTION Any modifications not expressly approved by the party responsible for compliance could void the user's authority to operate the equipment. This device complies with Part 15 of FCC Rules. Operation is subject to these conditions: 1) This device may not cause harmful interference; 2) This device must accept any interference received including that which causes undesired operation. For products available in the US/ Canadian markets, only channels 1–11 are available.
Important Safety Instructions Read All Instructions Before Using This Appliance • All electrical and gas equipment with moving parts can be dangerous. Read and follow the Important Safety Instructions carefully to minimize risk of property damage, personal injury, and death. • Keep this manual in a handy place for personal and professional reference. Symbols Used In This Manual Follow these warning icons and symbols explicitly to prevent property damage and personal injury.
Important Safety Instructions General Safety, cont. • Ensure all meat and poultry is cooked thoroughly. Meat should always be cooked to an internal temperature of 160 °F (71 °C), and poultry to 180 °F (82 °C). • Do not leave/store combustible material and liquids on/near the rangetop. • Teach children not to touch or play with the controls or any part of the appliance.
Important Safety Instructions Electrical and Grounding Safety WARNING To reduce risk of fire, electric shock, personal injury, and death: • Plug the appliance in to a grounded, 3-prong outlet. • Do not remove the ground prong. • Do not use an adapter or an extension cord. • Do not use a damaged power plug/cord, or loose power outlet. • Do not modify the power plug, cord, or outlet. • Do not put a fuse in a neutral or ground circuit. • Use a dedicated 120-volt, 60-Hz, 20-amp, AC, fused electrical circuit.
Important Safety Instructions Rangetop Safety WARNING To reduce risk of fire, electric shock, personal injury, and death: • Turn all burners are off when not in use. • Do not use aluminium foil to line the grates or any part of the rangetop. • Do not leave burners unattended on medium or high heat settings. • Before igniting, ensure all burner caps are properly in place and all burners are level. • Always use the LITE position to ignite the burners, then ensure the burners ignite.
Product Overview External Features 36" Model: DTT36M974 48" Model: DTT48M976 1 2 2 4 4 5 5 1 3 3 1 Spill tray 2 Surface burners 3 Knob (shower lighting) 4 Surface burner knobs (6 pcs) 5 Griddle knob 1 Spill tray 2 Surface burners 3 Knob (shower lighting) 4 Surface burner knobs (4 pcs) 5 Griddle knob Parts Lists 36" Model: DTT36M974 48" Model: DTT48M976 Grate (2) Burner heads (4) and Burner caps* (5) Wok Ring Griddle (1) Grate (3) Wok Ring Burner heads (6) and Burner caps* (7) Griddle (1
Using the Rangetop About the Burners The rangetop has four types of burners. (See below for heat output and location.) The rangetop generates a spark to light the burner when you turn the knob to HI. Gaskets under the burners keep spilled liquids from leaking into internal parts. DTT36M974 C C DTT48M976 B E D B C D E A A, B Dual burner C, D Stack dual burner E 1.4 KW Electric griddle A Each burner has a specific cooking purpose.
Using the Rangetop Igniting a Burner To prevent unintentional setting changes, each burner knob uses a push-turn system with stop points. When you reach a stop point, push and turn the knob again. OFF Lite M LO HI Burner location, left rear Each burner knob has a corresponding burner, the location of which appears in a small graphic next to each knob. • In contrast to the other knobs, the griddle knob has no flame symbol and is turned clockwise for ignition.
Using the Rangetop Using the Proper Cookware WARNING • • • • • • • Rough-bottomed cookware can permanently damage the coated surfaces. To avoid burns and scalding, always turn pan handles away from the front edge of the rangetop and adjacent burners. Lift to reposition cookware. Sliding may damage the grate finish. Always set cookware gently onto the grates and center them for good balance. To avoid burns or fire, do not let flames extend beyond the base of the cookware.
Using the Rangetop Using the Grates Gently set the grates on the spill tray. Put the legs of each grate into the corresponding dimples. NOTE Take care handling the heavy grates. Before installing the grates, check the words embossed into the underside of each grate to know their proper orientation and placement. Using the Griddle Preheat the griddle on HI for 10 minutes, then adjust the setting to the cooking task. 1.
Using the Rangetop Using the Griddle, cont. Griddle Preheat Info for Various Foods Type of Food Pancakes, fried eggs, sausages Hamburgers, bacon Preheat Time Preheat Setting Cook Setting 8-10 min. HI MED-HI 15 – 20 min. HI HI CAUTION • • • • • Remove the griddle when all rangetop surfaces (incl. the griddle and grates) are cool. Adjacent burners may make the griddle very hot though it is not in use. Take care not to touch the griddle when using adjacent burners. Do not overheat the griddle.
Using the Rangetop Using iQ Connect The rangetop has a built-in Wi-Fi module that you can use to sync the rangetop with the Dacor iQ Kitchen app, which lets you monitor the On/Off status of rangetop elements. The Dacor iQ Kitchen app may not work properly under compromised wi-fi conditions (e.g., blocked by other electronic appliances or external electrical interference) or if the signal is weak (e.g., rangetop is far from the Wi-Fi source).
Using the Rangetop Using Hood Control NOTE The rangetop features a Bluetooth device that connects a Dacor hood-control rangetop to certain hood models. In this table, both hood-control rangetops work with any of the hood models at right. Hood-Control Rangetop Model Hood Model DTT36M974, DTT48M976 DHD30M967W*, DHD36M987W*, DHD48M987W*, DHD36M967I*, DHD48M967I* To connect a hood-control rangetop with a hood: 1. Download and run the Dacor iQ Connect app on your smartphone, then complete the iQ Connect 2.
Care and Maintenance Cleaning the Rangetop Surface You should clean up spills immediately. 1. Turn off all burners. 2. Let the grates cool, then remove them. 3. Clean the rangetop surface with a soft cloth. If spills run down into burner components, remove the burner caps and heads, and wipe up the spills. 4. When finished, reassemble the burners, and reposition the grates. Cleaning the Stainless-Steel Surfaces 1. Wipe spills, spots, and grease stains with a soft, wet cloth. 2.
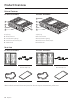
Care and Maintenance Cleaning the Grates and Burners Turn off all burners, and wait for them to cool. 1. Remove the grates, then remove the burner caps 1 2. 3. 4. 2 5. 6. 7. 3 and burner heads. Clean the grates and burner parts in warm, soapy water. (Do not use steel-wool pads or abrasive cleaners.) Rinse and dry grates and burner parts fully. Reassemble the burner heads, engaging the slots in each head with those in each manifold. Lay each cap flat on each heads.
Care and Maintenance About the Burner Bases CAUTION The burner bases are not removable. Ensure no water enters the bases and brass gas orifices. Clean them with a damp cloth, and dry them fully before using the cooktop. About the Electrodes CAUTION Do not try to remove the electrode from the cooktop or burner bases. Clean the metal tip Clean the ceramic portion with nonabrasive material Do not cook while you clean the cooktop. Ensure the white ceramic electrodes are clean and dry.
Care and Maintenance Reassembling the Burner Heads and Caps Dual Burner Head/Caps 1. Orient the burner head so the electrode opening aligns with the electrode itself. 2. Install the burner head so the electrode passes through its opening in the head. Lay the burner head flat on the base. 3. Size the burner caps to the burners, then re-install them on the heads. CAUTION Each cap fits a specific burner head. Make sure all caps lie flat on the correct head. Round Burner Head/Caps 1.
Care and Maintenance Reinstalling the Burner Heads and Caps, cont. SimmerSear Burner Assembly WARNING Turn off electrical power and wait for all surfaces to cool before cleaning the rangetop. 1. Place the burner heads as shown. The locater tab on the head goes in the keyed hole as shown. Locating tab Keyed hole Burner head Burner base Burner ring 2. Put the burner rings on the heads as shown. Match the tabs on the bottom of the ring to the slots on the head.
Troubleshooting In case of malfunction, before calling for service, review this section for a possible resolution. Gas Safety Possible cause Problem You smell gas. Action Burner knob is on; burner not lit. Turn burner knob off. Gas leak. • • Evacuate building. Immediately call gas supplier from neighbor’s phone; follow gas supplier’s directions. • If you cannot reach gas supplier, call fire dept. Surface Burner Problem Some burners not lighting. Burners not lighting.
Warranty What Is Covered CERTIFICATE OF WARRANTIES: DACOR RANGETOPS WITHIN THE 50 STATES OF THE U.S.A., THE DISTRICT OF COLUMBIA, AND CANADA*: FULL 2-YEAR WARRANTY This warranty applies only to the Dacor Modernist appliance sold to the original purchaser, from the date of the original retail purchase, or the closing date for new construction, whichever period is longer. The warranty is valid on Modernist products purchased new from a Dacor Authorized Dealer or other Dacor-authorized seller.
Warranty What Is Not Covered, cont. • • • • Replacement of house fuses, fuse boxes or resetting of circuit breakers. Damage due to accident, fire, flood, power outages, or other so-called “acts of God.” Damage to surrounding property (countertops, cabinetry, floors, ceilings, etc.). Breakage, discoloration, or damage to glass, metal surfaces, plastic components, trim, paint or other cosmetic finish caused by improper usage, care, abuse, or neglect.
Open-Source Announcement The software included with this range contains open-source software. You may obtain the complete corresponding source code up to 3 years after the last shipment of this model by emailing: oss.request@samsung.com. You may also obtain the full corresponding source code in a physical medium (e.g., CD-ROM) at a minimal charge. This URL: http://opensource.samsung.
Please visit www.dacor.com to activate your warranty online. WARRANTY INFORMATION IMPORTANT: Your warranty will not be activated until you activate it online or return this form to Dacor. If you have purchased more than one Dacor product, please return all forms in one envelope, or activate the warranty online for each product. Owner Last Name (please print) First Middle Init.
fold here NO POSTAGE NECESSARY IF MAILED IN THE UNITED STATES BUSINESS REPLY MAIL FIRST-CLASS MAIL PERMIT NO 1600 CITY OF INDUSTRY CA POSTAGE WILL BE PAID BY ADDRESSEE DACOR ATTN WARRANTY PROCESSING DEPT PO BOX 90070 CITY OF INDUSTRY CA 91715-9907