
Installation Instructions


6
Tools and Parts
This section describes the refrigerator’s supplied hardware,
and the tools and accessories needed for installation.
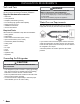
Supplied Hardware/Accessories
• Water filter
• Anti-tip brackets
• Kickplate (and attaching screws)
• Front leveling legs (packed with kickplate)
• Tapping screws (12 qty.)
• Installation Instructions
• Use and Care Guide
Required Tools
Have these items available to help with the installation:
• Safety glasses
• Drill and bits
• Socket wrench and sockets (6mm, 12mm)
• Open-end wrenches (11mm, 12mm)
• Screwdrivers (blade and Phillips)
• Tubing cutter
• Pliers
• Tin snips
• Level
• Bucket
• Appliance dolly
• Stepladder
Grounding the Refrigerator
• This refrigerator’s power cord has a 3-prong (grounding)
plug, which inserts into a standard 3-prong (grounding)
wall outlet to minimize the risk of electric shock.
• Ensure a qualified electrician verifies that the wall outlet
and circuit are properly grounded.
• It is the homeowner’s responsibility to have the proper
outlet installed. (Do not use a GFI outlet.)
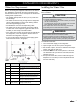
Water-Pressure Requirements
The water dispenser and icemaker need a cold-water
supply with 30–120 psi (207–827 kPa) water pressure.
If you install a reverse-osmosis system between the water
supply and refrigerator, the water pressure from the supply
to the osmosis system must be 40–60 psi and from there to
the refrigerator, 30–120 psi.
A licensed plumber can answer questions about water
pressure.
CAUTION
FOR YOUR SAFETY, THIS APPLIANCE MUST BE PROP-
ERLY GROUNDED.
INSTALLATION REQUIREMENTS
WARNING
FAILURE TO FOLLOW THESE INSTRUCTIONS MAY
RESULT IN ELECTRICAL SHOCK/FIRE/DEATH:
• Never cut/remove the power cord ground (third) prong.
• Do not use an adapter plug to connect the refrigerator to a
2-prong outlet.
• Do not use an extension plug with this appliance.