
Installation guide


INSTALLATION
INSTRUCTIONS
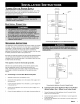
INSTALLING
THE
EXHAUST
GRILL
With
the
oven
now
secured
to
the
cabinet,
install
the
Exhaust
Grill
by
mounting
it
to
the
oven
with
the
two
screws
provided.
NOTE:
You
may
need
to
loosen
the
side
mounting
screws
a
little
to
align
the
Exhaust
Grill
mounting
holes.
Tighten
the
side
mounting
screws
after
attaching
the
Exhaust
Grill.
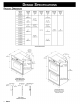
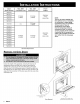
Z
a
Exhaust
Grill
Secure
oven
to
cabinet
with
screws
provided
Single
Ovens
—
4
screws
Double
Ovens
—
6
screws
Installing
the
Cabinet
Mounting
Screws
REINSTALLING
THE
Oven
Doors
WARNING
WARNING
-
Failure
to
fully
rotate
the
hinge
catches
will
cause
them
to
bend
when
the
door
is
closed.
This
will
make
closing
the
door
impossible.
Grasp
the
oven
door
on
opposite
sides
and
lift
it
until
the
door
hinges
are
aligned
with
the
openings
in
the
oven
frame.
Holding
the
door
at
about
a
30°
angle
from
the
horizontal,
slide
the
hinges
into
the
openings
until
the
bottom
hinge
arms
drop
fully
into
the
hinge
receptacles.
Lower
the
door
to
the
fully
opened
position,
and
then
rotate
the
two
hinge
catches
toward
the
oven.
Open
and
close
the
door
completely
to
ensure
that
it
is
properly
installed.
For
double
ovens,
complete
Verifying
Oven
Operation
for
both
the
upper
and
lower
doors.
For
stainless
steel
ovens,
peel
off
the
protective
layer
of
plastic
that
covers
the
door
panel.
VERIFYING
OVEN OPERATION
Verifying
Oven
Operation
Slide
the
oven
racks
onto
the
support
racks
within
the cavity.
Place
the
broiler
pan and
tray
on
a
rack
within
the
oven,
if
desired.
Turn
on
the
power
supply
to
the
oven.
Set
the
time
of
day
by
pressing
the
Clock
touch
pad
then
pressing
the
TIME*TEMP
key.
Press
the
BAKE
selector
pad
for
the
upper
oven
or
single
oven.
Select
a
temperature
of
350°F
by
pressing
the
TIME*TEMP
“+”
key.
The
oven
should
now
be
heating.
After
approximately
three
(3)
minutes,
the
lower
heating
element
should
glow
red.
Press
the
CANCEL*SECURE
pad
to
stop
the
oven
heating
process.
It
may
take
longer
than
three
(3)
minutes
when
ovens
are
running
at
voltages
lower
than
240V.
If
checking
the
operation
of
the
double
oven,
repeat
the
bake
test
for
the
lower oven.
Press
the
BROIL
selector
pad
for
the
upper
oven
or
single
oven.
Select
a
temperature
of
350°F
by
pressing
the
TIME*TEMP
“+”
key.
The
oven
should
now
be
heating.
After
approximately
three
(3)
minutes,
the
upper
heating
element
should
glow
red.
Press
the
CANCEL*SECURE
pad
to
stop
the
oven
heating
process.
It
may
take
longer
than
three
(3)
minutes
when
ovens
are
running
at
voltages
lower
than
240V.
If
checking
the
operation
of
the
double
oven,
repeat
the
broil
test
for
the
lower
oven.
WARNING
WARNING
-—
If
the
oven does
not
operate
properly,
follow
these
troubleshooting
steps:
Verify
that
power
is
being
supplied
to
the
oven.
Check
the
electrical
connections
to
ensure
that
the
installation
has
been
completed
correctly.
Repeat
the
above
bake
test.
If
the
appliance
still
does
not
work,
contact
an
authorized
Dacor
service
company.
If
you
are
unable
to
locate
a
Dacor
Servicer,
please
contact
Dacor
at
(800)
793-0093.
or
visit
us
on
the
web
at
www.Dacor.
com.
Do
not
attempt
to
repair
the
appliance
yourself.
Dacor
is
not
responsible
for
service
required
to
correct
a
faulty
installation.
dacar
9