
Installation guide


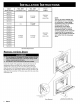

INSTALLATION
INSTRUCTIONS
Cc.
Connecting
the
Green
Appliance
Wire
to
a
Grounded
Junction
Box
Wire
or
Grounded
Cold
Water
Pipe
—-
Where
Local
Codes
Permit
1.
Separate
the
green
and
white
appliance
wires.
2.
Connect
the
black
appliance
wire
to
the
black
(L1)
power
supply
wire
in
the
junction
box.
3.
Connect
the red
appliance
wire
to
the
black
(L2)
power
supply
wire
in
the
junction
box.
4.
Connect
the red
appliance
wire
to
the red
(L2)
power
supply
wire
in
the
junction
box
5.
Connect
the
green
appliance
wire
to
a
grounded
wire
in
the
junction
box
or
to
a
grounded
cold
water
pipe.
6.
If
connecting
to
a
grounded
coid
water
pipe,
a
separate
copper
grounding
wire
(No.
10
minimum)
must
be
connected
to
a
grounded
cold
water
pipe
by
means
of
a
clamp
and
then
to
an
external
grounding
connector
screw.
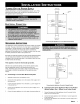
Cable
from
power
supply
=
Junction
a
box
RED
[
RED
GREEN
GREEN
Wire
nut
(4
places)
Conduit
from
appliance
Clamp
must
be
tight
on
pipe
WARNINGS
Do
not
ground
the
appliance
to
a
gas
supply
pipe
or
hot
water
pipe.
Do
not
turn
on
power
to
the
appliance
until
the
oven
is
permanently
grounded.
Grounded
cold
water
pipe
must
have
metal
continuity
to
electrically
ground
and
must
not
be
interrupted
by
insulating
materials.
Any
insulating
materials
must
be
jumped
as
shown
below
with
a
length
of
No.
4
copper
wire
securely
clamped
to
bare
metal
at
both
ends.
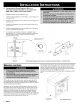
Separate
No.
10
(minimum)
copper
grounding
wire
No.
4
copper
wire
oe
Metal
water
pipe
Bare
metal
Connecting
the
Appliance
Ground
to
a
Grounded
Junction
Box
Wire
or
Coid
Water
Pipe.
MouNTING
THE
OVEN
WARNING
Failure
to
install
the
mounting
screws
may
result
in
movement
or
tipping
of
the
oven
during
use
and
personal
injury.
Do
not
block
the
oven
air
exhaust
located
at
the
bottom
of
the
oven.
Blocking
the
intake
may
cause
cabinet
damage
and
poor
baking
performance.
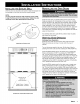
Lift
the wall
oven
up
to
the
cabinet
cutout,
using
the
upper
edge
of
the
cavity
opening
and
the
bottom
of
the
oven case
side
as
gripping
points.
Use
extreme
caution
when
lifting
the
appliance
as
it
is
heavy.
Be certain
to
take
all
necessary
safety
precautions.
Resting
the
oven
on the
cabinet-mounting
platform,
slide the
oven
into
the
recessed
area
until
the
rear
edge
of
the
oven
frame
is
flush
with
the
cabinet
face
and
the
oven
is
centered
within
the
cutout.
Ensure
that the
electrical
conduit
slides
through
the
opening
in
the
cabinet
platform
or
coils
above
the
oven
chassis
as
the
oven
is
slid
into
place.
The
cable
must
be
placed
into
the
recessed
area
located
along
the
rear
vertical
edge
of
the
oven
or
coiled
above
the
oven
chassis.
Do
not
trap
the
appliance
cable
between
the
oven
case
back
and
the
rear
wall.
8
dacor
For
the
single
ovens
and
the
upper
cavity
of
the
double
ovens,
locate
the
mounting
holes
found
in
the
sides
of
the
oven
frame.
Using
a
1/16”
drill,
drill
four
pilot
holes
for
the
#6
x
3/4”
screws
provided
in
the
instruction
envelope.
Install
the
screws
through
the
oven
frame
and
into
the
cabinet
to
secure
the
oven.
Do
not
over-tighten
the
screws.
Repeat
the
mounting
procedure
for
the
lower
cavity
if
installing
a
double
oven.
Upper
edge
of
cavity
opening
Case
side
bottom
both
sides
Oven
Gripping
Points