Installation Instructions Built-In Refrigerator Part No. 103675 Rev.
Table of Contents Refrigerator Safety........................................................................1 Model Identification.......................................................................2 Installation Requirements.......................................................3-12 Tools and Parts............................................................................ 3 Location Requirements.............................................................3-4 Electrical Requirements....................
Refrigerator Safety You can be killed or seriously injured if you don't follow WARNING Tip Over Hazard Refrigerator is top heavy and tips easily when not completely installed. Keep doors taped closed until refrigerator is completely installed. Use two or more people to move and install refrigerator. Failure to do so can result in death or serious injury.
Model Identification Refrigerators With Ice and Water Dispensers EF42DBSS and EF48DBSS: 42” and 48” dispensing models with all stainless steel finish IF42DBOL and IF48DBOL: 42” and 48” dispensing models designed for installation of custom panels and handles Refrigerators Without Ice and Water Dispensers EF42NBSS and EF48NBSS: 42” and 48” non-dispensing models with all stainless steel finish 2 IF42NBOL and IF48NBOL: 42” and 48” non- dispensing models designed for installation of custom panels and handle
Installation Requirements Tools and Parts Location Requirements Tools needed: Your Dacor refrigerator can be recessed in an opening between cabinets or installed at the end of a cabinet run using a side panel to enclose the refrigerator. Gather the required tools and parts before starting installation. Read and follow the instructions provided with any tools listed here.
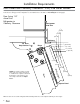
Installation Requirements Location Requirements (continued) Electrical Requirements A grounded 3 prong electrical outlet should be placed within 4” (10.2 cm) of the right side cabinets or end panel. See Electrical Requirements for more information. WARNING The water shutoff should be located in the base cabinet on either side of the refrigerator or some other easily accessible area.
Installation Requirements Water Supply Requirements If the water pressure to the reverse osmosis system is less than 40 to 60 psi (276 to 414 kPa): All installations must meet local plumbing code requirements. Check to see whether the sediment filter in the reverse osmosis system is blocked. Replace the filter if necessary. The water shutoff should be located in the base cabinet on either side of the refrigerator or some other easily accessible area. The right-hand side is recommended.
Installation Requirements Product Dimensions Side View: Front View: The depth from the front of the top grille to the back of the refrigerator cabinet is 25³⁄8” (64.5 cm). Width dimensions were measured from trim edge to trim edge. The power cord is 84” (213 cm) long. The water line attached to the back of the refrigerator is 5 ft (1.5 m) long. Height dimensions are shown with leveling legs extended ¹⁄8” (3 mm) below the rollers.
Installation Requirements Door Swing Dimensions The location must permit both doors to open to a minimum of 90°. Allow 4½” (11.4 cm) minimum space between the side of the refrigerator and a corner wall. NOTE: More clearance may be required if you are using overlay panels, custom handles or extended handles on a IF series model. EF42 and IF42 Model Series To adjust the door swing, see Adjust Doors.
Installation Requirements Door Panels and Cabinetry Clearance - IF42/IF48 Series Models The custom door panels and adjacent cabinetry for models series IF42 and IF48 must be designed so that there is sufficient clearance for the doors to swing open. If the refrigerator is to be installed close to the wall, see Door Swing 90° on facing page. Door Swing 110° Actual Size Refrigerator to Cabinetry Clearance Refrigerator Side Trim 11/2" (3.8 cm) 11/4" (3.2 cm) 1" (2.
Installation Requirements Door Swing 90° Actual Size Door Swing 90˚ Actual Size Refrigerator to Cabinetry Clearance Refrigerator to Cabinetry Clearance Refrigerator Side Trim 1" (2.5 cm) 3/4" (1.9 cm) 1 /2" (1.3 cm) 90° Door Stop Position Cabinetry / " (6.35 mm) 1 4 Hinge / " (1.3 cm) 1 2 / " (1.9 cm) 3 4 1" (2.5 cm) 1 /2 " (1.3 cm) Door 3/4" (1.9 cm) 1" (2.5 cm) Overlay Panel Backer Panel 11/4" (3.2 cm) 11/2" (3.8 cm) Spacer Panel Allow a minimum of 4½” (11.
Installation Requirements Custom Panels and Handles - IF42/IF48 Series Models IMPORTANT: Custom overlay panels used with models IF42 and IF48 allow you to blend the exterior of your refrigerator into the overall kitchen décor, and to use custom handles for additional design flexibility. Install the panels after moving the refrigerator into place (page 17) . The custom panels must have backer panels attached in order to mount them to the refrigerator.
Installation Requirements Custom Handles Side Trim Dacor recommends handles with larger D-style pulls. If using screws with thick heads, they must be countersunk into the panel before installing the handles. ³⁄8 " (9.7 mm) ³⁄16 " (4.5 mm) Any handle designed for use with an appliance should produce satisfactory results. Mounting screw length varies with the total thickness of the panels. IMPORTANT: Dacor does not advise the use of single pull knobs. B Trim frame surrounding door ¹⁄16 " (1.
Installation Requirements Custom Side Panels - EF42/EF48 Inset Installation Dimensions Custom side panels may be needed when not enough space is available to have cabinets on both sides of the refrigerator or when the refrigerator is placed at the end of a cabinet run. You may choose an inset, flush or recessed inset panel installation for models EF42 and EF48. 1. Measure the distance from point A (as shown) to the back wall. Add 7⁄32” (5.
Installation Instructions Unpack the Refrigerator WARNING 1. Grasp both ends of the top grille. 2. Push the top grille straight up, then pull straight out. Lay the grille on a soft surface. B A B Tip Over Hazard Refrigerator is top heavy and tips easily when not completely installed. Keep doors taped closed until refrigerator is completely installed. Use two or more people to move and install refrigerator. Failure to do so can result in death or serious injury.
Installation Instructions Install Anti-Tip Boards Connect the Water Supply IMPORTANT: Read all directions before you begin. To avoid tipping during use, the solid soffit must be within 1” (2.5 cm) maximum above the refrigerator. If the solid soffit is higher than 1” (2.5 cm) or one is not available, then the refrigerator must be braced. IMPORTANT: If you turn the refrigerator on before the water line is connected, turn the ice maker OFF.
Installation Instructions 5. Using a cordless drill, drill a ¼” (6.35 mm) hole in the cold water pipe you have selected. 7. Plug in the refrigerator or reconnect power. A 8. Flush the water system. See Water System Preparation. B G NOTE: Allow 24 hours to produce the first batch of ice. Discard the first three batches of ice produced. Allow 3 days to completely fill ice container. C F E Plug in Refrigerator D A. Cold water pipe B. Pipe clamp C. Copper tubing D. Compression nut 6.
Installation Instructions Level and Align Refrigerator 3. Continue adjusting all of the leveling legs to raise the refrigerator until the top is within at least 1” (2.54 cm) of the top soffit. WARNING NOTE: If an anti-tip board has been used, adjust the leveling legs until the top of the refrigerator is within ¼” (6.35 mm) of the bottom of the anti-tip board as shown. Do not crush the compressor cover. A B Tip Over Hazard Refrigerator is top heavy and tips easily when not completely installed.
Installation Instructions Custom Panel and Handle Installation - IF42/IF48 Series Models IMPORTANT: 3. Remove the handle side and top trims. Install the custom handles prior to installing the panels on the refrigerator. A A Create custom door overlay panels according to the specifications in the Custom Panels and Handles section. Dacor is not responsible for customer installed molding or decorative panels that need to be removed or replaced to service the refrigerator.
Installation Instructions Adjust Doors Door Height Adjustment 1. Use the following steps to adjust the door height, up or down, after the doors have been leveled. Open the freezer or refrigerator door. Locate the bottom hinge and remove the door stop screw. EF Series Models Remove the door stop screw from the bottom side of the hinge with a ³⁄8” open end wrench. 4. After adjusting, check the doors to make sure they are even at the top and bottom.
Installation Instructions Install Side Panel(s) 3. Snap the skirt onto the base grille. If the built-in area depth is 25” (63.5 cm) or more, the side panels can be installed inside the side trim or attached to the outside of the side trim. IMPORTANT: Dacor is not responsible for customer installed molding or decorative panels that need to be removed or replaced to service the refrigerator. 1. For the inside side trim piece, slide the front edge of the routed side panel into the trim piece. 2.
Installation Instructions Complete Installation 1. Turn the water supply line valve to the “Open” position. 2. Turn the refrigerator switch to the ON position. See Power On/ Off Switch in the use and care manual for instructions. Wait a few minutes. Check the water line connections for leaks. 3. Remove all boxes, parts packages and packing materials from the interior of the refrigerator. See the Care and Cleaning section in the use and care manual for instructions.
Dacor ● 1440 Bridge Gate Drive, Diamond Bar, CA 91765 ● Tel: (800) 793-0093 ● FAX: (626) 403-3130 ● www.Dacor.