
Product specifications

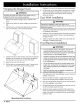
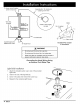


Installing the AHT1 0 Transition"
Top exhaust
models and 18"
high models with
rear exhaust:
Center the transition
over the duct collars
and fasten it in place
using sheet metal
screws (not included).
Seal the base of the
transition with duct
tape.
Top mounting
shown
12" high models with rear exhaust:
Center the transition over the duct collars while resting the
unmodified edge on the top of the hood. Fasten in place
using sheet metal screws (not included). Seal the base of
of the transition with duct tape.
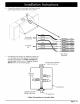
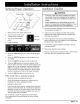
Mounting Bracket Installation
,
Draw the horizontal center line for the temporary
mounting brackets on the wall. The center line for the
brackets is 2 1/8" (54 cm) below where the top of the
hood will be located. The horizontal line marks the cen-
ter line of the mounting screws that hold the temporary
mounting brackets in place.
I [_ IMPORTANT ,,
Installing the braCkets lower Or hig her than 2 !/8 below I
the top of the final hood location will cause alignment I
problems during final installation: ............... I
2. Draw the two (2) vertical center lines for the brackets
on the wall. They are located on both sides of the hood
center line drawn on the wall before making the duct
cut-out. The distance from the center line depends on
the model. See the chart below.
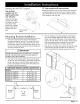
TEMPORARY BRACKET CENTER LINE DISTANCE
Models
EHR3012, EHR3018
EHR3612, EHR3618
EHR4212, EHR4218
EHR4812, EHR4818
EH R5418
F
12 3/8" (31.4 cm)
15 3/8" (39.1 cm)
18 3/8" (46.7 cm)
21 3/8" (54.3 cm)
24 3/8" (61.9 cm)
,/
Bracket
location
2 1/8"
\
I
i
I
÷
I
I
I
blood
location
I
I-
F -----_,
i
\
Bracket
location
,
,
Find the temporary mounting bracket in the shipping
box. Put the bracket against the wall and line up the
center hole with the intersection of the bracket center
lines on the wall. Make sure the anchors and/or screws
used are strong enough to support the hood. Make
sure drywall installations are properly reinforced.
Mark the two mounting hole positions through the holes
in the bracket. Drill the pilot holes for the screws or
anchors and attach the brackets securely to the wall.
i i
I I
i i
i
i
i i
i i
Reinforced Drywall , ,
L i
ctacor 11