
Technical information
Technical Manual - Page 35
2. Check for possible miswire of the exhaust motor.
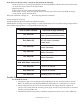
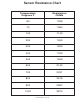
Quick Check – Main PCB:
If the vent is not working at all:
- Check the fuse on the main PCB
- If the fuse is good check for continuity between the fuse and L3 (drive motor terminal)
- If this circuit is open the PCB is bad and must be replaced.
When reassembling please be sure all the wiring is correct.
KEYPAD, KEYBOARD REPLACEMENT
RV SERIES RAISED VENT
Removal of the cooktop is not required.
- Raise the vent sleeve by pressing the UP/DOWN button. If the unit is dead, raise the vent by
removing the black motor sleeve wires L3 and N3 from the main PCB and hook direct to a power
source (Auxiliary power cord, pigtail etc)
- With the vent in up position turn off the electrical power to the vent and remove the vent electric
cover plate.
- If a cabinet blower is used, disconnect the blower from the vent by loosening the three wing nuts
located above the blower and lifting up on the blower retaining bracket.
- If a remote blower is used remove the cover plate.
- Disconnect the 14 wire Molex plug from the main PCB.
- Remove the screws, 1 on each side of the sleeve. Lift topcap assembly from the sleeve assembly.
-Guide the Molex plug through the electric box and through the channel in the sleeve assembly.
- Remove the right end cap (pressed in). Slide out the bezel, keypad and keyboard as one unit. Replace
desired part and reinstall in reverse order.
OFF BUTTON
Pressing and releasing this button will switch off the fan motor. The fan speed indicators will be switched off
and the OFF LED will be switched on. The OFF LED will only be switched on to indicate the fan motor is
switched of whenever the UPPER LIMIT switch is closed.
If DELAY OFF function is on, this will also be cancelled by pressing the OFF button.
DELAY OFF BUTTON
This button has a toggle action. Pressing and releasing this button will enable the fi ve- minute DELAY OFF
function. Pressing and releasing this button again will cancel the selected DELAY OFF function.
When the DELAY OFF function is selected, the fan will continue to operate at the selected speed for fi ve
minutes and then turn off automatically.
During this fi ve-minute interval the fan speed can be changed by pressing and releasing the HIGH, MEDIUM,
or the LOW button.
FAN SPEED – LOW BUTTON
Pressing and releasing this button will select the low speed for the fan. The LOW speed LED indicator will be
on indicating the selected fan speed. Both the MEDIUM and HIGH LED will be off.
FAN SPEED – MEDIUM BUTTON
Pressing and releasing this button will select the medium speed for the fan. The MEDIUM speed LED indicator