
Installation guide
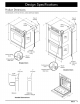
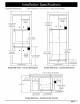

Verify the Package Contents
Verify that all the components below have been provided. If any item is missing or damaged, please contact your dealer
immediately. Do not install a damaged or incomplete appliance. Make sure that you have everything necessary to ensure
proper installation before proceeding.
ovens come with either 4 or 5)
Use and care manual •
Mounting screws (Wood, #6 X ¾, Dacor PN 83331, 4
for single ovens, 6 for double ovens)
Standard oven racks (single ovens come with 2, double
• GlideRack TM oven rack (1)
• Broil grill and pan
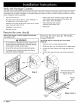
Remove the oven door(s)
Remove the door(s) to reduce weight and make the
oven easier to lift:
[_ WARNING
Exhaust grill with 2 mounting screws (2, #8 X 3/8",
color should match exhaust grill: Silver Dacor PN
83571, Black Dacor PN 83263)
Dacor Stainless Steel Cleaner
(stainless steel models only)
Meat probe
' D0 not attempt t° disengage the hinge catches with
the door removed from the oven. The hinge springs
could release, causing personal injury.
;i'Do not lift or CariYoven door bY the door handiel
• On double ovens, remove the bottom door first to
reduce the chance of damage.
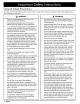
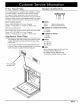
Removing the Oven Door(s)" All Models
Except EORS136
See facing page for removing door from model
EORS136.
1. Open the door to its fully opened position.
2. Rotate the catch over the retaining arm on both hinges.
3. Lift the oven door to about a 30° angle from the hori-
zontal.
4. Pull the door away from the oven while continuing to
lift.
Catch
Step 2
Grab both sides of the
door and pull out at a 30°
angle to remove.
Gripping
point
Gripping
point
30°/
Steps 3 and 4
8 _mC_