Use and Care Manual Epicure ® Range For Use With Models ER30D, ER30DSR, ER30D-C Ta b l e o f C o n t e n t s Important Safety Instructions.............................................. 1-4 Getting To Know Your Range............................................. 4-6 Setting Up Your Range...................................................... 7-9 Operating the Cooktop................................................. 10-11 Operating the Oven.....................................................
res, style on of featu ombinati r unique c er: ed Custom and Ou ® products! in Dacor t s te la ur home.
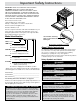
Important Safety Instructions INSTALLER: LEAVE THIS GUIDE WITH THE APPLIANCE. CUSTOMER: READ THIS USE AND CARE MANUAL COMPLETELY BEFORE USING THIS APPLIANCE. SAVE IT FOR FUTURE REFERENCE. IT CONTAINS IMPORTANT USE AND CARE INFORMATION. KEEP YOUR SALES RECEIPT OR CANCELED CHECK IN A SAFE PLACE. PROOF OF ORIGINAL PURCHASE DATE IS REQUIRED FOR WARRANTY SERVICE. IF YOU HAVE ANY QUESTIONS, CALL: Dacor Customer Service Team 1-800-793-0093 (U.S.A. and Canada) Monday — Friday 6:00 a.m. to 5:00 p.m.
Important Safety Instructions To reduce the risk of fire, electric shock, serious injury or death when using your range, follow basic safety precautions, including the following: danger IMPORTANT: If you smell gas: • Do not use or light any appliance. • Do not touch any electrical switch or use any electrical devices including the telephone in your building. • From a neighbors phone, immediately call the gas supplier. Follow the gas supplier’s instructions.
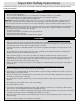
Important Safety Instructions WARNING 19. Do not use water on grease fires. A violent steam explosion may result. Smother any flames with a lid, cookie sheet, or flat tray. Use baking soda or a foam extinguisher to extinguish flaming grease. Be careful to avoid getting burned. 20. Keep flammable items, such as paper, cardboard, plastic and cloth away from the burners and other hot surfaces. Do not place such items in the oven. Do not allow pot holders to touch hot surfaces or gas burners. 21.
Important Safety Instructions CAUTION 1. Do not allow acids (citrus juices, tomato sauces, etc.) to remain on the range’s surfaces. The porcelain finish may stain. 2. Never use the cooktop surface as a cutting board. 3. Do not try to remove heavy spills with a sharp object such as a knife or metal spatula. Sharp objects may scratch the range’s surfaces. 4. To prevent damage, remove the meat probe from the oven when it is not being used. 5. Do not line the oven with aluminum foil or other materials.
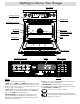
Getting to Know Your Range Control Panel Self-Clean Latch Broil Element Meat Probe Connector Oven Light Rack Supports Oven Light Convection Element, Fan, and Filter Rack Bake Element Door Gasket Cooking Mode Keypad Display Number Keypad Light Key Keys CLOCK: Use this key to set the clock. LIGHT: Located on the number keypad. If you need to turn the oven lights on or off, press the light key. TIMER: Use the TIMER 1 and TIMER 2 keys to time an event.
Getting to Know Your Range About the Cooktop Burner Grate Spill Tray Backguard Trim Ring Burner Control Knob Model ER30D BACKGUARD: Some versions of the range come with a three (3) inch backguard installed. It protects the wall from the effects of heat and splattering grease. An optional six (6) inch and a nine (9) inch backguard are also available. SPILL TRAY: The spill tray catches any food that falls through the cooktop grates.
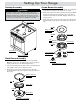
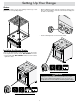
Setting Up Your Range Cooktop Assembly Crown Burner Assembly 1. Put the burner head in place as shown below. The locating tab on the burner head goes in the keyed hole as shown. warning To avoid the chance of fire, explosion or carbon monoxide poisoning, do not attempt to use your range without the burners completely and properly assembled. The burner rings spread the flame evenly around the burner cap. The burner rings must be properly seated for proper burner lighting and operation. 2.
Setting Up Your Range Grates Gently set the grates on top of the spill tray. Put the legs of each grate into the corresponding dimples. • When installing the knobs, align the “D-shaped” opening on the back of the knob with the end of the valve shaft. Carefully push the knob on until it stops. • Put the remaining knobs on the left valve shafts. Installing the Burner Knobs There are two different types of knobs for the range. The knobs for the right burners have the words “MAX GRIDDLE” on them.
Setting Up Your Range CONTROL PANEL SETTINGS Setting the Time Setting the Temperature Scale IMPORTANT: The control panel allows you to select the temperature scale (Fahrenheit or Celsius) it uses to display the cooking temperature. The oven is preset at the factory to Fahrenheit. • The clock cannot be set during delay timed cooking or if one or both timers are in use. • After a power failure, the time on the display may flash, indicating that the time may not be correct.
Operating the Cooktop warning • • • Lighting A Burner Always check the position of the control knobs to make sure the cooktop is off when you are finished cooking. Do not operate the cooktop without all the burner components in place. If the burner ring and cap are not properly seated, the burner may not operate correctly. See page 7 for assembly instructions. Never light the burners with a match or other open flame. IMPORTANT: • Avoid spills as much as possible.
Operating the Cooktop Cooktop Tips: • Dacor’s SimmerSear feature allows you precision control of the flame. The larger the burner size, the wider the range of control. See page 6 for the heat ranges of the different burners. • Food cooks just as quickly at a gentle boil as it does at a vigorous, rolling boil. Maintaining a higher boil than necessary wastes energy and cooks moisture, food flavor, and nutrients out of the food.
Operating the Oven Before You Cook... To Remove the Standard Oven Racks: • When you use your oven to bake or roast, it preheats automatically. The preheat cycle rapidly brings the oven chamber up to the proper cooking temperature. It takes several minutes to preheat the oven. Preheat time depends on the temperature settings. The time may be longer depending on the type of electrical supply in your community. There is no preheat cycle for any of the broil modes.
Operating the Oven Starting Your Oven 1. Adjust the racks to the appropriate level. You can enter any temperature between 100°F and 555°F. The suggested broil temperature is 555°F. On model ER48D the same START key is used to start both ovens. 2. Determine the best cooking mode for the type of food to be cooked. Select from the following: • CONVECTION BAKE - A combination of the convection fan and a bottom heat source. Good for single rack items in a deep pan.
Operating the Oven Preset (Jump-in) Temperature Settings 12 Hour Timer Feature Your oven has a preset “jump-in” temperature setting for each of the cooking modes to reduce the need to always enter the temperature. See the table below. See “Starting Your Oven” on page 13 for directions on how to cook at the preset temperature. Your range is equipped with a feature that automatically turns the oven off after 12 hours of continuous use.
Operating the Oven Understanding the Various Oven Modes The three basic styles of cooking in an oven are: BAKING - The gentle cooking of dry goods such as cookies, cakes, soufflés, etc. ROASTING - The cooking of meats or vegetables over a period of time. BROILING - Cooking with an intense heat for a short amount of time. BAKE Uses only a heat source from below the food. This mode is the stand-by, non-convection mode. All baked items will turn out nicely in this mode.
Operating the Oven Understanding the Various Oven Modes (cont.) Your range offers three convection cooking modes: • Pure Convection • Convection Bake • Convection Roast As a general rule, in the convection modes time is about 25% shorter. Set the timer 15 minutes before the shortest stated time and add more time if necessary. For Pure Convection and Convection Bake Modes: Some recipes, especially those that are homemade, may require adjustment and testing when converting from standard to convection baking.
Operating the Oven Understanding the Various Oven Modes (cont.) Your range offers two broil modes: Broiling Tips • Broil • If the meat probe is plugged into the oven, disconnect and remove it before selecting one of the broil modes. The broil modes do not function with the meat probe connected. • Convection Broil Broiling is a quick and flavorful way to prepare many foods, including steaks, chicken, chops, hamburgers, and fish.
Operating the Oven Delay Timed Cooking Features If you want to set the oven to automatically turn itself on or off at a later time, you can use the delay timed features. Things to Know About Delay Timed Cooking: • The delay timed options work for all of the various cook modes, except broil and convection broil. • You may use the timers while using the delay timed features. The timers do not have an effect on any of the delay timed cooking options.
Operating the Oven Using the Meat Probe When you cook foods like roasts and poultry, the internal temperature is the best way to tell when the food is properly cooked. Your oven’s meat probe is an easy way to take the guesswork out of roasting. You can use it to cook food to the exact temperature you desire. The probe can be set from 100°F to 200°F. NOTE: The meat probe does not work with the BROIL or CONVECTION BROIL modes. • • • • 8. Press START.
Operating the Oven Important details about the meat probe: Dehydrating/Defrosting • You must select the specific cooking mode (BAKE, CONVECTION BAKE, PURE CONVECTION, or CONVECTION ROAST) before you press the PROBE key. Your range can be used to dehydrate or defrost foods at low heat settings in the Pure Convection mode. • There is no preheat cycle when the meat probe feature is used. For best results, select the mode and allow the oven to preheat prior to starting the meat probe feature.
Operating the Oven Dehydrating Tips (cont.) Proofing Solving Discoloration Problems: You can use your range to proof yeasted doughs at a low and draft-free temperature using the bake mode. To prevent darkening during dehydration and storage, you should steam blanch apples, apricots, peaches, nectarines, pears, or foods that will oxidize. 1. Press the BAKE key. 2. Enter the temperature of 100°F on the keypad. To steam blanch: 3. Press START. a. Add 1 inch of water to a 4 quart sauce pot.
Cooking Tips Food Placement NOTE: The rack positions mentioned below are counting from the bottom up. • Typically, when baking on 2 racks, use rack positions #2 and #4 or #1 and #3. When baking on 3 racks, use rack positions #1, #3, and #5. • For roasting, Dacor’s optional “V” shaped rack and broil/roast pan works best to allow air circulation around the food. Dacor’s roasting pan works particularly well and two of them will fit side by side in a 30-inch oven.
Cleaning and Maintenance warning • • • • • Clean only the parts of the range listed in this manual. Clean them only in the manner specified. To avoid dangerous fumes or damage to your range’s surfaces and accessories, use only the types of cleaning solutions specified in this manual. To avoid electrical shock or burns, turn off the burners and the oven and make sure that all parts are cool before cleaning.
Cleaning and Maintenance Self-Cleaning Tips General Cleaning • If any soil remains in the oven after the self-clean cycle is done, you may repeat the cycle if you want. • Self-clean the oven regularly to prevent excessive soil build-up. Doing so will make the self-clean cycle work better and reduce smoke and odors. Setting the Oven to Self-Clean at a Later Time caution Use only a sponge, soft cloth, fibrous or plastic brush, or nylon pad for cleaning the surfaces of your range.
Cleaning and Maintenance Cooktop Disassembly caution • • Do not clean the cooktop grates, burner parts or WOK ring in a dishwasher. They will be damaged. Dry and re-assemble the burners and grates completely before use. • When the cooktop is cool, remove the grates from the top of the cooktop. • Lift the burner caps and burner rings off of the burners. Remove the burner heads from the crown burners.
Cleaning and Maintenance Control Panel Oven warning caution Do not use abrasive cleaners or scrubbers on the control panel. They will permanently damage the finish. To avoid accidentally turning the oven on while cleaning the control panel, activate the lock-out feature. Press the CANCEL/ SECURE key for six seconds. The lock-out feature disables the keys. When the control panel is locked, the word “OFF” appears on the display.
Cleaning and Maintenance Door Gasket (Seal) Optional Roast/Broil Pan with “V” Shaped Rack warning Your roast/broil pan has a porcelain enamel finish. When you clean it, use a solution of detergent and hot water. If your roast/ broil pan is heavily soiled, use a scouring pad and plenty of water. Take extreme caution when cleaning the door gasket. Rubbing or displacing it may damage the tight door seal required for proper cooking and self-cleaning. Rinse it well after cleaning.
Cleaning and Maintenance Replacing the Light Bulbs warning • • • • To prevent electrical shock and/or personal injury, make certain that the oven and light bulb(s) are cool and that power to the oven has been turned off at the main power supply before replacing the light bulb(s). Always make sure the lens covers are in place when using the oven. The lens covers protect the bulbs from breakage. Use the pry stick with caution. Do not cause uneven stress on the lens cover.
Replacement Parts and Accessories description dacor part number Halogen Light Bulb (12V, 20W) 100429 Meat Probe 72723 Wok Ring AWR4 Cooktop Griddle AG30 Cooktop Grill AEGR30 Standard Broil Pan 82107 Grill for Standard Broil Pan 82108 6-Inch Backguard, Models ER30D, ER30D-C AERB30D6 9-Inch Backguard, Models ER30D, ER30D-C AERB30D9 Standard Type Oven Rack 62139 GlideRack Oven Rack ARGR30 Large Capacity Roast/Broil Pan with “V” Shaped Rack AORPVR Pizza Baking Stone ABS20 Cookie Shee
Before You Call for Service Problem Solution Guide - Oven NOTE: See Common Problems When Using the Bake Mode in the Operating the Oven section for problems with cooking food. Problem Nothing works. may be caused by What to do Range not connected to electrical power. Have electrician connect range to properly wired electrical connection. Power to range is off. Turn power on at junction box. Check for tripped circuit breaker or blown fuse. Control panel locked.
Before You Call for Service Problem Solution Guide - Cooktop Problem Igniters do not spark. No flame. Flame is distorted, yellow, or very large. Igniter continues to spark (click) after flame ignites. Flame goes out at low setting. may be caused by What to do Range not connected to electrical power. Have electrician connect range to properly wired electrical connection. Power to range is off. Turn power on at junction box. Check for tripped circuit breaker or blown fuse. Power outage.
Warranty and Service Product Maintenance What Is Covered Do not perform any maintenance other than that instructed in the Cleaning and Maintenance section of this manual. A qualified service technician should perform all other service. CERTIFICATE OF WARRANTIES: DACOR RANGES Getting Help FULL ONE-YEAR WARRANTY Before you obtain service, please review the Before You Call for Service section of this manual starting on page 30.
fold here NO POSTAGE NECESSARY IF MAILED IN THE UNITED STATES BUSINESS REPLY MAIL FIRST-CLASS MAIL PERMIT NO. 4507 DIAMOND BAR CA POSTAGE WILL BE PAID BY ADDRESSEE DACOR INC.
Please visit www.Dacor.com to activate your warranty online. WARRANTY INFORMATION IMPORTANT: Please rest assured that under no conditions will Dacor sell your name or any of the information on this form for mailing list purposes.