Installation Instructions Heritage ® Series Gas Cook top Models HCT305G, HCT365G Part No. 113554 Rev.
Table of Contents Important Safety Instructions.......................................................... 1 Important Information....................................................................... 1 General Safety Precautions...............................................................2 Electrical Requirements....................................................................3 Gas-Supply Requirements.................................................................3 Installation Specifications........
Important Safety Instructions Important Information • The Important Safety Instructions and warnings in this manual cannot cover all possible conditions. Use common sense and caution when installing/maintaining/operating the cooktop. • Always contact Dacor Customer Assurance (see info, previous page) about issues you cannot resolve. Safety Symbols, Labels, and Alerts These inform you of the risk of death or serious injury. DANGER Immediate hazard that WILL severely injure or kill.
Important Safety Instructions General Safety Precautions To promote household safety when using the cooktop, follow basic safety precautions, including these precautions: WARNING • • • • Read the cooktop use and care manual completely before operating this appliance. Keep packaging materials away from children. (Plastic sheets/bags are suffocation hazards.) If you receive a damaged product, immediately contact your dealer/builder. Do not install/use a damaged appliance.
Important Safety Instructions Electrical Requirements WARNING To avoid an electric shock hazard, the power supply must meet the specifications below. The owner shall ensure the electrical service meets the requirements in this section and the outlet is installed by a licensed electrician. • A 42” power cord with a 3-prong, grounding plug is attached to the chassis’ bottom in the right-rear corner.
Installation Specifications Product Dimensions All tolerances: ±1/16” (±1.6 mm) unless otherwise noted. HCT305G and HCT365G W x H x D Dimensions WARNING Observe applicable codes and ordinances during planning/ installation. Contact your local building authority for details. HCT305G/-365G Utility Locations Cooktop/Chassis Overhang Dimensions HCT305G/-365G Utility Dimensions 4 Model A (width) B (width) HCT305G 30” (76.2 cm) 27 5/16” (69.4 cm) HCT365G 36” (91.4 cm) 33 5/16” (84.
Installation Specifications Cabinet and Countertop Layout WARNING • To reduce risk of burn injury from reaching over a hot appliance, do not hang cabinets above the cooktop. • Failure to meet or exceed the max/min dimensions and clearances in this manual may cause a fire hazard. • Follow the countertop manufacturer’s instructions regarding minimum corner radius, use of heat-reflective tape, corner reinforcement, etc. • Carefully check the cooktop location site.
Installation Specifications Cutout Dimensions All tolerances: ±1/16” (±1.6 mm) unless otherwise noted. Rear wall Vertical combustible surface 4 1/4” (10.8 cm) min. from mounting surface to combustibles below cooktop chassis C F E D F Minimum distance to combustible side wall above countertop (both sides) 1 5/8” min. (4.1 cm) Configuration HCT305G (no downdraft) HCT305G (ERV3015 downdraft) HCT365G (no downdraft) HCT365G (ERV3615 downdraft) (C) Minimum (D) 3 1/4” (8.3 cm) 19 5/8” (49.9 cm) 3/8” (1.
Installation Instructions Verifying Package Contents • • • • • Connecting the Gas Line Hold-down brackets (2) Grates (3) Burner sets (5) Gas-pressure regulator (1) Stainless-steel cleaner (1; stainless-steel models only) If parts are missing, contact Dacor Customer Assurance. (See If You Need Help…, inside cover.) Installing the Cooktop WARNING • • • • • • • WARNING • • Before proceeding, verify that the power supply meets the specifications on Page 3.
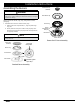
Installation Instructions Assembling the Burners Inner burner cap (bottom) WARNING • Never operate the cooktop with burner parts removed. • All burner air-mixture settings are done at the factory; do not try to adjust these settings.. Remove the burner heads, rings, caps, and grates from their packaging. 1. Assemble the burners as shown on this page: a. Gather same-size components (i.e., large cap with large ring, etc). b. Center, and turn each piece until it seats properly.
Installation Instructions Placing the Grates When a grate is correctly installed, the tips of the four longest fingers center over the corresponding burner. ♦♦ Use the grate notches to place and orient the grates. –– The notches beneath the grates fit the cooktop rear. –– The notches on the grate sides fit the cooktop sides. –– Gently set the grate legs in their corresponding dimples in the cooktop.
Installation Instructions Verifying Proper Function Perform this procedure for all cooktop burners. WARNING NOTE SimmerSear burner: Turn the control knob to the simmer setting, and ensure the low-level flame can be adjusted and the burner indicator illuminates. TM The cooktop must always be properly grounded when electrical power is applied. 1. Turn off power to the electrical outlet at the circuit breaker or fuse box. 2. Close the gas-supply valve. 3. Turn off all cooktop burner controls. 4.
Installation Instructions Installer Checklist IMPORTANT Though the installer should complete this checklist to ensure proper installation/function, the homeowner is ultimately responsible for the cooktop’s proper installation. □□Was the gas-supply inlet pressure verified to be within the maximums specified in this manual? (Pg. 3.) □□Is the cooktop secured with the provided hold-down brackets? (Pg. 8.
Notes
Notes
Dacor ● 14425 Clark Avenue, City of Industry, CA 91745 ● Phone: (800) 793-0093 ● Fax: (626) 403-3130 ● www.dacor.