
Installation guide


9
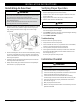
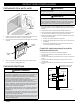
Reinstalling An Oven Door
WARNING
To avoid personal injury and property damage:
• Ensure the notch on the bottom of each hinge rests atop the lower
lip of each hinge receptacle before opening the door.
• Rotate the hinge locks toward the front of the oven immediately
after installing the door.
• (Double ovens) Install the top door first to reduce the chance of
damaging the lower door during installation.
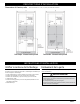
1. Grasp the oven door on opposite sides and, holding it at 15° to
the front of the oven, slide the hinges into the hinge open-
ings, resting the bottom of the hinge arms on the hinge
receptacles.
2. Continue holding the door at 15° with one hand while pushing
in on each of the bottom corners of the door. Push until the
notch on the bottom of each hinge slips over the lower lip of
each hinge receptacle.
3. Lower the door to the fully opened position, then rotate the
two hinge locks toward the oven.
4. Slowly and carefully open and close the door completely to
ensure that it is properly installed.
Verifying Proper Operation
1. (Stainless-steel ovens) Peel off the protective plastic.
2. Remove packaging from inside the oven(s).
3. Slide the oven racks onto the supports inside the oven. (See
the User Manual.)
4. Apply power to the oven at the circuit breaker/fuse box.
5. Set the clock. (See the User Manual.)
NOTE
(Double ovens) Be sure to test both ovens.
6. On the control panel, press BAKE. (The default bake tempera-
ture should appear on the display.)
7. Press START. (In about 3 minutes, heat should begin radiating
from the floor of the oven chamber.)
8. Press CANCEL/SECURE.
Troubleshooting
If the oven does not operate properly:
1. Verify that the oven receives power.
2. If the oven will not come on, cut power at the circuit breaker/
fuse box, and check the electrical connections.
3. Turn on power, and repeat the verification test.
4. If the appliance still does not work, contact Dacor Customer
Assurance: 833-353-5483; have the model and serial num-
bers ready. (See pg. 2.)
Do not try to repair the oven yourself.
Installation Checklist
WARNING
The installer shall complete this checklist to ensure the installation is
thorough and proper.
F Is the oven mounted on a level platform? (Pg. 5)
F Is the oven wired and grounded as instructed in this manual
and per applicable electrical codes? (Pgs. 3, 7)
F Is the oven secured in the cabinet with all 4 mounting
screws (single ovens) and 6 screws (double ovens)? (Pg. 10)
F Is/are the oven door(s) properly installed as instructed in
this manual? (Pg. 11)
F Was proper operation verified?
F Was the warranty activated online or the warranty card com-
pleted and mailed?
INSTALLATION INSTRUCTIONS