Technical Diagnostic Quick Reference Guide Technical Assistance Line 800-353-2267
V11 Dacor Contact Information: Dacor Customer Service: 800-793-0093 X 2813 customersatisfaction@dacor.com Dacor Distinctive Service: 800-793-0093 X 2822 dds@dacor.com Dacor Technical Assistance: 800-353-2267 X 2 service@dacor.com Dacor Warranty Administration Department: 800-793-0093 X 4806 warranty@dacor.com Install Spec’s, Use & Care, Planning Guide: www.dacor.com Parts and Service Information: www.dacorservice.
Technical Diagnostic Quick Reference Index Dacor Contact information - Page: 2 Index - Page: 3 & 4 Serial Number Format – Page: 5 Oven Temperature Calibration Instructions - Pages: 6 & 7 All Models where Available Classic Wall Oven & Range Quick ERC Test - Page: 8 Wall Oven Models: CPS/CPD, CPTS/CPTD, ECPS/ECPD, ECS/ECD, PCS/PCD, MCS/MCD Single & Double Ovens, 27, 30 & 36 inches wide.
Technical Diagnostic Quick Reference Index Continued… Distinctive Wall Oven & Range Diagnostic Mode - Page: 16 Wall Oven Models: DO130, DO230 Range Models: DR30D, DR30DI, DR30EF, DR30EIF, DR30E & DR30EI Distinctive Wall Oven & Range Fault Codes – Page: 17 Wall Oven Models: DO130, DO230 Range Models: DR30D, DR30DI, DR30EF, DR30EIF, DR30E & DR30EI Classic Dishwasher Factory Test Mode – Page: 20 Dishwasher Models: ID24, ED24SCH, ED24SCP, ED24SBK, ED24SBR, PD24(all colors), MDV24S & MDH24S, ID30, ED30SCH, ED30S
Dacor Serial Number Format: **Prior to the 38th week of 2002 the serial number format was: FC2371234 In 2002 Dacor changed the serial number format slightly to accommodate additional product line growth by adding two (2) characters each for product code and revision and two (2) digits for the year of manufacture.
Oven Temperature Calibration Instructions: Classic Wall Oven & Range Temperature Calibration Procedure Wall Oven Models: CPS/CPD, CPTS/CPTD, ECPS/ECPD, ECS/ECD, PCS/PCD, MCS/MCD Single & Double Ovens, 27, 30 & 36 inches wide. Range Models: ERSD30/36/48, PGR30, RSE30, RSG30, RSD30, ERD30/36/48/60, ERDE36/48, MRE30, MRES30, EGR30 & ERG30/36 Classic Products – All models WITH Bake Keypad: Select a Bake Cycle, Increase Temperature to 500˚F. Quickly press and Hold Bake Keypad until display changes.
Oven Temperature Calibration Instructions Continued: Discovery Dual Fuel Range Temperature Calibration Procedure Range Models: ER30D, ER30DSR, ER36D & ER48D Press and HOLD Bake Keypad for 10 seconds or until the display changes. Using the Number Keypad, enter the new Calibration Offset. Use the Self Clean Keypad to select “+” or “-” up to +/-35˚F. Press Cancel to lock in new setting. Factory setting is “00”.
Dacor Classic Wall Oven and Range ERC Quick Test Wall Oven Models: CPS/CPD, CPTS/CPTD, ECS/ECD, PCS/PCD, MCS/MCD Single & Double Ovens, 27” & 30” Range Models: PGR30, RSE30, RSG30, RSD30, ERD30-60, ERDE36-48 MRE, MRES30, EGR30, ERG30-36 To access the ERC Quick Test Program: Turn circuit breaker off or disconnect power to unit, count to five and then turn power back on. Make sure time of day is blinking. Push and hold COOK TIME. Within 5-10 seconds the EEPROM number will display.
Dacor Classic Wall Oven and Range Fault Codes Wall Oven Models: CPS/CPD, CPTS/CPTD, ECS/ECD, PCS/PCD, MCS/MCD Single & Double Ovens, 27” & 30” Range Models: PGR30, RSE30, RSG30, RSD30, ERD30-60, ERDE36-48 MRE, MRES30, EGR30, ERG30-36 -F0- Shorted Or Jammed Input Device This failure will appear if a shorted or jammed input device is defective. Possible causes include shorted wires or a defective membrane switch.
Dacor Discovery Oven Diagnostic Mode: Models: EO, PO, MOV, MOH, SINGLES AND DOUBLES, 27” AND 30” To Enter Diagnostic Mode: With the main power supply to the oven turned on, press and hold the CANCEL/SECURE and # keys at the same time. When the diagnostic password screen appears, release the CANCEL/SECURE key first then the # key. Page 8-1 Enter your Dacor Authorized Servicer Number: Press the 7 key on the keypad repeatedly until the letter S appears just below the words SERVICE ID NUMBER. Wait 3 seconds.
Dacor Discovery Oven Fault Codes: Models: EO, PO, MOV, MOH, SINGLES AND DOUBLES, 27” AND 30” Error Code: U20 OVER TEMP (UPPER/SINGLE) L20 OVER TEMP (LOWER) U21 OVER TEMP (UPPER/SINGLE) L21 OVER TEMP (LOWER) U22 OVER TEMP (UPPER/SINGLE) L22 OVER TEMP (LOWER) U23 OVER TEMP (UPPER/SINGLE) L23 OVER TEMP (LOWER) U24 OVER TEMP (UPPER/SINGLE) L24 OVER TEMP (LOWER) U25 OVER TEMP (UPPER/SINGLE) L25 OVER TEMP (LOWER) U30 TEMP SENSOR (UPPER/SINGLE) L30 TEMP SENSOR (LOWER) U31 TEMP SENSOR (UPPER/SINGLE) L31 TEMP SENSOR
Dacor Discovery Range Quick Set Guide Range Models: ER30D, ER30DSR, ER36D & ER48D Control Panel Position: The Control panel can be swiveled to a 50° angle for easier viewing and use. To pivot control panel: 1. Push in on the bottom of the control panel where it says “PRESS HERE”. The control panel will pivot up. 2. Pull the bottom of the control panel housing (under “PRESS HERE”) until it locks in place. To put the control panel back in vertical position: 1.
Dacor Discovery Range Fault Code Troubleshooting Guide Models: ER30D, ER30DSR, ER36D and ER48D General Error Codes The following codes give a general indication of the location of problems detected by the control panel controller board. They are usually followed by another, more specific error code (see below).
Dacor Discovery Duel-Fuel Range ERC Diagnostic Test Models: ER30D, ER30DSR, ER36D, ER48D and ER60D To access the ERC Diagnostic Test: Turn circuit breaker off or disconnect power to unit, count to five and then turn power back on. Within the first 30 seconds after power up, press and hold the BAKE and BROIL keys for 6 to 10 seconds. Test 1: Latch Motor right/large oven – LOCK/UNLOCK Press the CLEAN key. Verify that the Latch Motor is moving and that the lock icon is flashing.
Test 16: Convection Fan right/large oven side Press the right/large oven side PURE CONV. Key and verify that the CONV. And ON icons are lit. Verify that the Convection Fan turns on. Test 17: Bake Element left/small oven side (for 48” range otherwise skip step) Press the left/small oven side BAKE key and verify that the BAKE and ON icons are lit. Verify that the Bake Element begins to heat (glow red) and that between 10 and 14 amps are being drawn.
Dacor Renaissance & Distinctive Oven/Range Quick ERC/Diagnostic Test Wall Oven Models: EORS127, MORS127, EORD227, MORD227, EORS227, MORS227S, EORS130, MORS130, EORD230, MORD230, EORS230, MORS230, RO130, ROV130, RO230, ROV230, DO130 & DO230 Range Models: RR30N, RR30NI, RR30NF, RR30NIF, DR30D, DR30DI, DR30EF, DR30EIF, DR30E & DR30EI To enter Quick ERC/Diagnostic Test Mode: Disconnect power to unit, wait five seconds, turn power back on.
DACOR RENAISSANCE & DISTINCTIVE OVEN/RANGE ERROR CODES Wall Models: EORS127, MORS127, EORD227, MORD227, EORS227, MORS227S, EORS130, MORS130, EORD230, MORD230, EORS230, MORS230, RO130, ROV130, RO230, ROV230, DO130 & DO230 Range Models: RR30N, RR30NI, RR30NF, RR30NIF, DR30D. DR30DI & DR30E Error Code Error Condition Software Logic Description Control Errors C01 Shorted Key Failure Release of Key not seen in 2 mionutes.
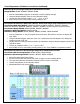
Renaissance Induction Range - Induction Generator Technical Features Renaissance Induction Range Models: RR30NS, RR30NIS, RR30NFS & RR30NIFS Induction Generators: Each Induction Generator Assembly consists of two burners (front and rear) and each operates as a separate circuit. Left and Right side Generator Assembly, Touch Control, Ribbon Cable and Wiring are separate but identical which will assist in your diagnostic procedure. So, essentially there is two of everything.
Renaissance Induction Range – Cooktop Error Codes Models: RR30NS, RR30NIS, RR30NFS & RR30NIFS Error Codes will not be displayed to the user, but will be stored for later retrieval by a Technician. The Induction Generator may continue to operate through some very brief error conditions, or the generator will shut down when the error condition persists. When the Error Codes are called up, the 7-segment, Power Level LED will alternately display “F” and a numeric error indicator at ½ second intervals.
Dishwasher Factory Test Mode 24” Models: ID24, ED24SCH, ED24SCP, ED24SBK, ED24SBR, PD24 (all colors), MDV24S & MDH24S 30” Models: ID30, ED30SCH, ED30SCP, ED30SBK & ED30SBR Factory Test Mode: The Factory Test Mode, or FTM, is run on each unit during final QC to ensure that all of the components are operating normally. The FTM runs the unit through an abbreviated wash cycle and checks various sensors for response and is a valuable diagnostic tool.
Dishwasher Fault Codes: 24” Models: ID24, ED24SCH, ED24SCP, ED24SBK, ED24SBR, PD24 (all colors), MDV24S & MDH24S Fault F-1 Effect Three long beeps. F1 will be displayed only during the Diagnostic mode. Solution Press Cancel key twice to reset this fault. Replace Pressure Switch. F2 Cause Pressure Switch is in the closed position after two full drain procedures. Inlet Valve does not close. Three long beeps. F2 will be displayed to the user and in Diagnostic mode. Drain pump is ON until open door.
Dishwasher Diagnostic Quick Reference Sheet. Distinctive Model: DDWF24S To activate the service menu 1. Turn off the main power switch (I/0) 2. Wait at least 5 seconds 3. Press and hold the Program and Start buttons (S1 & S2) 4. Switch on the main power switch (I/0) 5. Release the Program and Start buttons (S1 & S2) L7 flashes Press S1 to activate the component test. These are activated in order after each button press: 1.
Dishwasher Control Programming and Fault Code Reference Sheet Control Programming DDWF24S When the power is switched on for the first time after replacing the control unit, the Variant settings menu is displayed. L4 flashes (Control with one option: Temp) 1. Press the Program button (S1) until Variant 2 (L4 flashes). 2. Confirm your selection by pressing Start (S2). (The program automatically returns to the main menu.
Dacor 36” Freestanding Refrigerator Programming and Diagnostics: Models: EF36BNDFSS, IF36BNDFSF, EF36LNDFSF, EF36RNDFSS, IF36INDFSF, EF36BNFSS, EF36LNFSS, EF36RNFSS, & EF36BNNFSS and PF36BNDF (all colors: AG, BK, BU, GN, SG and TS). Programming Mode: Note: The Programming Code is located on the Serial Plate. 1. Press and Hold the “Door Alarm” Keypad. 2. Press and hold the Freezer Temperature Down Keypad. 3. Release the “Door Alarm” Keypad and wait 3 seconds. 4.
Service Test 121 – Open Damper Test Press the Refrigerator Up Keypad and Down Keypad to toggle Damper (OP) open and (CL) Closed. Note: If Damper is opening or closing it will not allow you to toggle damper and will beep. Display will show –CL or –OP if Damper is in the process of closing or opening. Service Test 131 – Mullion Heater 3 Door Models Press the Refrigerator Up Keypad and Down Keypad to toggle Mullion Heater On or Off.
Dacor 36” Water/Ice Dispenser Freestanding Refrigerator - Programming and Diagnostics: Model: EF36IWFSS Control Panel Touch Pads Programming Mode: NOTE: The Program Code is located on the Serial Plate after the word Code. 1. Press and hold the WATER Keypad. 2. Press and hold LL Keypad. 3. Release the WATER Keypad and wait 3 seconds. 4. The control will display PE to indicate the programming mode. 5. Entry is confirmed by pressing the LL Keypad once more. 6.
Service Test - 151 Fresh Food Door State • Will show state of Fresh Food Door. OP (open) CL (closed). NOTE: By pushing either fresh food door switches you can toggle from OP to CL. Service Test - 152 Freezer Food Door State • Will show state of Freezer Door. OP (open) CL (closed). NOTE: By pushing freezer door switch you can toggle from OP (open) to CL (closed). Service Test - 153 Disable Internal Lights • Press the UR keypad or LR keypad to toggle Enable En and Disable dIS internal lights.
Dacor 42” and 48” Built-in Refrigerator Diagnostics (First Generation - Classic): Models: EF42BDCBSS, EF42BNDBSS, IF42BNDBOL, IF42BDCBOL, EF48BDCBSS, EF48BNDBSS, IF48BNDBOL, IF48BDCBOL Service Test Mode There are several test modes available through the diagnostic system. Use of these test modes can greatly decrease the time needed for troubleshooting. It is to the service technician’s advantage to be able to perform many tests in a very short period of time.
Continued… Dacor 42” and 48” Built-in Refrigerator Diagnostics (First Generation - Classic): Models: EF42BDCBSS, EF42BNDBSS, IF42BNDBOL, IF42BDCBOL, EF48BDCBSS, EF48BNDBSS, IF48BNDBOL, IF48BDCBOL Thermistor Tests: This test will give a “GO – NO GO” test of all thermistors. Pressing the Power Interrupt Button will report the condition of the thermistor. Note: The condition displays that follow apply to the tests for all thermistors.
Continued… Dacor 42” and 48” Built-in Refrigerator Diagnostics (First Generation - Classic): Models: EF42BDCBSS, EF42BNDBSS, IF42BNDBOL, IF42BDCBOL, EF48BDCBSS, EF48BNDBSS, IF48BNDBOL, IF48BDCBOL Service Test 17 – Compressor Minimum Speed The compressor should have been off for at least five minutes prior to this test. If the off time is not five minutes, the short cycle protection within the compressor controller will prevent operation until enough time has elapsed.
Continued… Dacor 42” and 48” Built-in Refrigerator Diagnostics (First Generation - Classic): Models: EF42BDCBSS, EF42BNDBSS, IF42BNDBOL, IF42BDCBOL, EF48BDCBSS, EF48BNDBSS, IF48BNDBOL, IF48BDCBOL Service Test 28 – Actuator Switch This test displays the current state of the dispenser actuator (paddle switch) as read by the Main Control board. Pressing the Power Interrupt Button will display the current state of the switch.
Dacor 36”, 42” and 48” Built-in Refrigerator Diagnostics (Second Generation): Models: EF36LNBSS / EF36RNBSS / IF36LNBOL / IF36RNBOL / EF42NBSS / EF42DBSS / IF42NBOL / IF42DBOL / EF48NBSS / EF48DBSS / IF48NBOL / IF48DBOL Diagnostic Test Mode There are several test modes available through the diagnostic system. Use of these test modes can greatly decrease the time needed for troubleshooting. It is to the service technician’s advantage to be able to perform many tests in a very short period of time.
Continued… Dacor 36”, 42” and 48” Built-in Refrigerator Diagnostics (Second Generation): Models: EF36LNBSS / EF36RNBSS / IF36LNBOL / IF36RNBOL / EF42NBSS / EF42DBSS / IF42NBOL / IF42DBOL / EF48NBSS / EF48DBSS / IF48NBOL / IF48DBOL Service Diagnostic Mode Chart Water Filter Input (WFI) Test To confirm that the water valves are being monitored by the WFI control, follow the procedures listed: Testing the Dispenser Valve Input 1. Open the refrigerator door. 2. Depress the refrigerator light switch. 3.
Dacor WineStation Screen Functions Model: DYWS4 The WineStation is designed to provide a wide range of operating functions. Below you will find an in depth review of each LCD Screen and its function: 4 Position 1. Unlocking your WineStation Switch Board a. Open the front door. b. Lift the spout cover. c. Underneath the spout cover you will find a switch board. Move the switch down one notch to access the service menu. d. Select “Bottle Service.” e. Select “Exit.” f.
Dacor WineStation Screen Functions Continued… Model: DYWS4 3. Setting Pour Volumes. a. Next you will select “Set VOL”. b. Volume sizes will appear on the Volume Size selection screen. Using the buttons on the right, you can set the desired pour volume in ½ ounce increments, as shown right: 4. Setting the Temperature a. To set the desired temperature, select “WineStation Service” from the default menu screen and then select “More.” b. Next, select “Set Temp”. c.
Dacor Coffee System Programming: Models: CM24T and CM24P Accessing the Main Programming Menu: Remove the drip tray. Unlock the front panel door. When the door is open, the buttons on the front of the unit will not make drinks when pushed. “Machine Off - Front Panel Open” should appear on the display. If it does not, find the white button on the back of the front panel door. Push and release the white button. Check to make sure “Machine Off - Front Panel Open” appears on the display.
Turning Pre-brew On and Off: 1. With the main programming menu accessed, push the UP or DOWN button repeatedly until “Pre-brew” appears on the display. 2. Push the MENU button. 3. Repeatedly push the MENU button to see the pre-brew status for each drink. Stop on the drink for which you want to turn pre-brew on or off. 4. Push the UP or DOWN buttons to select “Yes” or “No”. 5. Push the SET button to make the change. 6.