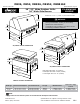
OB36, OB52, OBS36, OBS52, OBSB162 Document # PG13-001 Revised 04/07/09 Page 1/3 PLANNING GUIDE 36”, 52” Wide Outdoor Grills 16” Wide Side Burner All tolerances: +1/16”, -0, (+1.6mm, -0) unless otherwise stated 25 1/8" (638mm) 9 1/8" (232mm) warning ◊ Observe all governing codes and ordinances during planning and installation. Contact your local building department for further information. ◊ This appliance must be installed in accordance with the accompanying installation instructions.
OB36, OB52, OBS36, OBS52, OBSB162 Document # PG13-001 Revised 04/07/09 Page 2/3 PLANNING GUIDE 36”, 52” Wide Outdoor Grills 16” Wide Side Burner OBSB162 16 1/8" (410mm) OB(S)36 - 36 1/2" (927mm) OB(S)52 - 52 1/2" (1334mm) 9" (228mm) Max. 3/4" (19mm) Min.
OB36, OB52, OBS36, OBS52, OBSB162 Document # PG13-001 Revised 04/07/09 Page 3/3 36”, 52” Wide Outdoor Grills 16” Wide Side Burner PLANNING GUIDE All tolerances: +1/16”, -0, (+1.6mm, -0) unless otherwise stated 10" (254mm) Min. to combustibles 1 1/4" (32mm) Min. to non-combustible 1 1/4" (32mm) 28 1/2" (724mm) To finished countertop Junction Box 1/4" Rotisserie mounting bracket (factory installed) (6mm) 3/4" (19mm) min.
Installation Instructions Epicure Outdoor Grill ® Models: OB36, OBS36, OB52, OBS52 and OBSB162 Tested in accordance with the latest edition of ANSI Z21.58 2006 ● cSa 1.6-2006 Standard for outdoor cooking gas appliances. IN CANADA: INSTALLATIONS MUST BE IN ACCORDANCE WITH THE CURRENT CAN/CG A-B149.1. NATURAL GAS INSTALLATION CODE CAN/CG A-B149.2. PROPANE INSTALLATION CODE AND/OR LOCAL CODE. Part No. 102032 Rev.
Table of Contents Before You Begin............................................................... 1 Important Safety Instructions........................................... 1 Important Information About Safety Instructions............... 1 General Safety Precautions.............................................. 2 Planning the Installation.................................................... 4 Product Dimensions.......................................................... 4 Location Planning - General...........
Important Safety Instructions Important Information About Safety Instructions • • The Important Safety Instructions and warnings in these instructions are not meant to cover all possible problems and conditions that can occur. Use common sense and caution when installing, maintaining or operating this or any other appliance. DANGER If you smell gas: 1. Shut off gas to the appliance. 2. Extinguish any open flame. 3. Open lid. 4.
Important Safety Instructions General Safety Precautions To reduce the risk of fire, electric shock, serious injury or death when using your appliance, follow basic safety precautions, including the following: warning warning • Read the use and care manual completely before using this appliance. • To avoid the possibility of fire, do not leave the appliance unattended when in use. • Use this appliance only for its intended use as described in the use and care manual. Use it only to cook food.
Important Safety Instructions warning • Do not leave children alone or unattended in the area around the appliance. Do not allow children to operate it, play with the controls, pull on the handle or touch other parts. • Do not store items of interest to children on top of or above the appliance. Children could be burned or injured while climbing on it. • Keep the ventilation openings for the LP cylinder free and clear from debris. • Non-stick coatings, when heated, can be harmful to birds.
Planning the Installation Product Dimensions 25 1/8" (638mm) 9 1/8" (232mm) 23 3/4" (603mm) 36" (914mm) 26 1/2" (673mm) 27” * (686mm) OB36 and OBS36 25 1/8" (638mm) 9 1/8" (232mm) 23 3/4" (603mm) 26 1/2" (673mm) 27" * (686mm) 52" (1321mm) OB52 and OBS52 * Total depth from back to front of handles is 30” (762mm) 4
Planning the Installation 9 1/8" *** (232mm) 23 3/4" (603mm) 26 1/2" (673mm) 27" ** (686mm) 16" (406mm) OBSB162 ** Total depth from back to front of knobs is 28 5/8” (727mm) *** Total height with cover is 12” (305mm) Cut-out for outdoor grill Overall height Overall width Door depth: 1/4” 6mm) Model Number Overall Width Overall Height OBAD20 (Single door) 19 1/2” (495mm) 21” (533mm) OBAD36 (Dual door) 35 7/8” (911mm) 21” (533mm) OBAD SERIES ACCESSORY DOORS (OBAD36 SHOWN) 5
Planning the Installation warning • • • This installation must conform to local codes or, in the absence of local codes, with either the National Fuel Gas Code, ANSI Z223.1/NFPA 54, Natural Gas and Propane Installation Code, CSA B149.1, or Propane Storage and Handling Code, B149.2. Gas and Electric Power Requirements • Prior to installation, the gas supply for natural gas or whole house LP installations must meet the specifications below.
Planning the Installation Location Planning - Enclosed Cabinets • Maintain all minimum clearances specified on pages 7 and 8. • For proper outdoor grill operation, provide a flat, level mounting surface with minimum 3/4” thickness. • All models are designed to allow installation in combustible or non-combustible base material structures.
Planning the Installation Location Planning - Enclosed Cabinets (continued) 6" x 6" (152mm x 152mm) utility cutout for OBSB162 6" x 7" (152mm x 178mm) utility cutout 12 1/4" (311mm) Coutertop 25" (635mm) 24" (610mm) 3/8" (10mm)ø Both sides OB(S)36 - 33 1/2" (851mm) OB(S)52 - 49 1/2" (1257mm) 8" (203mm) Min.
Planning the Installation Location Planning - Cart Installations • Maintain all minimum clearances shown between the appliance and all surfaces behind and to the side of the appliance. • Allow 26 inches minimum in front to open and close the cabinet drawers. Above surface, both bothsides: sides: Above the the cooking cooking surface, 111/4” non-combustibles 1/4”(32mm) (32mm) Min. Min. to non-combustibles 10” to combustibles combustibles 10”(254mm) (254mm) Min.
Installation Instructions warning • • • • Before installing the appliance, make sure the electrical and gas (on tank-less installations) service meets the requirements specified in the Planning the Installation section of this manual. This appliance must be installed by a licensed plumber or gas fitter when installed within the Commonwealth of Massachusetts. Excessive weight warning: Since the appliance and grill cart are heavy, install the appliance with the help of at least one other person.
Installation Instructions D D D LP cylinder regulator OBS162, OB36 and OBS36 (PN 72310) LP cylinder regulator OB52 and OBS52 (PN 101578) Whole house natural gas or LP regulator* E F G H J L N M K P R * A whole house gas regulator comes standard with natural gas models. For whole house LP installations, replace the standard LP tank regulator and hose that come with LP models with a whole house LP regulator (Dacor PN 700597LP). The whole house LP regulator must be ordered separately.
Installation Instructions Cabinet Installation Cart Installation warning warning To avoid an explosion hazard, do not connect the cart or appliance(s) to electrical power until after the gas supply system has been checked for leaks. important To prevent damage to the gas regulator, install the regulator only after the appliance is mounted in its permanent position in the enclosure. • With at least one person on each side of the unit, lift it up and lower it into the cabinet cutout.
Installation Instructions Optional Side Shelf Installation 1. Install the front mounting bracket for the right side shelf. Use two (2) of the provided button head fasteners and two (2) lock washers. Tighten into place using a 5/32” Allen wrench. 2. Slide the slot on the inside of the shelf over the pin on the mounting bracket. Pin 3. While holding the shelf in place, insert the pin on the back mounting bracket into the slot on the back side of the shelf. 4.
Installation Instructions Connecting the Gas 3. Install an approved flexible gas line from the regulator to the gas shut-off valve. Gas Connection - Natural Gas note • Units equipped for use with natural gas ship with a regulator assembly with 3/4” pipe attached and an additional 3/4” nipple. • The regulator assembly is also equipped with a 3/4” to 1/2” reducer on the inlet side. Whole House LP Gas Connection 1.
Installation Instructions Final Assembly and Test Assemble the Side Burner - Some Models Assemble the Grill 1. Open the canopy on the unit. 2. Insert the drip tray completely into the slot on the front of the unit. 3. Put the flame spreaders on the floor of the appliance, inside the canopy. The large holes go toward the front of the unit. The holes are used to light the burners in case of power failure. Push the spreaders as far to the right as possible, leaving an opening on the left for the smoker box.
Installation Instructions Final Assembly and Test (cont.) 1. For units that will use a LP cylinder, start by making sure the tank shut-off valve is completely closed. LP Cylinder Installation - Some Models 2. Place the tank into the final position within the cabinet or cart. warning • The largest recommended LP cylinder size for the rollout tank shelf on the cart is five gallons.
Installation Instructions 2. With the tank shelf open, connect the power cord from the outdoor grill and the warming oven (if equipped with one) to the electrical outlet on the back panel inside the cart. 3. Connect the rotisserie motor power cord to the electrical outlet on the back side of the cart. 6. If the second or third attempt to ignite the burner is not successful then turn all burner controls to the OFF position. 7.
Wiring Diagrams Wiring Diagram - OB(S)36 18
Wiring Diagram - OB(S)52 Wiring Diagrams 19
Notes 20
21
Dacor ● Phone: (800) 793-0093 ● FAX: (626) 403-3130 ● www.Dacor.
Epicure Outdoor Grill ® Use and Care Manual Models: OB36, OBS36, OB52, OBS52, OBSB162 Style varies. model OB52 shown. Ta b l e o f C o n t e n t s Important Safety Instructions................................. 1 Getting to Know Your Outdoor Grill.......................... 4 Setting Up Your Outdoor Grill.................................. 6 Operating Your Outdoor Grill................................... 8 Care and Cleaning................................................17 Parts and Accessories.............
© 2007 Dacor. all rights reserved.
Important Safety Instructions Installer: Leave these instructions with the appliance. danger Customer: Read this use and care manual completely before using this appliance. Save it for future reference. It contains important use and care information. Keep your sales receipt or canceled check in a safe place. Proof of original purchase date is required for warranty service. If you smell gas: For service and warranty information see page 24. 4.
Important Safety Instructions General Safety Precautions To reduce the risk of fire, electric shock, serious injury or death, follow basic safety precautions, including the following: warning warning • If the information in this manual is not followed exactly, a fire or explosion may result causing property damage, personal injury or death.
Important Safety Instructions warning warning • Make sure that all of the burner parts are dry before lighting a side burner. • Use this gas cooking appliance only outdoors. Do not use it inside a building, garage or any other enclosed area. • Do not allow food to sit for more than one hour before or after cooking. Eating spoiled food can result in food poisoning. • Use this outdoor grill and the rotisserie motor only for their intended use as described in this manual. Use them only to cook food.
Getting to Know Your Outdoor Grill Outdoor Grill Features O Rotisserie Motor Bracket: Holds the rotisserie motor in place during rotisserie cooking. A Illumina™ Burner Control Knobs: Use the knobs to light and adjust the heat level for the various burners. The matching knob illuminates when a burner is on. The trim rings B , located behind each knob, prevent liquids from getting into the outdoor grill’s internal parts.
Getting to Know Your Outdoor Grill H R L M T K P C Grill compartment A B Q G N E F I P H O R M D A B J L T Models OB36 and OBS36 Grill compartment K C G N E U F I O D V A B J Models OB52 and OBS52 Locking wheels Grill Cart: Model OBC36 Shown Not Shown: Cart Models OBC52 and OBCW52 5
Setting Up Your Outdoor Grill Electrical Requirements Assembling the Cooktop warning Grill Compartment Assembly • Connect the power cords for this outdoor cooking gas appliance only to an electrically grounded outlet that meets local codes for outdoor appliances. In the absence of local codes, the electrical outlet must meet National Electric Code, ANSI/NFPA 70 or Canadian Electrical Code Standards for outdoor appliances.
Setting Up Your Outdoor Grill Side burner assembly OB52, OBS52 and OBSB162 only Side burner cap Side burner cover Side burner head Side burner base Side burner grate Grill compartment grates Flame spreaders Drip tray Outdoor Grill Assembly - Model OBS52 shown 7 Warming rack
Operating Your Outdoor Grill LP Tank Connection Instructions for LP tank connection and use for outdoor grills equipped for use with a portable LP tank. warning • Dacor outdoor grills are factory equipped for use with either LP or natural gas. DO NOT ATTEMPT FIELD CONVERSIONS FROM LP TO NATURAL GAS OR FROM NATURAL GAS TO LP. • Use only a U.S. DOT or CSA approved LP gas supply tank. The LP tank must include a collar to protect the tank valve.
Operating Your Outdoor Grill Tank-less Gas Supply Selecting and Using Cookware for the Optional Side Burner warning warning Dacor outdoor grills are factory equipped for use with either LP or natural gas. DO NOT ATTEMPT FIELD CONVERSIONS FROM LP TO NATURAL GAS OR FROM NATURAL GAS TO LP. • Use cookware only for its intended purpose. Check the manufacturer’s recommendations before use to determine if a utensil is suitable for use on a cooking appliance.
Operating Your Outdoor Grill Lighting and Preheating - Grill Compartment Lighting the Burners warning 1. Make sure the drip tray is in place. 2. Open the canopy to the fully open position. • Do not light the appliance if you smell gas. Call for service. 3. If using a LP tank, make sure all control knobs are in the OFF position, then turn the valve on the top of the tank counter-clockwise to the fully open position. • To avoid a fire or explosion hazard, light the burners only as instructed.
Operating Your Outdoor Grill Lighting the Side Burners (OB52, OBS52 and OBSB162 Only) Burner Lighting Notes Each side burner control knob has an icon next to it to tell you which burner it operates. 1. Push in on the knob and turn it counter-clockwise to the LIGHT/HIGH position. The knob will illuminate and the igniter for the burner will spark (click) repeatedly until it lights. The burner should light within five seconds. 2.
Operating Your Outdoor Grill Lighting the Burners (Continued) To manually light the optional sear burner: Manual Lighting Procedures - Grill Compartment 2. Make sure all control knobs are in the OFF position. 1. Make sure the drip tray is in place. 3. Make sure the grate above the sear burner is in place. 4. If using a LP tank, turn the valve on the top of the tank, counter-clockwise, to the fully open position. warning 5.
Operating Your Outdoor Grill 6. Slide both forks toward the center, skewering the meat. Tighten both forks using the attached thumb screws. Rotisserie Cooking warning 7. Attach the rotisserie motor to the side of the outdoor grill by slipping the edge of the bracket down into the slot on the right side of the frame. The canopy must be open. • To avoid an explosion or fire hazard, do not use the rotisserie burner during high wind conditions.
Operating Your Outdoor Grill Rotisserie Cooking (Cont.) Manual Lighting Procedure - Rotisserie 4. Make sure the motor power cord is routed away from all surfaces that become hot when any of the burners are lit. 2. Make sure all control knobs are in the OFF position. 1. Make sure the drip tray is in place. 3. If using a LP tank, turn the valve on the top of the tank, counter-clockwise, to the fully open position. 5. Turn on the motor and watch the meat rotate several times.
Operating Your Outdoor Grill 5. With the canopy closed, preheat the outdoor grill to a temperature of 225 to 300ºF. Make sure the burner under the smoker box is lit. Once the outdoor grill reaches the above temperature range, allow an additional 15 to 20 minutes for smoke to gather inside the grill compartment. Smoker Cooking Use the smoker box to add a smoked flavor to grilled foods. You can also use the smoker box with the rotisserie. Smoking is always performed with the canopy closed. 6.
Operating Your Outdoor Grill Using the Optional Sear Burner Safe Cooking Temperature Chart Models OBS36 and OBS52 Only Below is the USDA Minimum Safe Cooking Temperature for Various Foods.* Temperatures are obtained using a meat thermometer inserted into the food. The optional infrared (IR) sear burner is located on the right side of the grill compartment. It quickly sears meat to lock in flavor and juices.
Care and Cleaning Cleaning the Grill Compartment Cleaning Instructions • • Disconnect the power cord from the electrical outlet and close the gas shut-off valve before cleaning. To keep your outdoor grill looking and operating its best, clean it after every use. Spills that remain on the parts may be very difficult to clean, especially if allowed to burn on.
Care and Cleaning Cleaning the Porcelain Grates and Warming Rack Cleaning the Rotisserie Parts • 1. Clean the rotisserie rod and forks with a solution of hot dishwashing soap and the coarse side of a sponge. Rinse and dry with a soft, lint-free cloth. The standard grates and warming rack that come with the appliance are coated with a porcelain finish. For everyday cleaning, use a soft cloth or non-abrasive pad with warm soapy water to clean all of the porcelain parts.
Care and Cleaning Cleaning the Optional Side Burners Cleaning the Exterior Knobs and Trim Rings caution important • Do not soak the knobs in water or put them in a dishwasher. • Cover the side burners with the included stainless steel burner cover when they are not in use and cool. Doing so will protect them and help keep them clean. • Do not remove the trim rings from the appliance. Clean only the outside edges of the trim rings.
Care and Cleaning To replace a light bulb, follow these steps: Light Bulb Replacement 1. Disconnect the outdoor grill power cord from the electrical outlet. warning 2. Remove the lens from the housing by pulling straight out. In some cases the lens may be tight enough to require the use of the included lens pry stick. Use the lens pry stick with caution. Do not Lens Pry cause uneven stress on the lens. Stick Gently insert the pointed end of the pry stick under the edge of the lens.
Care and Cleaning Standard “U” Burner Removal and Replacement Testing/Resetting the Ground Fault Interrupter (GFI) The optional outdoor grill cart is equipped with a GFI to minimize the risk of injury due to an electric shock in the event of a short circuit. If your outdoor grill is connected to a GFI outlet that is not part of a Dacor grill cart, the following instructions still apply.
Parts and Accessories Description Dacor Part Number Dacor Stainless Steel Cleaner A302 Replacement halogen light bulb (12 Vac, 20 Watt) 100429 Lens pry stick 62974 Vinyl cover for built-in 36” outdoor grill OVBC36 Vinyl cover for built-in 52” outdoor grill OVBC52 Vinyl cover for 36” outdoor grill and cart OVCC36 Vinyl cover for 52” outdoor grill and cart OVCC52 Cutout trim kit for model OB36 and OBS36 OBGT36 Cutout trim kit for model OB52 and OBS52 OBGT52 20” Epicure access door assembly
Before You Call for Service Problem Solution Guide Problem Nothing works. Igniters do not spark (no clicking sound). Sparking, but no flame (burners make a clicking sound, but do not ignite). May be caused by What to do Outdoor grill not connected to electrical power. Connect power plug to electrical outlet . Power to electrical outlet is off. Check for tripped circuit breaker or blown fuse. Check also for tripped ground fault interrupter (see page 21). Power outage. Contact power company.
Warranty and Service Getting Help OUTSIDE THE FIFTY STATES OF THE U.S.A., THE DISTRICT OF COLUMBIA, AND CANADA: Before you request service, please review the Before You Call for Service section on page 23. If you have performed the checks in the Problem Solution Guide and the problem has not been remedied, please contact us at one of the numbers below. Prior to requesting service, it is helpful to be familiar with the warranty terms and conditions listed in the Warranty section below.
fold here NO POSTAGE NECESSARY IF MAILED IN THE UNITED STATES BUSINESS REPLY MAIL FIRST-CLASS MAIL PERMIT NO.
Please visit www.Dacor.com to activate your warranty online. WARRANTY INFORMATION IMPORTANT: Please rest assured that under no conditions will Dacor sell your name or any of the information on this form for mailing list purposes.