Use and Care Manual Distinctive Wall Oven For use with single and double wall oven models DO130 and DO230 Style varies - single model, DO130 shown Ta b l e o f C o n t e n t s Important Safety Instructions............................................1 Getting to Know Your Oven.............................................3 Operating Your Oven.....................................................8 Cooking Tips...............................................................21 Care and Cleaning..................
© 2010 Dacor, all rights reserved.
Important Safety Instructions Installer: Leave these instructions with the appliance. Important Information About Safety Instructions Customer: Read this use and care manual completely before using this appliance. Save it for future reference. It contains important use and care information. RETAIN your sales receipt or canceled check. Proof of original purchase date is required for warranty service.
Important Safety Instructions General Safety Precautions To reduce the risk of fire, electric shock, serious injury or death when using your oven, follow basic safety precautions, including the following: warning warning • If you receive a damaged product, immediately contact your dealer or builder. Do not install or use a damaged appliance. • Make sure that the oven has been properly installed and grounded by a qualified installer according to the accompanying installation instructions.
Getting to Know Your Oven Model Identification • The oven is available in single and double oven models. • Both models are equipped with Dacor’s Pure Convection cooking system (see page 13 for description). On double oven models, only the upper oven is equipped for convection cooking.
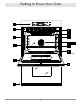
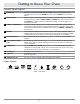
Getting to Know Your Oven Parts of the Oven A Control panel Your oven’s control panel consists of keys and a display. Use the control panel to control all the oven’s features (sometimes called modes). B Air intake/Exhaust slots The oven draws air in through the intake slots to cool its internal parts. The air comes out through the exhaust slot at the bottom of the oven. Do not block or cover the air intake or exhaust slots.
Getting to Know Your Oven A B G H C 6 D 5 4 E 3 J 2 K L M 1 N (below floor) F B B 5
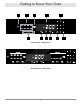
Getting to Know Your Oven Control Panel Layout A START key When you use the various features (or modes) on your oven, select the cooking mode first, then press the START key. Also, use the START key to start the timers. B Mode keypad Select the type of cooking you want to perform by pressing one of the cooking mode keys. Also includes the SELF CLEAN and PROBE keys and on double ovens, the PROOF key. Double ovens have two mode keypads, one for the upper oven and one for the lower.
Getting to Know Your Oven A B C F D G H E G Control Panel - Single Oven Control Panel - Double Oven 7 J K
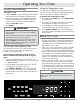
Operating Your Oven Setting the Temperature Scale Control Panel Settings You can select the temperature scale (Fahrenheit or Celsius) the oven uses to display the cooking temperature. The oven is preset at the factory to Fahrenheit. Setting the Time 1. Press the CLOCK key. The colon between the minutes and seconds on the time display will begin to flash. To change the temperature scale: 2. Enter the current time on the number keypad before the colon stops flashing.
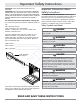
Operating Your Oven Inserting the Optional GlideRack™ Oven Rack Racks You may use either rack type on any level inside the oven. You can pull the GlideRack oven rack out further than standard oven racks and still support heavy pots and pans full of food. It is great for heavier foods and the optional Dacor baking stone. warning To reduce the chance of burns, position the oven racks when the oven is cool. If you must reposition a rack when the oven is hot, use pot holders. 1.
Operating Your Oven Turning Off Your Oven Starting Your Oven To turn the oven off, press the CANCEL · SECURE key. On double ovens, press the CANCEL · SECURE key under UPPER OVEN or LOWER OVEN. 1. Adjust the racks to the appropriate level. 2. Determine the best cooking mode for the type of food to be cooked. note Select from the following: After you turn off the oven, the cooling fans may continue to run until the oven’s internal parts have cooled down.
Operating Your Oven Lock-Out Feature 12 Hour Timer Feature If you want to disable the keys on the control panel when the oven is not in use: Your oven is equipped with a feature that automatically turns it off after 12 hours of continuous use. The 12 hour timer resets if you change the cooking temperature or cooking mode. • • Push and hold the CANCEL · SECURE key for about three seconds. The control panel keys will stop working and “OFF” will appear on the display.
Operating Your Oven Understanding the Various Oven Modes The three basic styles of cooking in an oven are: ◊ Baking: The gentle cooking of dry goods such as cookies, cakes, soufflés, etc. ◊ Roasting: The cooking of meats or vegetables over a period of time. ◊ Broiling: Cooking with an intense heat for a short amount of time. Bake • Follow your recipe’s original cooking time and temperature when using bake mode. Uses only a heat source from below the food.
Operating Your Oven Your oven offers three convection cooking modes: Multiple Rack Baking in Pure Convection Mode • Pure Convection • • Convection bake • Convection roast Typically, when baking on two racks, use rack positions #1 and #3 or #2 and #4 (counting from the bottom up) for best results. When cooking a full meal, use rack positions #1, #3 and #5 for best results.
Operating Your Oven Your oven offers two broil modes: Convection Roast Your oven’s convection roast mode uses a combination of the convection fan and heat sources above and below the 2 1 2 food. It is best for rib roasts, turkeys,1chickens, etc. • Broil • Convection broil warning Roasting Tips • All baking modes can be used to successfully roast in your oven.
Operating Your Oven Timers Delay Timed Cooking Features If you want to set the oven to automatically turn itself on or off at a later time, you can use the delay timed features. warning The timers on your oven do not turn the oven on or off. They are only for timing purposes. When you want to turn the oven off automatically, use the Delay Timed Cooking Features. warning Food safety is an important consideration when using the delay timed features.
Operating Your Oven About Hold Mode... • Other Things to Know About Delayed Timed Cooking When you set the oven to stop cooking using the DURATION or STOP TIME keys, it will go into “hold” mode (HLd appears on the display) when it reaches the end of the cook time you have set. The oven will keep the temperature at 150°F for two hours. When the oven is in delay timed mode... • Push the CLOCK key to view the clock (current time). • Push the START TIME key to view the current start time setting.
Operating Your Oven Meat Probe Instructions To change the cooking mode during meat probe cooking: 1. Prepare the meat for cooking prior to setting the oven. Insert the meat probe skewer into the center of the meat. Make sure that the skewer is not inside any fatty portions of the meat and does not touch any bones. The point should rest in the thickest part of the meat. When you are cooking fowl, the tip of the skewer should rest toward the center of the bird. 1. Press the CANCEL · SECURE key. 2.
Operating Your Oven Using the Meat Probe (Cont.) Dehydrating/Defrosting USDA Minimum Safe Internal Cooking Temperatures for Various Foods Your oven can be used to dehydrate or defrost foods at low heat settings in the Pure Convection mode. warning Ground Meat and Meat Mixtures Beef, pork veal, lamb 160°F Turkey, chicken 165°F To avoid food poisoning, cook meats immediately after defrosting them.
Operating Your Oven Preventing Tough Skins When Dehydrating When you dehydrate: 1. Wash and remove excess moisture from all fruits and vegetables before dehydrating. You should water blanch items with tough skins such as grapes, prunes, dark plums, cherries, figs and some types of berries. Water blanching these types of fruit will crack the skins so that moisture can escape and dehydration can be done more effectively. 2. Cut fruits and vegetables into uniform pieces. 3.
Operating Your Oven Setting Up the Sabbath Feature Proofing 1. Press the # key. You can use your oven to proof yeasted doughs at a low and draft-free temperature using the Bake mode. 2. Press the BAKE or PURE CONV key. On double ovens, be sure to press the BAKE or PURE CONV key for the oven you want to use. 1. Press the BAKE key*. 2. Enter the temperature of 100°F on the keypad. 3. Press the 0 or 2 keys repeatedly if you want to change the pre-selected cooking temperature shown on the display. 3.
Operating Your Oven 3. With the oven off, press and hold the 0 and # keys on the number keypad at the same time. After about three seconds “PASS” will appear on the display. Adjusting the Oven Temperature Your oven is equipped with a feature that allows you to calibrate the temperature inside the oven to match the display value without the help of a service technician. Due to various conditions, the actual temperature inside may vary somewhat from the displayed temperature.
Cooking Tips The Best Use of Bake Ware High Altitude Cooking • You should bake cakes, quick breads, muffins and cookies in shiny, reflective pans for light, golden crusts. Avoid old, darkened, warped, dented, stainless steel and tin-coated pans. They heat unevenly and will not give good baking results. • Use medium gauge aluminum sheets with low sides when preparing cookies, biscuits and cream puffs. Dacor cookie sheets, with their low profiles, will give you the best results.
Care and Cleaning How to Use the Self Clean Feature warning IMPORTANT • Clean only the parts of the oven listed in this manual. Clean them only in the manner specified. • To avoid dangerous fumes or damage to your oven’s surfaces and accessories, use only the types of cleaning solutions specified in this manual. • To avoid burns, turn off the oven and make sure that all parts are cool before cleaning.
Care and Cleaning Self Clean (Cont.) To cancel the time delayed self clean cycle: After the self clean cycle is complete: • Press CANCEL/SECURE. • If the self clean process has not started, allow about a minute for the door to unlock before attempting to use the oven. • If the oven is in the middle of the self clean process, the door will unlock when the oven has cooled down enough to open safely. The oven will still be hot (about 400°F).
Care and Cleaning Door Gasket (Seal) Cleaning the Interior warning Convection Filter Take extreme caution when cleaning the door gasket. Rubbing or displacing it may damage the tight door seal required for proper cooking and self cleaning. warning For your safety and proper oven performance, re-install the filter before using the oven to cook. If you don’t, the spinning fan blades at the back of the oven will be exposed. Clean the door gasket by dabbing it with a solution of water and mild soap.
Care and Cleaning Optional Roast/Broil Pan with “V” Shaped Rack Optional Baking Stone Wash the optional baking stone with hot water and scrub it clean before you use it for the first time. Do not use any soap or detergents to wash the stone. The stone is porous and soap will get trapped inside. The trapped soap will affect the flavor of the food cooked on it. Do not be alarmed if the stone gets stains on it after it is used for a while. Stains do not affect the stone’s ability to bake properly.
Care and Cleaning Replacing the Light Bulb(s) 4. Grasp the old bulb and pull it straight out of the socket. warning • To prevent electrical shock and/or personal injury, make certain that the oven and the light bulb are cool and that power to the oven has been turned off at the circuit breaker panel or fuse box before replacing a light bulb. • Always make sure the lens cover is in place when using the oven.
Before You Call for Service Problem Solution Guide NOTE: See Common Problems When Using the Bake Mode on page 12 for problems with cooking food. Problem Nothing works. May Be Caused By What to Do Oven not connected to electrical power. Have a licensed electrician connect the oven to a properly wired electrical connection. Power to oven is off. Turn on power at the circuit breaker or fuse box. Check for a tripped breaker or blown fuse. Control panel locked.
Before You Call for Service Problem Solution Guide - (Continued) Problem May Be Caused By What to Do Cooling fan continues to run after oven has been turned off. Normal operation. The cooling fan may run for a while after the oven is turned off, until the internal parts have cooled. Error code appears and stays on display, for example “U55.” An error code having a letter with a number following it that appears and stays on the display indicates a problem that cannot be resolved by the customer.
Warranty and Service Getting Help OUTSIDE THE FIFTY STATES OF THE U.S.A., THE DISTRICT OF COLUMBIA, AND CANADA: Before you request service, please review the Before You Call for Service section on pages 28 and 29. If you have performed the checks in the Problem Solution Guide and the problem has not been remedied, please contact us at one of the numbers below. Prior to requesting service, it is helpful to be familiar with the warranty terms and conditions in the Warranty section on this page.
Notes 31
Notes 32
fold here NO POSTAGE NECESSARY IF MAILED IN THE UNITED STATES BUSINESS REPLY MAIL FIRST-CLASS MAIL PERMIT NO 1600 CITY OF INDUSTRY CA POSTAGE WILL BE PAID BY ADDRESSEE DACOR ATTN WARRANTY PROCESSING DEPT PO BOX 90070 CITY OF INDUSTRY CA 91715-9907
Please visit www.Dacor.com to activate your warranty online. WARRANTY INFORMATION IMPORTANT: Please rest assured that under no conditions will Dacor sell your name or any of the information on this form for mailing list purposes.